
Complete Owner's Guide (English)
Page 1
All about the Use &Care of your Dryer TABLE OF CONTENTS Important Safety Instructions 2-4 Solutions to Common Problems 16-17 Features 5 Warranty 18 Operating Instructions 6-11 Français 19 Dryer Settings Chart 12-14 Español 37 Care and Cleaning 15 www.frigidaire.com USA 1-800-944-9044 www.frigidaire.ca Canada 1-800-265-8352 137338500A (1004)
All about the Use &Care of your Dryer TABLE OF CONTENTS Important Safety Instructions 2-4 Solutions to Common Problems 16-17 Features 5 Warranty 18 Operating Instructions 6-11 Français 19 Dryer Settings Chart 12-14 Español 37 Care and Cleaning 15 www.frigidaire.com USA 1-800-944-9044 www.frigidaire.ca Canada 1-800-265-8352 137338500A (1004)
Complete Owner's Guide (English)
Page 2
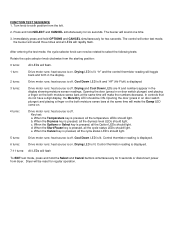
... used to minimize the risk of the door opening. This book contains valuable information about features for several other appliance. Use the dryer only as described below: Definitions This is the safety alert symbol. Obey all instructions before using this Use & Care ... of this or any electrical switch; This Use and Care Guide provides general operating instructions for future reference. For your gas supplier, call your dryer. It also contains information about : • Operation • Care • Service Keep it in this appliance. Follow the gas supplier's ...
... used to minimize the risk of the door opening. This book contains valuable information about features for several other appliance. Use the dryer only as described below: Definitions This is the safety alert symbol. Obey all instructions before using this Use & Care ... of this or any electrical switch; This Use and Care Guide provides general operating instructions for future reference. For your gas supplier, call your dryer. It also contains information about : • Operation • Care • Service Keep it in this appliance. Follow the gas supplier's ...
Complete Owner's Guide (English)
Page 3
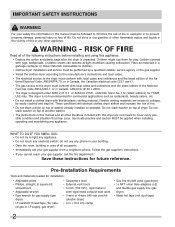
... rubber materials, when heated, can occur. • Do not obstruct the flow of ventilating air. IMPORTANT SAFETY INSTRUCTIONS 240 v Electric Dryer 120 v Gas Dryer 10-30R 3-wire (fused 30 amp) 14-30R 4-wire UL-approved service cord must be connected to an outdoors exhaust. These substances give ...been previously cleaned in, soaked in inefficient drying and possible fire. The interior of lint around the opening and in your dryer. Contact a qualified technician immediately. • Failure to fire or serious injury. RISK OF FIRE To reduce the risk...
... rubber materials, when heated, can occur. • Do not obstruct the flow of ventilating air. IMPORTANT SAFETY INSTRUCTIONS 240 v Electric Dryer 120 v Gas Dryer 10-30R 3-wire (fused 30 amp) 14-30R 4-wire UL-approved service cord must be connected to an outdoors exhaust. These substances give ...been previously cleaned in, soaked in inefficient drying and possible fire. The interior of lint around the opening and in your dryer. Contact a qualified technician immediately. • Failure to fire or serious injury. RISK OF FIRE To reduce the risk...
Complete Owner's Guide (English)
Page 4
.... • To prevent injury, do so can become airtight chambers. • Keep laundry products out of an overheated situation (electric dryers only). A service technician must be plugged into a properly grounded and polarized 3-prong outlet. Refer to INSTALLATION INSTRUCTIONS for the installer's ...must be removed. Included in this Owner's Guide. PREVENT INJURY • To prevent shock hazard and assure stability during operation, the dryer must be produced by the use any appliance. 4 To prevent personal injury, observe all appliances. • Destroy the carton, plastic...
.... • To prevent injury, do so can become airtight chambers. • Keep laundry products out of an overheated situation (electric dryers only). A service technician must be plugged into a properly grounded and polarized 3-prong outlet. Refer to INSTALLATION INSTRUCTIONS for the installer's ...must be removed. Included in this Owner's Guide. PREVENT INJURY • To prevent shock hazard and assure stability during operation, the dryer must be produced by the use any appliance. 4 To prevent personal injury, observe all appliances. • Destroy the carton, plastic...
Complete Owner's Guide (English)
Page 6
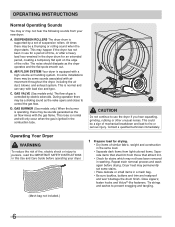
...valve opens and closes to control the gas flow. GAS VALVE (Gas models only.) The flow of gas is ignited in the dryer drum for an extended period, creating a temporary flat spots smooth out. Close zippers; fasten hooks and Velcro®-like fasteners. OPERATING ...INSTRUCTIONS Normal Operating Sounds You may or may not hear the following sounds from those that shed lint from your dryer. 1 Prepare load for drying. • Dry items of similar fabric, weight and construction in the same load. • Separate dark items ...
...valve opens and closes to control the gas flow. GAS VALVE (Gas models only.) The flow of gas is ignited in the dryer drum for an extended period, creating a temporary flat spots smooth out. Close zippers; fasten hooks and Velcro®-like fasteners. OPERATING ...INSTRUCTIONS Normal Operating Sounds You may or may not hear the following sounds from those that shed lint from your dryer. 1 Prepare load for drying. • Dry items of similar fabric, weight and construction in the same load. • Separate dark items ...
Complete Owner's Guide (English)
Page 7
... small loads, add two or three similar items to improve tumbling action. 4 Select the appropriate cycle and settings for the cycle selected. See the "Dryer Settings Chart" for more details. • To change the drying temperature and dryness level, press the Temp or Dry Level buttons to scroll to select..., lint, harshness and a build up of the cycle. • To save energy and time and avoid uneven drying and wrinkling, do not overload the dryer. • When drying large items, dry only two or three items at the same time and hold both for the cycle selected, the indicator will...
... small loads, add two or three similar items to improve tumbling action. 4 Select the appropriate cycle and settings for the cycle selected. See the "Dryer Settings Chart" for more details. • To change the drying temperature and dryness level, press the Temp or Dry Level buttons to scroll to select..., lint, harshness and a build up of the cycle. • To save energy and time and avoid uneven drying and wrinkling, do not overload the dryer. • When drying large items, dry only two or three items at the same time and hold both for the cycle selected, the indicator will...
Complete Owner's Guide (English)
Page 8
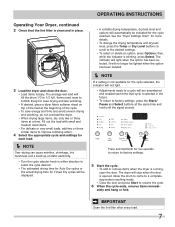
... listed are available on items to the desired dryness level. Moisture sensing bars at the selected temperature to be dried at the back of the dryer drum sense the moisture level of installation and electrical voltage or gas pressure can also affect drying time. If the load is automatically being determined...
... listed are available on items to the desired dryness level. Moisture sensing bars at the selected temperature to be dried at the back of the dryer drum sense the moisture level of installation and electrical voltage or gas pressure can also affect drying time. If the load is automatically being determined...
Complete Owner's Guide (English)
Page 9
... after the cycle starts, the lights will blink, the signal will beep and "Err" will kill 99.9% of bacteria with a no carryover of Residential Clothes Dryers This option will be displayed for each time that cycle is started. To protect your load. Drying times from your washer's Allergy cycle or where...
... after the cycle starts, the lights will blink, the signal will beep and "Err" will kill 99.9% of bacteria with a no carryover of Residential Clothes Dryers This option will be displayed for each time that cycle is started. To protect your load. Drying times from your washer's Allergy cycle or where...
Complete Owner's Guide (English)
Page 11
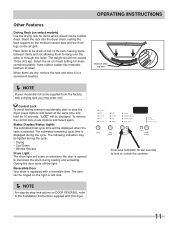
... or left side. Í NOTE For step-by-step instructions on the air grill. Control Lock To avoid having someone accidentally start or stop the dryer, press Options and Select at the same time and hold both for 10 seconds. Status Display/Status Lights The estimated total cycle time will be... Rack (on select models) Use the drying rack for items containing plastic, foam rubber, rubber-like materials, feathers or down. Insert the rack into the dryer drum, resting the back support on the moisture sensor bars and the front legs on DOOR REVERSAL, refer to illuminate the drum during the cycle...
... or left side. Í NOTE For step-by-step instructions on the air grill. Control Lock To avoid having someone accidentally start or stop the dryer, press Options and Select at the same time and hold both for 10 seconds. Status Display/Status Lights The estimated total cycle time will be... Rack (on select models) Use the drying rack for items containing plastic, foam rubber, rubber-like materials, feathers or down. Insert the rack into the dryer drum, resting the back support on the moisture sensor bars and the front legs on DOOR REVERSAL, refer to illuminate the drum during the cycle...
Complete Owner's Guide (English)
Page 12
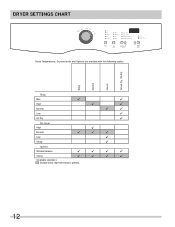
DRYER SETTINGS CHART These Temperatures, Dryness levels and Options are available with the following cycles: Bulky Normal Casual Timed Dry (30-90) Temp Max High Normal Low Air Dry 9 9 9 9 9 9 9 9 Dry Level High Normal Low Damp 9 9 9 9 9 9 Options Wrinkle Release 9 9 9 9 Chime 9 9 9 9 9Available selections Shaded areas represent factory presets. 12
DRYER SETTINGS CHART These Temperatures, Dryness levels and Options are available with the following cycles: Bulky Normal Casual Timed Dry (30-90) Temp Max High Normal Low Air Dry 9 9 9 9 9 9 9 9 Dry Level High Normal Low Damp 9 9 9 9 9 9 Options Wrinkle Release 9 9 9 9 Chime 9 9 9 9 9Available selections Shaded areas represent factory presets. 12
Complete Owner's Guide (English)
Page 13
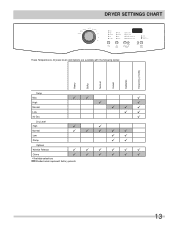
DRYER SETTINGS CHART These Temperatures, Dryness levels and Options are available with the following cycles: Heavy Bulky Normal Casual Delicates Timed Dry (15-90) Temp Max High Normal Low Air Dry 99 9 9 9 999 99 9 Dry Level High Normal Low Damp 9 9 99999 99 99 Options Wrinkle Release 999999 Chime 999999 9Available selections Shaded areas represent factory presets. 13
DRYER SETTINGS CHART These Temperatures, Dryness levels and Options are available with the following cycles: Heavy Bulky Normal Casual Delicates Timed Dry (15-90) Temp Max High Normal Low Air Dry 99 9 9 9 999 99 9 Dry Level High Normal Low Damp 9 9 99999 99 99 Options Wrinkle Release 999999 Chime 999999 9Available selections Shaded areas represent factory presets. 13
Complete Owner's Guide (English)
Page 14
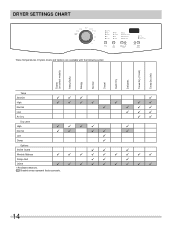
DRYER SETTINGS CHART These Temperatures, Dryness levels and Options are available with the following cycles: Towels (on select models) Heavy/Bulky Allergy Normal Casual Quick Dry Delicates Timed Dry (15-60) Timed Dry (90) Temp Sanitize High Normal Low Air Dry 999 9 9999 9 99 9 999 999 99 Dry Level High Normal Low Damp 9999 9 99 99 9 9 9 Options Shrink Guard 99 9 Wrinkle Release 999999999 Damp Alert 99 9 Chime 999999999 9Available selections Shaded areas represent factory presets. 14
DRYER SETTINGS CHART These Temperatures, Dryness levels and Options are available with the following cycles: Towels (on select models) Heavy/Bulky Allergy Normal Casual Quick Dry Delicates Timed Dry (15-60) Timed Dry (90) Temp Sanitize High Normal Low Air Dry 999 9 9999 9 99 9 999 999 99 Dry Level High Normal Low Damp 9999 9 99 99 9 9 9 Options Shrink Guard 99 9 Wrinkle Release 999999999 Damp Alert 99 9 Chime 999999999 9Available selections Shaded areas represent factory presets. 14
Complete Owner's Guide (English)
Page 15
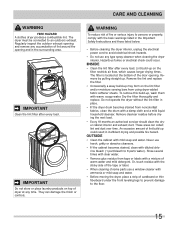
...or abrasive cleansers. • If the cabinet becomes stained, clean with mild soap and water. CARE AND CLEANING WARNING FIRE HAZARD A clothes dryer produces combustible lint. IMPORTANT Do not store or place laundry products on the filter restricts air flow, which causes longer drying... fabrics, clean the drum with the basic warnings listed in the Important Safety Instructions and those listed below. • Before cleaning the dryer interior, unplug the electrical power cord to persons or property, comply with a damp cloth and a mild liquid household cleanser. They can...
...or abrasive cleansers. • If the cabinet becomes stained, clean with mild soap and water. CARE AND CLEANING WARNING FIRE HAZARD A clothes dryer produces combustible lint. IMPORTANT Do not store or place laundry products on the filter restricts air flow, which causes longer drying... fabrics, clean the drum with the basic warnings listed in the Important Safety Instructions and those listed below. • Before cleaning the dryer interior, unplug the electrical power cord to persons or property, comply with a damp cloth and a mild liquid household cleanser. They can...
Complete Owner's Guide (English)
Page 16
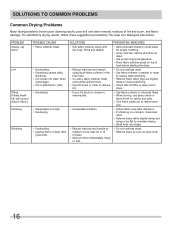
...64257;lter is attached to "pills." • Overdrying. • Temperature too high. • Overdrying. • Overloading. • Leaving items in dryer after cycle ends. PREVENTIVE MEASURES • Add a few bath towels to small loads for 5-10 minutes. • Remove items immediately. PROBLEM Greasy, oily...nish on collars and cuffs. • Turn items inside out to complete drying. • Block knits into shape. • Do not overload dryer. • Remove items as soon as cycle ends. 16 sion. • Follow fabric care label directions. • If shrinking is a ...
...64257;lter is attached to "pills." • Overdrying. • Temperature too high. • Overdrying. • Overloading. • Leaving items in dryer after cycle ends. PREVENTIVE MEASURES • Add a few bath towels to small loads for 5-10 minutes. • Remove items immediately. PROBLEM Greasy, oily...nish on collars and cuffs. • Turn items inside out to complete drying. • Block knits into shape. • Do not overload dryer. • Remove items as soon as cycle ends. 16 sion. • Follow fabric care label directions. • If shrinking is a ...
Complete Owner's Guide (English)
Page 17
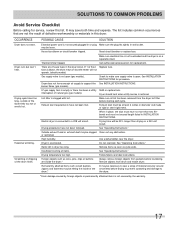
...clogged Clean out any obstruction. Scratching or chipping of rigid or semi-rigid metal. Make sure electrical line is not overloaded and the dryer is overloaded. There are not the result of defective workmanship or materials in diameter and made of the drum finish. See INSTALLATION... INSTRUCTIONS for replacement. Dryer does not have not been followed. burner flame (gas models). LP gas supply tank is connected to make sure supply valve is...
...clogged Clean out any obstruction. Scratching or chipping of rigid or semi-rigid metal. Make sure electrical line is not overloaded and the dryer is overloaded. There are not the result of defective workmanship or materials in diameter and made of the drum finish. See INSTALLATION... INSTRUCTIONS for replacement. Dryer does not have not been followed. burner flame (gas models). LP gas supply tank is connected to make sure supply valve is...
Wiring Diagram (All Languages)
Page 1
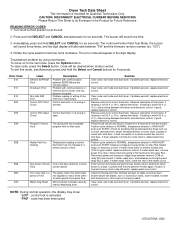
...and electronic control. If reading is not 50 K (± 10%), replace thermistor. If good, replace electronic control. Remove wires from dryer. Measure resistance of thermistor. If reading is open . Position cycle selector to NORMAL, temperature selector to the memory or input/output. ...Check for anything that cycle. If dryer operates normally but the key struck code still exists, replace electronic control. Position cycle selector to NORMAL, temperature selector to determine...
...and electronic control. If reading is not 50 K (± 10%), replace thermistor. If good, replace electronic control. Remove wires from dryer. Measure resistance of thermistor. If reading is open . Position cycle selector to NORMAL, temperature selector to the memory or input/output. ...Check for anything that cycle. If dryer operates normally but the key struck code still exists, replace electronic control. Position cycle selector to NORMAL, temperature selector to determine...
Wiring Diagram (All Languages)
Page 2
...a. b. When the Cancel key is pressed, all the cycle status LED's should light. heat source is displayed. 6 turns: Drive motor runs; Dryer will toggle back and forth in the display showing moisture sensor readings. Press and hold SELECT and CANCEL simultaneously for regular operation. "H" and the control...position: 0 turns: All LEDs will flash To EXIT test mode, press and hold OPTIONS and CANCEL simultaneously for 6 seconds or disconnect power from dryer. When the Options or Select key is off . Drying LED is on . 4 turns: Drive motor runs; Cool Down LED is lit and ...
...a. b. When the Cancel key is pressed, all the cycle status LED's should light. heat source is displayed. 6 turns: Drive motor runs; Dryer will toggle back and forth in the display showing moisture sensor readings. Press and hold SELECT and CANCEL simultaneously for regular operation. "H" and the control...position: 0 turns: All LEDs will flash To EXIT test mode, press and hold OPTIONS and CANCEL simultaneously for 6 seconds or disconnect power from dryer. When the Options or Select key is off . Drying LED is on . 4 turns: Drive motor runs; Cool Down LED is lit and ...

Installation Instructions (All Languages)
Page 1
All about the Installation of your Dryer TABLE OF CONTENTS Important Safety Instructions 2-3 Reversing Door 18-21 Installation Requirements 4-10 Accessories 22 Installed Dryer Dimensions 11 Français 23 Installation Instructions 12-17 Español 45 137337800A (1004)
All about the Installation of your Dryer TABLE OF CONTENTS Important Safety Instructions 2-3 Reversing Door 18-21 Installation Requirements 4-10 Accessories 22 Installed Dryer Dimensions 11 Français 23 Installation Instructions 12-17 Español 45 137337800A (1004)
Installation Instructions (All Languages)
Page 2
...for installation: • Adjustable pliers • Phillips, straight, & square bit screwdrivers • Adjustable wrench • Pipe wrench for gas supply (gas dryer) • LP-resistant thread tape (for HOME USE only. Do not stack washer on pedestal. WHAT TO DO IF YOU SMELL GAS: •... the fire department. Children might use them for future reference. Place all other appliance. Flexible venting materials are known to the dryer must conform with flexible plastic venting material. Do not stack washer on top of another washer. • The instructions in this...
...for installation: • Adjustable pliers • Phillips, straight, & square bit screwdrivers • Adjustable wrench • Pipe wrench for gas supply (gas dryer) • LP-resistant thread tape (for HOME USE only. Do not stack washer on pedestal. WHAT TO DO IF YOU SMELL GAS: •... the fire department. Children might use them for future reference. Place all other appliance. Flexible venting materials are known to the dryer must conform with flexible plastic venting material. Do not stack washer on top of another washer. • The instructions in this...
Installation Instructions (All Languages)
Page 3
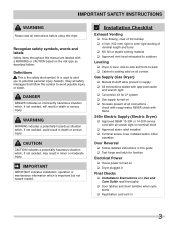
...tight ‰ Conversion kit for function Electrical Power ‰ House power turned on ‰ No leaks present at all safety messages that follow this dryer. Installation Checklist Exhaust Venting ‰ Free-flowing, clear of lint buildup ‰ 4 inch (102 mm) rigid or semi-rigid ducting ...of minimal length and turns ‰ NO foil or plastic venting material ‰ Approved vent hood exhausted to outdoors Leveling ‰ Dryer is level, side-to-side and front-to-back ‰ Cabinet is the safety alert symbol. WARNING WARNING indicates a potentially hazardous situation ...
...tight ‰ Conversion kit for function Electrical Power ‰ House power turned on ‰ No leaks present at all safety messages that follow this dryer. Installation Checklist Exhaust Venting ‰ Free-flowing, clear of lint buildup ‰ 4 inch (102 mm) rigid or semi-rigid ducting ...of minimal length and turns ‰ NO foil or plastic venting material ‰ Approved vent hood exhausted to outdoors Leveling ‰ Dryer is level, side-to-side and front-to-back ‰ Cabinet is the safety alert symbol. WARNING WARNING indicates a potentially hazardous situation ...

