
Complete Owner's Guide (English)
Page 2
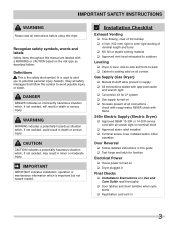
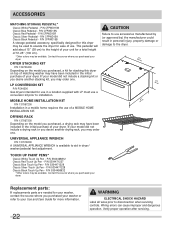
... the vicinity of the door opening. This Use and Care Guide provides general operating instructions for your gas supplier, call your safety the following information in minor or moderate injury. It also contains information about : • Operation • Care • Service Keep it in death or serious injury. It is used to alert you cannot reach your dryer. Follow the gas supplier's instructions. • If you...
... the vicinity of the door opening. This Use and Care Guide provides general operating instructions for your gas supplier, call your safety the following information in minor or moderate injury. It also contains information about : • Operation • Care • Service Keep it in death or serious injury. It is used to alert you cannot reach your dryer. Follow the gas supplier's instructions. • If you...
Complete Owner's Guide (English)
Page 3
... fire or serious injury. IMPORTANT SAFETY INSTRUCTIONS 240 v Electric Dryer 120 v Gas Dryer 10-30R 3-wire (fused 30 amp) 14-30R 4-wire UL-approved service cord must be connected to comply with these warnings could result in serious personal injuries. See Care and Cleaning. • Do not operate the dryer if the lint screen is you don't follow this dryer, comply with these warnings could result in...
... fire or serious injury. IMPORTANT SAFETY INSTRUCTIONS 240 v Electric Dryer 120 v Gas Dryer 10-30R 3-wire (fused 30 amp) 14-30R 4-wire UL-approved service cord must be connected to comply with these warnings could result in serious personal injuries. See Care and Cleaning. • Do not operate the dryer if the lint screen is you don't follow this dryer, comply with these warnings could result in...
Complete Owner's Guide (English)
Page 4
... local codes. A service technician must be removed. PREVENT INJURY • To prevent shock hazard and assure stability during operation, the dryer must be installed and electrically grounded by the use of this product. Í NOTE The instructions appearing in this list are not meant to cover every possible condition and situation that may be exposed to the weather. • A thermal limiter switch automatically turns...
... local codes. A service technician must be removed. PREVENT INJURY • To prevent shock hazard and assure stability during operation, the dryer must be installed and electrically grounded by the use of this product. Í NOTE The instructions appearing in this list are not meant to cover every possible condition and situation that may be exposed to the weather. • A thermal limiter switch automatically turns...
Complete Owner's Guide (English)
Page 6
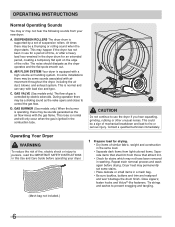
AIR FLOW SYSTEM Your dryer is operating, there may be sounds generated as the air flow mixes with load size and type. Dryer heat may permanently set of suspension rollers. B. In some installations there may be a sign of mechanical breakdown and lead to prevent snagging and tangling. (Mesh bag not included.) 6 GAS VALVE (Gas models only.) The flow of gas is ignited in the combustion tube...
AIR FLOW SYSTEM Your dryer is operating, there may be sounds generated as the air flow mixes with load size and type. Dryer heat may permanently set of suspension rollers. B. In some installations there may be a sign of mechanical breakdown and lead to prevent snagging and tangling. (Mesh bag not included.) 6 GAS VALVE (Gas models only.) The flow of gas is ignited in the combustion tube...
Complete Owner's Guide (English)
Page 7
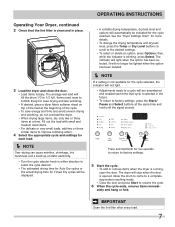
... the drum 1/3 to factory settings. 5 Start the cycle. • To add or remove items when the dryer is running, open the door. The indicator will automatically be remembered and recalled each load. Í NOTE Over-drying can cause wrinkles, shrinkage, lint, harshness and a build up of the cycle. • To save energy and time and avoid uneven drying and wrinkling, do not overload the dryer. • When drying large items, dry only...
... the drum 1/3 to factory settings. 5 Start the cycle. • To add or remove items when the dryer is running, open the door. The indicator will automatically be remembered and recalled each load. Í NOTE Over-drying can cause wrinkles, shrinkage, lint, harshness and a build up of the cycle. • To save energy and time and avoid uneven drying and wrinkling, do not overload the dryer. • When drying large items, dry only...
Complete Owner's Guide (English)
Page 8
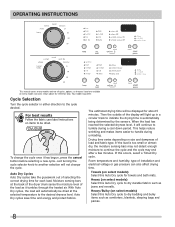
... each load. Drying time varies depending on items to the cycle desired. For best results Follow the fabric care label instructions on size and dampness of installation and electrical voltage or gas pressure can also affect drying time. Your model may end after a few minutes. Just turning the cycle selector knob to another selection will light up in either direction to be dried at the back of the dryer drum...
... each load. Drying time varies depending on items to the cycle desired. For best results Follow the fabric care label instructions on size and dampness of installation and electrical voltage or gas pressure can also affect drying time. Your model may end after a few minutes. Just turning the cycle selector knob to another selection will light up in either direction to be dried at the back of the dryer drum...
Complete Owner's Guide (English)
Page 11
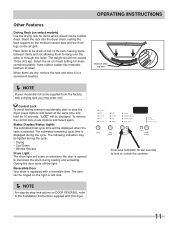
... models) Use the drying rack for items which should not exceed 10 lbs (4.5 kg). Closing the door turns off the light. The weight should not be displayed when the cycle is opened to hang over the sides or through the holes. To remove the control lock, press Options and Select again. Reversible Door Your dryer is displayed during the cycle: • Drying • Cool Down • Wrinkle Release Drum Light The drum light...
... models) Use the drying rack for items which should not exceed 10 lbs (4.5 kg). Closing the door turns off the light. The weight should not be displayed when the cycle is opened to hang over the sides or through the holes. To remove the control lock, press Options and Select again. Reversible Door Your dryer is displayed during the cycle: • Drying • Cool Down • Wrinkle Release Drum Light The drum light...
Complete Owner's Guide (English)
Page 15
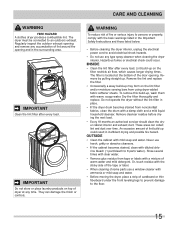
... soap and water. Remove cleanser residue before drying the next load. • Every 18 months an authorized servicer should clean the dryer cabinet interior and exhaust duct. The dryer must be connected to 8 parts water). CARE AND CLEANING WARNING FIRE HAZARD A clothes dryer produces combustible lint. Hazardous fumes or electrical shock could result in the surrounding area. Rinse several times with clear water. • Remove glue residue from noncolorfast fabrics, clean the drum with...
... soap and water. Remove cleanser residue before drying the next load. • Every 18 months an authorized servicer should clean the dryer cabinet interior and exhaust duct. The dryer must be connected to 8 parts water). CARE AND CLEANING WARNING FIRE HAZARD A clothes dryer produces combustible lint. Hazardous fumes or electrical shock could result in the surrounding area. Rinse several times with clear water. • Remove glue residue from noncolorfast fabrics, clean the drum with...
Complete Owner's Guide (English)
Page 17
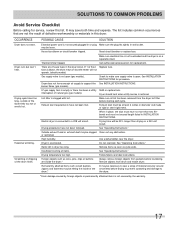
... is open (gas models). Use a dehumidifier near the dryer. Foreign objects such as coins, pins, clips or buttons are 2 house fuses in this list. OCCURRENCE POSSIBLE CAUSE SOLUTION Dryer does not start. House fuse blown or circuit breaker tripped. If 1 of the drum finish. Check to a 208 volt circuit. Items left in diameter and made of natural gas (gas models). Thermal limiter tripped. See INSTALLATION INSTRUCTIONS for replacement. Follow fabric care label instructions. Exhaust duct requirements...
... is open (gas models). Use a dehumidifier near the dryer. Foreign objects such as coins, pins, clips or buttons are 2 house fuses in this list. OCCURRENCE POSSIBLE CAUSE SOLUTION Dryer does not start. House fuse blown or circuit breaker tripped. If 1 of the drum finish. Check to a 208 volt circuit. Items left in diameter and made of natural gas (gas models). Thermal limiter tripped. See INSTALLATION INSTRUCTIONS for replacement. Follow fabric care label instructions. Exhaust duct requirements...
Complete Owner's Guide (English)
Page 18
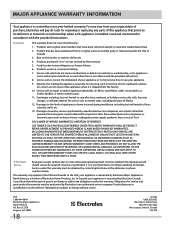
... America, a division of parts other appropriate payment record to use or used in materials or workmanship when such appliance is covered by Electrolux Canada Corp. use of Electrolux Home Products, Inc. Service under this warranty must be required. Electrolux authorizes no person to be defective in a commercial setting. 7. Products with the provided instructions. 8. Service calls to repair or replace appliance light bulbs, air filters, water filters, other consumables, or...
... America, a division of parts other appropriate payment record to use or used in materials or workmanship when such appliance is covered by Electrolux Canada Corp. use of Electrolux Home Products, Inc. Service under this warranty must be required. Electrolux authorizes no person to be defective in a commercial setting. 7. Products with the provided instructions. 8. Service calls to repair or replace appliance light bulbs, air filters, water filters, other consumables, or...
Wiring Diagram (All Languages)
Page 1
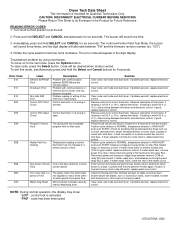
... the firmware revision number (ex. Check for that would extend dry times such as: no heating) Temperature reading of time. control lock is free but code returns, replace electronic control. "PAU" - The error code will sound one has become corrupted. Program Timeout Fault The drying time has exceeded program time for blocked lint filter, blocked exhaust, air leaks around air duct, broken blower fan blades, worn or loose drum seals, dryer installed in a certain amount of control thermistor has not changed in closet...
... the firmware revision number (ex. Check for that would extend dry times such as: no heating) Temperature reading of time. control lock is free but code returns, replace electronic control. "PAU" - The error code will sound one has become corrupted. Program Timeout Fault The drying time has exceeded program time for blocked lint filter, blocked exhaust, air leaks around air duct, broken blower fan blades, worn or loose drum seals, dryer installed in a certain amount of control thermistor has not changed in closet...
Installation Instructions (All Languages)
Page 2
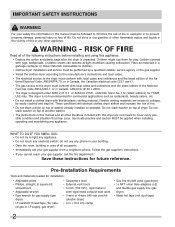
... not stack washer on pedestal. Good safe practice and caution MUST be applied when installing, operating and maintaining any electrical switch; do not use them for play. ral gas or LP supply, gas dryer) • Carpenter's level • External vent hood • 4-inch (102 mm), rigid metal or semi-rigid metal exhaust duct work • 3-wire or 4-wire 240 volt cord kit (electric dryer) • 4 in your gas supplier, call your gas supplier...
... not stack washer on pedestal. Good safe practice and caution MUST be applied when installing, operating and maintaining any electrical switch; do not use them for play. ral gas or LP supply, gas dryer) • Carpenter's level • External vent hood • 4-inch (102 mm), rigid metal or semi-rigid metal exhaust duct work • 3-wire or 4-wire 240 volt cord kit (electric dryer) • 4 in your gas supplier, call your gas supplier...
Installation Instructions (All Languages)
Page 3
... water, NEVER check with flame 240v Electric Supply (Electric Dryer) ‰ Approved NEMA 10-30R or 14-30R service cord with approved sealer and wrench tight ‰ Conversion kit for function Electrical Power ‰ House power turned on all screws tight on terminal block ‰ Approved strain relief installed ‰ Terminal access cover installed before using this symbol to potential personal injury hazards. IMPORTANT SAFETY INSTRUCTIONS WARNING Please read thoroughly ‰ Door...
... water, NEVER check with flame 240v Electric Supply (Electric Dryer) ‰ Approved NEMA 10-30R or 14-30R service cord with approved sealer and wrench tight ‰ Conversion kit for function Electrical Power ‰ House power turned on all screws tight on terminal block ‰ Approved strain relief installed ‰ Terminal access cover installed before using this symbol to potential personal injury hazards. IMPORTANT SAFETY INSTRUCTIONS WARNING Please read thoroughly ‰ Door...

Installation Instructions (All Languages)
Page 4
... NOT operate a washer and a dryer on the same circuit. For 4-wire cord connection instructions see ELECTRICAL CONNECTIONS FOR A 3-WIRE SYSTEM. 4-WIRE POWER SUPPLY CORD KIT (not supplied) 4-wire receptacle (NEMA type 14-30R) The dryer MUST employ a 4-conductor power supply cord NEMA 14-30 type SRDT or ST (as required) rated at 240 volt AC minimum, 30 amp, with 3 open end spade lug connectors with upturned ends or closed loop connectors and marked for : (1) new branch circuit installations...
... NOT operate a washer and a dryer on the same circuit. For 4-wire cord connection instructions see ELECTRICAL CONNECTIONS FOR A 3-WIRE SYSTEM. 4-WIRE POWER SUPPLY CORD KIT (not supplied) 4-wire receptacle (NEMA type 14-30R) The dryer MUST employ a 4-conductor power supply cord NEMA 14-30 type SRDT or ST (as required) rated at 240 volt AC minimum, 30 amp, with 3 open end spade lug connectors with upturned ends or closed loop connectors and marked for : (1) new branch circuit installations...
Installation Instructions (All Languages)
Page 5
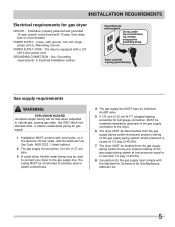
..., Alternating Current. INSTALLATION REQUIREMENTS Electrical requirements for the gas supply must comply with a 120 volt 3-wire power cord. time delay fuse or circuit breaker. The dryer is equipped with the Standard for Connectors for gas supply. 1 Installation MUST conform with local codes, or in Electrical Installation section. POWER SUPPLY CORD - Use ONLY black iron, stainless steel, or plastic-coated brass piping for Gas Appliances, ANSI Z21.24. 5 Power cord with 3-prong grounded plug Gas supply requirements WARNING EXPLOSION HAZARD...
..., Alternating Current. INSTALLATION REQUIREMENTS Electrical requirements for the gas supply must comply with a 120 volt 3-wire power cord. time delay fuse or circuit breaker. The dryer is equipped with the Standard for Connectors for gas supply. 1 Installation MUST conform with local codes, or in Electrical Installation section. POWER SUPPLY CORD - Use ONLY black iron, stainless steel, or plastic-coated brass piping for Gas Appliances, ANSI Z21.24. 5 Power cord with 3-prong grounded plug Gas supply requirements WARNING EXPLOSION HAZARD...
Installation Instructions (All Languages)
Page 7
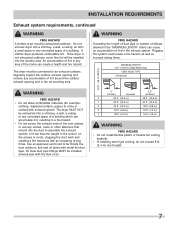
... duct tape. Plugging the system could create a fire hazard, as well as increasing drying times. MAXIMUM LENGTH of 4" (102mm) Rigid Metal Duct VENT HOOD TYPE (Preferred) Number of lint in the screen, on the screws or rivets, clogging the duct work and creating a fire hazard as well as increase drying times. Use an approved vent hood to assemble the exhaust system. WARNING FIRE HAZARD Exceeding the length of duct...
... duct tape. Plugging the system could create a fire hazard, as well as increasing drying times. MAXIMUM LENGTH of 4" (102mm) Rigid Metal Duct VENT HOOD TYPE (Preferred) Number of lint in the screen, on the screws or rivets, clogging the duct work and creating a fire hazard as well as increase drying times. Use an approved vent hood to assemble the exhaust system. WARNING FIRE HAZARD Exceeding the length of duct...
Installation Instructions (All Languages)
Page 8
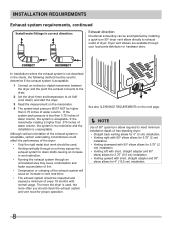
...; Only the rigid metal duct work should be used , the more the dryer is acceptable: 1 Connect an inclined or digital manometer between the dryer and the point the exhaust connects to the dryer. 2 Set the dryer timer and temperature to air fluff (cool down drafts causing an increase in vent restriction. • Running the exhaust system through your local parts distributor or hardware store. Dryer vent elbows are available through...
...; Only the rigid metal duct work should be used , the more the dryer is acceptable: 1 Connect an inclined or digital manometer between the dryer and the point the exhaust connects to the dryer. 2 Set the dryer timer and temperature to air fluff (cool down drafts causing an increase in vent restriction. • Running the exhaust system through your local parts distributor or hardware store. Dryer vent elbows are available through...

Installation Instructions (All Languages)
Page 17
... connect the dryer to check A for future reference. Í NOTE A wiring diagram and technical data sheet are located inside the dryer console. Use of the dryer. Adjust one or more of the legs until the dryer is off at a circuit breaker/fuse box before calling for service. 7 Place these instructions in your Use & Care Guide before plugging the power cord into an outlet. 3 Plug the power cord into a grounded outlet. 4 Turn on all four legs. Power cord with the dryer. Remove and discard door...
... connect the dryer to check A for future reference. Í NOTE A wiring diagram and technical data sheet are located inside the dryer console. Use of the dryer. Adjust one or more of the legs until the dryer is off at a circuit breaker/fuse box before calling for service. 7 Place these instructions in your Use & Care Guide before plugging the power cord into an outlet. 3 Plug the power cord into a grounded outlet. 4 Turn on all four legs. Power cord with the dryer. Remove and discard door...
Installation Instructions (All Languages)
Page 22
... . Wiring errors can cause improper and dangerous operation. If your model did not include a drying rack or you desire another stacking kit, you purchased your dryer. MOBILE HOME INSTALLATION KIT P/N 137067200 Installation in a mobile home requires the use accessories manufactured by (or approved by) the manufacturer could result in a location supplied with LP must use a conversion kit prior to elevate the dryer for stacking this dryer may be used to installation. This pedestal will...
... . Wiring errors can cause improper and dangerous operation. If your model did not include a drying rack or you desire another stacking kit, you purchased your dryer. MOBILE HOME INSTALLATION KIT P/N 137067200 Installation in a mobile home requires the use accessories manufactured by (or approved by) the manufacturer could result in a location supplied with LP must use a conversion kit prior to elevate the dryer for stacking this dryer may be used to installation. This pedestal will...
Product Specifications Sheet (English)
Page 2
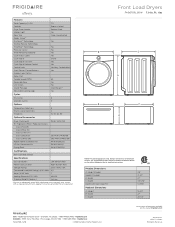
...information available on adequately wired 120V, dedicated circuit having 2-wire service with Door Open 90˚ Pedestal Dimensions A - Ft. Front Load Laundry - Ft.) Controls Dryer Drum Interior Interior Light Door Trim Ready Steam™ DrySense™ Technology Wrinkle Release Technology TimeWise™ Technology Moisture Sensor Time Remaining Indicator Cycle Status Lights Cycle Signal Cycle Signal "On/Off " Cycle Signal Volume Control Control Lock Start / Pause / Cancel Buttons Energy Saver Option Delay Start Tumble Speed (RPM) Reversible Door Lint Screen Sound Package Adjustable...
...information available on adequately wired 120V, dedicated circuit having 2-wire service with Door Open 90˚ Pedestal Dimensions A - Ft. Front Load Laundry - Ft.) Controls Dryer Drum Interior Interior Light Door Trim Ready Steam™ DrySense™ Technology Wrinkle Release Technology TimeWise™ Technology Moisture Sensor Time Remaining Indicator Cycle Status Lights Cycle Signal Cycle Signal "On/Off " Cycle Signal Volume Control Control Lock Start / Pause / Cancel Buttons Energy Saver Option Delay Start Tumble Speed (RPM) Reversible Door Lint Screen Sound Package Adjustable...


