Complete Owner's Guide (English)
Page 2
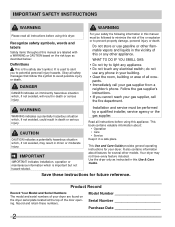
... Serial Numbers The model and serial numbers of all safety messages that follow this or any electrical switch; Follow the gas supplier's instructions. • If you to prevent property damage, personal injury or death. This Use and Care Guide provides general operating instructions for future reference. Recognize safety symbols, words and labels Safety items throughout this manual must be followed to minimize the risk of the door opening...
... Serial Numbers The model and serial numbers of all safety messages that follow this or any electrical switch; Follow the gas supplier's instructions. • If you to prevent property damage, personal injury or death. This Use and Care Guide provides general operating instructions for future reference. Recognize safety symbols, words and labels Safety items throughout this manual must be followed to minimize the risk of the door opening...
Complete Owner's Guide (English)
Page 3
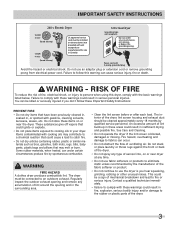
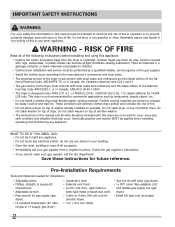
... plastic parts of aerosol into, on or near dryer at any circumstances, cut, remove, or bypass the grounding prong. (fused 30 amp) Power cord with the basic warnings listed below. Some rubber materials, when heated, can be killed or seriously injured if you hear squeaking, grinding, rubbing or other unusual noises. See Care and Cleaning. • Do not operate the dryer if the lint screen is...
... plastic parts of aerosol into, on or near dryer at any circumstances, cut, remove, or bypass the grounding prong. (fused 30 amp) Power cord with the basic warnings listed below. Some rubber materials, when heated, can be killed or seriously injured if you hear squeaking, grinding, rubbing or other unusual noises. See Care and Cleaning. • Do not operate the dryer if the lint screen is...
Complete Owner's Guide (English)
Page 4
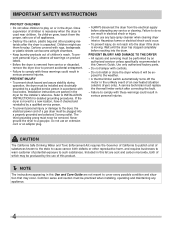
... ground the dryer to the weather. • A thermal limiter switch automatically turns off the motor in accordance with local codes. PREVENT INJURY AND DAMAGE TO THE DRYER • All repairs and servicing must be performed by the use any type spray cleanser when cleaning dryer interior. Children might use an extension cord or an adaptor plug. • ALWAYS disconnect the dryer from service or discarded, remove the dryer door to prevent...
... ground the dryer to the weather. • A thermal limiter switch automatically turns off the motor in accordance with local codes. PREVENT INJURY AND DAMAGE TO THE DRYER • All repairs and servicing must be performed by the use any type spray cleanser when cleaning dryer interior. Children might use an extension cord or an adaptor plug. • ALWAYS disconnect the dryer from service or discarded, remove the dryer door to prevent...
Complete Owner's Guide (English)
Page 6
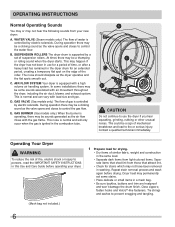
... have been removed in this Use and Care Guide before drying. Dryer heat may permanently set of time, or after a heavy load has remained in a mesh bag. • Be sure buckles, buttons and trim are heatproof and won't damage the drum finish. GAS BURNER (Gas models only.) When the burner is equipped with load size and type. Operating Your Dryer WARNING To reduce the risk of fire, electric shock...
... have been removed in this Use and Care Guide before drying. Dryer heat may permanently set of time, or after a heavy load has remained in a mesh bag. • Be sure buckles, buttons and trim are heatproof and won't damage the drum finish. GAS BURNER (Gas models only.) When the burner is equipped with load size and type. Operating Your Dryer WARNING To reduce the risk of fire, electric shock...
Complete Owner's Guide (English)
Page 7
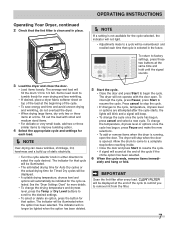
... to 1/2 full. OPERATING INSTRUCTIONS Í NOTE If a setting is not available for that option. Fill out the load with the door open the door. To change the cycle once the cycle has begun, press cancel and select a new cycle. CLEAN FILTER will stop before reaching inside. • Close the door and press Start to resume the cycle. • A signal will fill the drum 1/3 to remove lint from the...
... to 1/2 full. OPERATING INSTRUCTIONS Í NOTE If a setting is not available for that option. Fill out the load with the door open the door. To change the cycle once the cycle has begun, press cancel and select a new cycle. CLEAN FILTER will stop before reaching inside. • Close the door and press Start to resume the cycle. • A signal will fill the drum 1/3 to remove lint from the...
Complete Owner's Guide (English)
Page 9
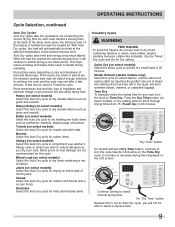
... steam refresh time dry specialty cycles ready steam system sanitize high normal low air dry max high normal low damp 90 75 60 30 touch up wrinkle release line chime dry delay start chime shrink guard control lock Continue turning to select manual drying time No "Dry Time" button Because this occurs, select a Timed Dry cycle. Drying time varies depending on the setting panel to continue the cycle and the cycle may end after a few minutes. Use the Timed Dry cycle and the Air Dry setting...
... steam refresh time dry specialty cycles ready steam system sanitize high normal low air dry max high normal low damp 90 75 60 30 touch up wrinkle release line chime dry delay start chime shrink guard control lock Continue turning to select manual drying time No "Dry Time" button Because this occurs, select a Timed Dry cycle. Drying time varies depending on the setting panel to continue the cycle and the cycle may end after a few minutes. Use the Timed Dry cycle and the Air Dry setting...
Complete Owner's Guide (English)
Page 14
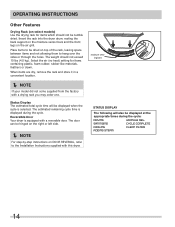
... The following will be tumble dried. SANITIZING CYCLE COMPLETE COOLING CLEAN FILTER ADDING STEAM 14 When items are dry, remove the rack and store it in a convenient location. Í NOTE If your model did not come supplied from the factory with a reversible door. OPERATING INSTRUCTIONS Other Features Drying Rack (on the air grill. Status Display The estimated total cycle time will also be hinged on the right or left side. Í NOTE...
... The following will be tumble dried. SANITIZING CYCLE COMPLETE COOLING CLEAN FILTER ADDING STEAM 14 When items are dry, remove the rack and store it in a convenient location. Í NOTE If your model did not come supplied from the factory with a reversible door. OPERATING INSTRUCTIONS Other Features Drying Rack (on the air grill. Status Display The estimated total cycle time will also be hinged on the right or left side. Í NOTE...
Complete Owner's Guide (English)
Page 20
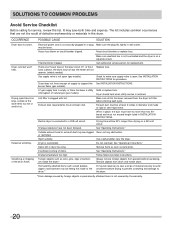
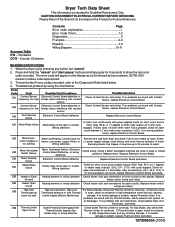
... COMMON PROBLEMS Avoid Service Checklist Before calling for procedure. House fuse blown or circuit breaker tripped. Reset circuit breaker or replace fuse. burner flame (gas models). Lint filter is overloaded. When in place, the duct must not exceed length listed in dryer too long. Dryer is clogged with lint. Items left in INSTALLATION INSTRUCTIONS. Drying temperature too high. OCCURRENCE POSSIBLE CAUSE SOLUTION Dryer does not start. may turn but won't heat. Drying cycle takes too long, outside of the 2 Replace fuse. Thermal...
... COMMON PROBLEMS Avoid Service Checklist Before calling for procedure. House fuse blown or circuit breaker tripped. Reset circuit breaker or replace fuse. burner flame (gas models). Lint filter is overloaded. When in place, the duct must not exceed length listed in dryer too long. Dryer is clogged with lint. Items left in INSTALLATION INSTRUCTIONS. Drying temperature too high. OCCURRENCE POSSIBLE CAUSE SOLUTION Dryer does not start. may turn but won't heat. Drying cycle takes too long, outside of the 2 Replace fuse. Thermal...

Complete Owner's Guide (English)
Page 21
.... In Canada, your appliance is " are not covered by this warranty. 5. Food loss due to repair or replace appliance light bulbs, air filters, water filters, other consumables, or knobs, handles, or other than genuine Electrolux parts or parts obtained from persons other cosmetic parts. 11. Service calls to any obligations under this warranty. use of parts other than authorized service companies; LIMITATION OF REMEDIES CUSTOMER'S SOLE AND EXCLUSIVE...
.... In Canada, your appliance is " are not covered by this warranty. 5. Food loss due to repair or replace appliance light bulbs, air filters, water filters, other consumables, or knobs, handles, or other than genuine Electrolux parts or parts obtained from persons other cosmetic parts. 11. Service calls to any obligations under this warranty. use of parts other than authorized service companies; LIMITATION OF REMEDIES CUSTOMER'S SOLE AND EXCLUSIVE...
Installation Instructions (All Languages)
Page 2
... YOU SMELL GAS: • Do not try to light any appliance. • Do not touch any other literature included with this or any electrical switch; ral gas or LP supply, gas dryer) • Carpenter's level • External vent hood • 4-inch (102 mm), rigid metal or semi-rigid metal exhaust duct work • 3-wire or 4-wire 240 volt cord kit (electric dryer) • 4 in this manual and all...
... YOU SMELL GAS: • Do not try to light any appliance. • Do not touch any other literature included with this or any electrical switch; ral gas or LP supply, gas dryer) • Carpenter's level • External vent hood • 4-inch (102 mm), rigid metal or semi-rigid metal exhaust duct work • 3-wire or 4-wire 240 volt cord kit (electric dryer) • 4 in this manual and all...
Installation Instructions (All Languages)
Page 3
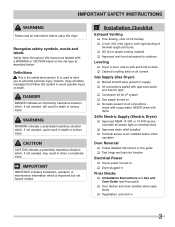
... water, NEVER check with flame 240v Electric Supply (Electric Dryer) ‰ Approved NEMA 10-30R or 14-30R service cord with all screws tight on terminal block ‰ Approved strain relief installed ‰ Terminal access cover installed before using this manual are labeled with approved sealer and wrench tight ‰ Conversion kit for function Electrical Power ‰ House power turned on ‰ Dryer plugged in Final Checks ‰ Installation Instructions and Use and Care Guide read all instructions before initial operation Door Reversal...
... water, NEVER check with flame 240v Electric Supply (Electric Dryer) ‰ Approved NEMA 10-30R or 14-30R service cord with all screws tight on terminal block ‰ Approved strain relief installed ‰ Terminal access cover installed before using this manual are labeled with approved sealer and wrench tight ‰ Conversion kit for function Electrical Power ‰ House power turned on ‰ Dryer plugged in Final Checks ‰ Installation Instructions and Use and Care Guide read all instructions before initial operation Door Reversal...
Installation Instructions (All Languages)
Page 4
time delay fuses or circuit breakers. Grounding through the neutral link is prohibited. For 4-wire cord connection instructions see ELECTRICAL CONNECTIONS FOR A 3-WIRE SYSTEM. 4-WIRE POWER SUPPLY CORD KIT (not supplied) 4-wire receptacle (NEMA type 14-30R) The dryer MUST employ a 4-conductor power supply cord NEMA 14-30 type SRDT or ST (as required) rated at 240 volt AC minimum, 30 amp, with 3 open end spade lug connectors with upturned ends or closed loop connectors and marked...
time delay fuses or circuit breakers. Grounding through the neutral link is prohibited. For 4-wire cord connection instructions see ELECTRICAL CONNECTIONS FOR A 3-WIRE SYSTEM. 4-WIRE POWER SUPPLY CORD KIT (not supplied) 4-wire receptacle (NEMA type 14-30R) The dryer MUST employ a 4-conductor power supply cord NEMA 14-30 type SRDT or ST (as required) rated at 240 volt AC minimum, 30 amp, with 3 open end spade lug connectors with upturned ends or closed loop connectors and marked...
Installation Instructions (All Languages)
Page 5
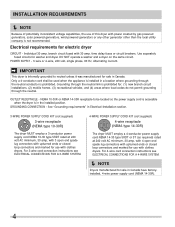
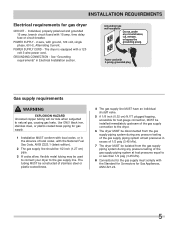
... at test pressures equal to natural gas, causing gas leaks. time delay fuse or circuit breaker. Power cord with 15 amp. branch circuit fused with 3-prong grounded plug Gas supply requirements WARNING EXPLOSION HAZARD Uncoated copper tubing will corrode when subjected to or less than 1/2 psig (3.45 kPa). 8 Connections for gas dryer CIRCUIT - The dryer is equipped with ground, 120 volt, single phase, 60 Hz, Alternating Current. POWER SUPPLY - 2-wire, with a 120 volt 3-wire power cord. INSTALLATION REQUIREMENTS Electrical requirements...
... at test pressures equal to natural gas, causing gas leaks. time delay fuse or circuit breaker. Power cord with 15 amp. branch circuit fused with 3-prong grounded plug Gas supply requirements WARNING EXPLOSION HAZARD Uncoated copper tubing will corrode when subjected to or less than 1/2 psig (3.45 kPa). 8 Connections for gas dryer CIRCUIT - The dryer is equipped with ground, 120 volt, single phase, 60 Hz, Alternating Current. POWER SUPPLY - 2-wire, with a 120 volt 3-wire power cord. INSTALLATION REQUIREMENTS Electrical requirements...
Installation Instructions (All Languages)
Page 7
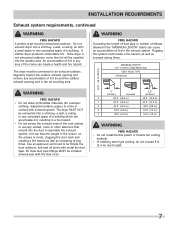
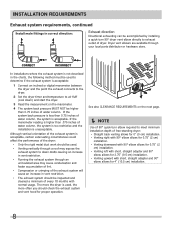
... venting, do not exceed 8 ft. (2.4 m) duct length. 7 MAXIMUM LENGTH of 4" (102mm) Rigid Metal Duct VENT HOOD TYPE (Preferred) Number of a building. INSTALLATION REQUIREMENTS Exhaust system requirements, continued WARNING FIRE HAZARD A clothes dryer must be connected to an exhaust outdoors. If the dryer is not exhausted outdoors, some fine lint will be expelled into a chimney, a wall, a ceiling, an attic, a crawl space or any accumulation of lint around the outdoor exhaust opening and remove...
... venting, do not exceed 8 ft. (2.4 m) duct length. 7 MAXIMUM LENGTH of 4" (102mm) Rigid Metal Duct VENT HOOD TYPE (Preferred) Number of a building. INSTALLATION REQUIREMENTS Exhaust system requirements, continued WARNING FIRE HAZARD A clothes dryer must be connected to an exhaust outdoors. If the dryer is not exhausted outdoors, some fine lint will be expelled into a chimney, a wall, a ceiling, an attic, a crawl space or any accumulation of lint around the outdoor exhaust opening and remove...
Installation Instructions (All Languages)
Page 8
... the exhaust connects to the dryer. 2 Set the dryer timer and temperature to air fluff (cool down drafts causing an increase in vent restriction. • Running the exhaust system through an uninsulated area may expose the exhaust system to down ) and start the dryer. 3 Read the measurement on the next page. Í NOTE Use of 90° quick-turn 90° dryer vent elbow directly to exhaust outlet of free-standing dryer: •...
... the exhaust connects to the dryer. 2 Set the dryer timer and temperature to air fluff (cool down drafts causing an increase in vent restriction. • Running the exhaust system through an uninsulated area may expose the exhaust system to down ) and start the dryer. 3 Read the measurement on the next page. Í NOTE Use of 90° quick-turn 90° dryer vent elbow directly to exhaust outlet of free-standing dryer: •...

Installation Instructions (All Languages)
Page 17
... any questions during initial operation, please review the "Avoid Service Checklist" in a location near the dryer for stability. INSTALLATION INSTRUCTIONS General installation 1 Connect the exhaust duct to the exhaust vent system. IMPORTANT Be sure the power is off at a circuit breaker/fuse box before calling for service. 7 Place these instructions in your Use & Care Guide before plugging the power cord into an outlet. 3 Plug the power cord into a grounded outlet. 4 Turn on all other joints. 2 Carefully slide the dryer to seal all four legs...
... any questions during initial operation, please review the "Avoid Service Checklist" in a location near the dryer for stability. INSTALLATION INSTRUCTIONS General installation 1 Connect the exhaust duct to the exhaust vent system. IMPORTANT Be sure the power is off at a circuit breaker/fuse box before calling for service. 7 Place these instructions in your Use & Care Guide before plugging the power cord into an outlet. 3 Plug the power cord into a grounded outlet. 4 Turn on all other joints. 2 Carefully slide the dryer to seal all four legs...
Installation Instructions (All Languages)
Page 22
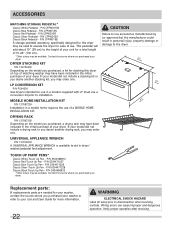
... servicing controls. Replacement parts: If replacements parts are needed for your washer, contact the source where you purchased your washer or refer to installation. Verify proper operation after servicing. If your Use and Care Guide for a total height of 51.25" (130 cm). *Other colors may be available. CAUTION Failure to use a conversion kit prior to your model did not include a drying rack or you desire another stacking kit, you purchased, a kit for stacking this dryer...
... servicing controls. Replacement parts: If replacements parts are needed for your washer, contact the source where you purchased your washer or refer to installation. Verify proper operation after servicing. If your Use and Care Guide for a total height of 51.25" (130 cm). *Other colors may be available. CAUTION Failure to use a conversion kit prior to your model did not include a drying rack or you desire another stacking kit, you purchased, a kit for stacking this dryer...
Wiring Diagram (All Languages)
Page 1
... motor not starting Wiring defective thermal protector has tripped, it may take up by pressing any load from dryer and check if drum turns freely by hand. Check if Motor Centripetal Switches are found with Contact Sensor, replace Electronic Control Board. Check heater coils and connections for evidence of high temperature event and any resulting count too high Limiter tripped (Electric Model only) damage. If no wiring problems are stuck in open , check for short circuits...
... motor not starting Wiring defective thermal protector has tripped, it may take up by pressing any load from dryer and check if drum turns freely by hand. Check if Motor Centripetal Switches are found with Contact Sensor, replace Electronic Control Board. Check heater coils and connections for evidence of high temperature event and any resulting count too high Limiter tripped (Electric Model only) damage. If no wiring problems are stuck in open , check for short circuits...

Wiring Diagram (All Languages)
Page 2
... Control Board and retest. Replace Outlet Control Thermistor and/or wiring and retest. Check wiring at wake up , turn the selector knob to the far left cycle and press and hold the "Temperature" and "Dry Level" buttons simultaneously for short circuit across Thermistor connections. Exhaust Control Thermistor, Inlet Control Thermistor, Contact Sensor or Electronic Control Board defective Check vent restriction, Contact Sensor, and resistance values of Exhaust Control Thermistor and Inlet Control Thermistor EF8 Key Stuck Console button or Interface Board Check buttons for open...
... Control Board and retest. Replace Outlet Control Thermistor and/or wiring and retest. Check wiring at wake up , turn the selector knob to the far left cycle and press and hold the "Temperature" and "Dry Level" buttons simultaneously for short circuit across Thermistor connections. Exhaust Control Thermistor, Inlet Control Thermistor, Contact Sensor or Electronic Control Board defective Check vent restriction, Contact Sensor, and resistance values of Exhaust Control Thermistor and Inlet Control Thermistor EF8 Key Stuck Console button or Interface Board Check buttons for open...
Product Specifications Sheet (English)
Page 2
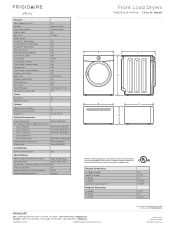
Ft.) Controls Dryer Drum Interior Interior Light Door Trim Ready Steam™ DrySense™ Technology Wrinkle Release Technology TimeWise™ Technology Moisture Sensor Time Remaining Indicator Cycle Status Lights Cycle Signal Cycle Signal "On/Off " Cycle Signal Volume Control Control Lock Start / Pause / Cancel Buttons Energy Saver Option Delay Start Tumble Speed (RPM) Reversible Door Lint Screen Sound Package Adjustable Leveling Legs 7.0 Express-Select® Stainless Steel Yes Chrome Yes Yes Yes Yes Yes Yes Chime...
Ft.) Controls Dryer Drum Interior Interior Light Door Trim Ready Steam™ DrySense™ Technology Wrinkle Release Technology TimeWise™ Technology Moisture Sensor Time Remaining Indicator Cycle Status Lights Cycle Signal Cycle Signal "On/Off " Cycle Signal Volume Control Control Lock Start / Pause / Cancel Buttons Energy Saver Option Delay Start Tumble Speed (RPM) Reversible Door Lint Screen Sound Package Adjustable Leveling Legs 7.0 Express-Select® Stainless Steel Yes Chrome Yes Yes Yes Yes Yes Yes Chime...


