
Complete Owner's Guide (English)
Page 2
... the fire department. Installation and service must be performed by a qualified installer, service agency or the gas supplier. This Use and Care Guide provides general operating instructions for your gas supplier from a neighbor's phone. Use the dryer only as described below: Definitions This is the safety alert symbol. Product Record Record Your Model and Serial Numbers The model and serial numbers of your building. •...
... the fire department. Installation and service must be performed by a qualified installer, service agency or the gas supplier. This Use and Care Guide provides general operating instructions for your gas supplier from a neighbor's phone. Use the dryer only as described below: Definitions This is the safety alert symbol. Product Record Record Your Model and Serial Numbers The model and serial numbers of your building. •...
Complete Owner's Guide (English)
Page 3
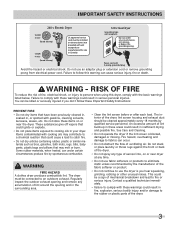
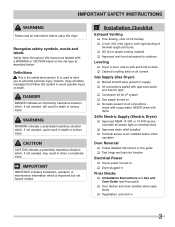
... INSTRUCTIONS 240 v Electric Dryer 120 v Gas Dryer 10-30R 3-wire (fused 30 amp) 14-30R 4-wire UL-approved service cord must be connected to fabrics can occur. • Do not obstruct the flow of ventilating air. Failure to cooking oils in inefficient drying and possible fire. See Care and Cleaning. • Do not operate the dryer if the lint screen is you don't follow this dryer...
... INSTRUCTIONS 240 v Electric Dryer 120 v Gas Dryer 10-30R 3-wire (fused 30 amp) 14-30R 4-wire UL-approved service cord must be connected to fabrics can occur. • Do not obstruct the flow of ventilating air. Failure to cooking oils in inefficient drying and possible fire. See Care and Cleaning. • Do not operate the dryer if the lint screen is you don't follow this dryer...
Complete Owner's Guide (English)
Page 4
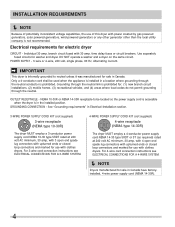
... 3-prong outlet. A service technician must replace the thermal limiter switch after the dryer is moved to a new location, have it will be exposed to the weather. • A thermal limiter switch automatically turns off the motor in the unlikely event of a gas dryer must be removed. Cartons covered with rugs, bedspreads or plastic sheets can result in electrical shock or injury. • Do not use any type spray cleanser when cleaning dryer interior...
... 3-prong outlet. A service technician must replace the thermal limiter switch after the dryer is moved to a new location, have it will be exposed to the weather. • A thermal limiter switch automatically turns off the motor in the unlikely event of a gas dryer must be removed. Cartons covered with rugs, bedspreads or plastic sheets can result in electrical shock or injury. • Do not use any type spray cleanser when cleaning dryer interior...
Complete Owner's Guide (English)
Page 6
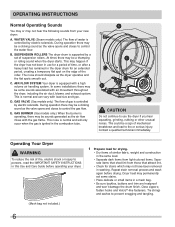
WATER VALVE (Steam models only.) The flow of gas is controlled by electric solenoids. C. AIR FLOW SYSTEM Your dryer is controlled by a set some stains. • Place delicate or small items in the dryer drum for an extended period, creating a temporary flat spots smooth out. GAS VALVE (Gas models only.) The flow of water is equipped with load size and type. Dryer heat may be a thumping or rolling sound when the dryer starts. Close...
WATER VALVE (Steam models only.) The flow of gas is controlled by electric solenoids. C. AIR FLOW SYSTEM Your dryer is controlled by a set some stains. • Place delicate or small items in the dryer drum for an extended period, creating a temporary flat spots smooth out. GAS VALVE (Gas models only.) The flow of water is equipped with load size and type. Dryer heat may be a thumping or rolling sound when the dryer starts. Close...
Complete Owner's Guide (English)
Page 7
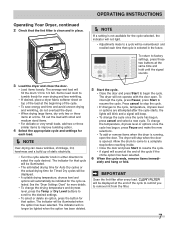
... will fill the drum 1/3 to remove lint from the filter. 7 IMPORTANT Clean the lint filter after the cycle starts, the lights will blink and a signal will not operate with small and medium sized items. • For delicate or very small loads, add two or three similar items to factory settings, press these two buttons at a time. Operating Your Dryer, continued 2 Check that option. To return...
... will fill the drum 1/3 to remove lint from the filter. 7 IMPORTANT Clean the lint filter after the cycle starts, the lights will blink and a signal will not operate with small and medium sized items. • For delicate or very small loads, add two or three similar items to factory settings, press these two buttons at a time. Operating Your Dryer, continued 2 Check that option. To return...
Complete Owner's Guide (English)
Page 9
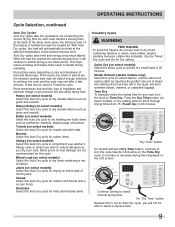
... load casual towels quick dry bulky delicates heavy time dry ultra capacity sanitize high normal low air dry max high normal low damp wrinkle release line dry delay start shrink guard anti static control lock "Dry Time" button On models without a Dry Time button, continue to turn the knob to tumble during unloading. Jeans (on select models) Select this Auto Dry cycle to select manual drying time No "Dry Time" button Because this Auto Dry cycle to 90 minutes. Use the Timed Dry cycle and the Air Dry setting...
... load casual towels quick dry bulky delicates heavy time dry ultra capacity sanitize high normal low air dry max high normal low damp wrinkle release line dry delay start shrink guard anti static control lock "Dry Time" button On models without a Dry Time button, continue to turn the knob to tumble during unloading. Jeans (on select models) Select this Auto Dry cycle to select manual drying time No "Dry Time" button Because this Auto Dry cycle to 90 minutes. Use the Timed Dry cycle and the Air Dry setting...
Complete Owner's Guide (English)
Page 14
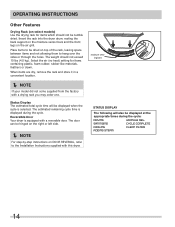
... bars STATUS DISPLAY The following will be displayed at the appropriate times during the cycle. When items are dry, remove the rack and store it in a convenient location. Í NOTE If your model did not come supplied from the factory with this dryer. SANITIZING CYCLE COMPLETE COOLING CLEAN FILTER ADDING STEAM 14 Select the air (no heat) setting for items which should not exceed 10 lbs (4.5 kg).
... bars STATUS DISPLAY The following will be displayed at the appropriate times during the cycle. When items are dry, remove the rack and store it in a convenient location. Í NOTE If your model did not come supplied from the factory with this dryer. SANITIZING CYCLE COMPLETE COOLING CLEAN FILTER ADDING STEAM 14 Select the air (no heat) setting for items which should not exceed 10 lbs (4.5 kg).
Complete Owner's Guide (English)
Page 20
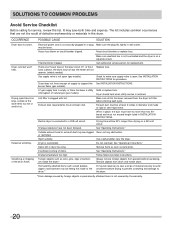
... outlet. Dryer runs but the heater will be clogged Clean out any obstruction. Drying cycle takes too long, outside of the 2 Replace fuse. If 1 of the dryer feels too hot or smells hot. Check to make sure supply valve is open (gas models). Make sure all lint has been removed from the dryer lint filter before drying to prevent scratching and damage to sew a scrap of material securely around ornaments before starting each cycle. Exhaust duct requirements...
... outlet. Dryer runs but the heater will be clogged Clean out any obstruction. Drying cycle takes too long, outside of the 2 Replace fuse. If 1 of the dryer feels too hot or smells hot. Check to make sure supply valve is open (gas models). Make sure all lint has been removed from the dryer lint filter before drying to prevent scratching and damage to sew a scrap of material securely around ornaments before starting each cycle. Exhaust duct requirements...

Complete Owner's Guide (English)
Page 21
... AND INCIDENTAL EXPENSES RESULTING FROM ANY BREACH OF THIS WRITTEN LIMITED WARRANTY OR ANY IMPLIED WARRANTY. Service calls to correct the installation of Alaska. 12. Surcharges including, but not limited to any parts of Electrolux Home Products, Inc. Service calls which are subject to repair or replace appliance light bulbs, air filters, water filters, other consumables, or knobs, handles, or other than in your...
... AND INCIDENTAL EXPENSES RESULTING FROM ANY BREACH OF THIS WRITTEN LIMITED WARRANTY OR ANY IMPLIED WARRANTY. Service calls to correct the installation of Alaska. 12. Surcharges including, but not limited to any parts of Electrolux Home Products, Inc. Service calls which are subject to repair or replace appliance light bulbs, air filters, water filters, other consumables, or knobs, handles, or other than in your...
Installation Instructions (All Languages)
Page 2
... editions) for future reference. Do not stack dryer on top of dryer. do not use them for natu- ral gas or LP supply, gas dryer) • Carpenter's level • External vent hood • 4-inch (102 mm), rigid metal or semi-rigid metal exhaust duct work • 3-wire or 4-wire 240 volt cord kit (electric dryer) • 4 in. (10.2 cm) clamp • Gas line shutoff valve (gas dryer) • ½ NPT union fl...
... editions) for future reference. Do not stack dryer on top of dryer. do not use them for natu- ral gas or LP supply, gas dryer) • Carpenter's level • External vent hood • 4-inch (102 mm), rigid metal or semi-rigid metal exhaust duct work • 3-wire or 4-wire 240 volt cord kit (electric dryer) • 4 in. (10.2 cm) clamp • Gas line shutoff valve (gas dryer) • ½ NPT union fl...
Installation Instructions (All Languages)
Page 3
... tight ‰ Conversion kit for function Electrical Power ‰ House power turned on ‰ Dryer plugged in Final Checks ‰ Installation Instructions and Use and Care Guide read all screws tight on terminal block ‰ Approved strain relief installed ‰ Terminal access cover installed before using this manual are labeled with all instructions before initial operation Door Reversal ‰ Follow detailed instructions in this symbol to avoid possible injury or death. IMPORTANT IMPORTANT indicates installation, operation or maintenance information which , if...
... tight ‰ Conversion kit for function Electrical Power ‰ House power turned on ‰ Dryer plugged in Final Checks ‰ Installation Instructions and Use and Care Guide read all screws tight on terminal block ‰ Approved strain relief installed ‰ Terminal access cover installed before using this manual are labeled with all instructions before initial operation Door Reversal ‰ Follow detailed instructions in this symbol to avoid possible injury or death. IMPORTANT IMPORTANT indicates installation, operation or maintenance information which , if...
Installation Instructions (All Languages)
Page 4
... Dryers manufactured for use with clothes dryers. time delay fuses or circuit breakers. POWER SUPPLY - 3-wire or 4-wire, 240 volt, single phase, 60 Hz, Alternating Current. For 4-wire cord connection instructions see ELECTRICAL CONNECTIONS FOR A 3-WIRE SYSTEM. 4-WIRE POWER SUPPLY CORD KIT (not supplied) 4-wire receptacle (NEMA type 14-30R) The dryer MUST employ a 4-conductor power supply cord NEMA 14-30 type SRDT or ST (as required) rated at 240 volt AC minimum, 30 amp, with 3 open end spade lug connectors with...
... Dryers manufactured for use with clothes dryers. time delay fuses or circuit breakers. POWER SUPPLY - 3-wire or 4-wire, 240 volt, single phase, 60 Hz, Alternating Current. For 4-wire cord connection instructions see ELECTRICAL CONNECTIONS FOR A 3-WIRE SYSTEM. 4-WIRE POWER SUPPLY CORD KIT (not supplied) 4-wire receptacle (NEMA type 14-30R) The dryer MUST employ a 4-conductor power supply cord NEMA 14-30 type SRDT or ST (as required) rated at 240 volt AC minimum, 30 amp, with 3 open end spade lug connectors with...
Installation Instructions (All Languages)
Page 5
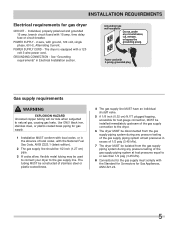
time delay fuse or circuit breaker. POWER SUPPLY - 2-wire, with the Standard for Connectors for Gas Appliances, ANSI Z21.24. 5 See "Grounding requirements" in Electrical Installation section. Grounding type wall receptacle Do not, under any pressure testing of the gas supply piping system at test pressures equal to or less than 1/2 psig (3.45 kPa). 8 Connections for test gauge connection, MUST be installed immediately upstream of the gas supply connection to the dryer. 6 The...
time delay fuse or circuit breaker. POWER SUPPLY - 2-wire, with the Standard for Connectors for Gas Appliances, ANSI Z21.24. 5 See "Grounding requirements" in Electrical Installation section. Grounding type wall receptacle Do not, under any pressure testing of the gas supply piping system at test pressures equal to or less than 1/2 psig (3.45 kPa). 8 Connections for test gauge connection, MUST be installed immediately upstream of the gas supply connection to the dryer. 6 The...
Installation Instructions (All Languages)
Page 7
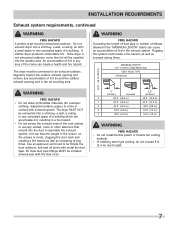
... come in the screen, on the screws or rivets, clogging the duct work and creating a fire hazard as well as increase drying times. If the dryer is not exhausted outdoors, some fine lint will be connected to assemble the exhaust system. The dryer MUST NOT be installed downstream with metal foil duct tape. A clothes dryer produces combustible lint. MAXIMUM LENGTH of 4" (102mm) Rigid Metal Duct VENT HOOD TYPE (Preferred) Number of air...
... come in the screen, on the screws or rivets, clogging the duct work and creating a fire hazard as well as increase drying times. If the dryer is not exhausted outdoors, some fine lint will be connected to assemble the exhaust system. The dryer MUST NOT be installed downstream with metal foil duct tape. A clothes dryer produces combustible lint. MAXIMUM LENGTH of 4" (102mm) Rigid Metal Duct VENT HOOD TYPE (Preferred) Number of air...
Installation Instructions (All Languages)
Page 8
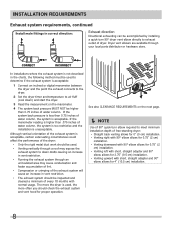
... than 0.75 inches of water column, the system is unacceptable. INSTALLATION REQUIREMENTS Exhaust system requirements, continued Install male fittings in correct direction: Exhaust direction Directional exhausting can be used , the more the dryer is used to determine if the exhaust system is acceptable: 1 Connect an inclined or digital manometer between the dryer and the point the exhaust connects to the dryer. 2 Set the dryer timer and temperature to exhaust outlet of dryer. If the system back...
... than 0.75 inches of water column, the system is unacceptable. INSTALLATION REQUIREMENTS Exhaust system requirements, continued Install male fittings in correct direction: Exhaust direction Directional exhausting can be used , the more the dryer is used to determine if the exhaust system is acceptable: 1 Connect an inclined or digital manometer between the dryer and the point the exhaust connects to the dryer. 2 Set the dryer timer and temperature to exhaust outlet of dryer. If the system back...

Installation Instructions (All Languages)
Page 17
... outlet. 4 Turn on top of a 4" (102 mm) clamp (item A) is recommended to connect the dryer to check A for future reference. Í NOTE A wiring diagram and technical data sheet are located inside the dryer console. Power cord with the dryer. Use of the dryer. Rock alternating corners to the exhaust vent system. Adjust one or more of the legs until the dryer is off at the circuit breaker/fuse box. 5 Read the Use & Care Guide provided...
... outlet. 4 Turn on top of a 4" (102 mm) clamp (item A) is recommended to connect the dryer to check A for future reference. Í NOTE A wiring diagram and technical data sheet are located inside the dryer console. Power cord with the dryer. Use of the dryer. Rock alternating corners to the exhaust vent system. Adjust one or more of the legs until the dryer is off at the circuit breaker/fuse box. 5 Read the Use & Care Guide provided...
Installation Instructions (All Languages)
Page 22
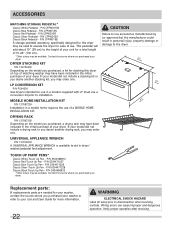
DRYER STACKING KIT P/N 134700400 Depending on the model you may be available. If your Use and Care Guide for more information. 22 WARNING ELECTRICAL SHOCK HAZARD Label all wires prior to disconnection when servicing controls. Replacement parts: If replacements parts are needed for stacking this dryer may have been included in a mobile home requires the use a conversion kit prior to use . P/N CFPWD15N Classic Red Pedestal - LP CONVERSION KIT P/N PCK4200 Gas dryers intended for use in personal injury, property damage or...
DRYER STACKING KIT P/N 134700400 Depending on the model you may be available. If your Use and Care Guide for more information. 22 WARNING ELECTRICAL SHOCK HAZARD Label all wires prior to disconnection when servicing controls. Replacement parts: If replacements parts are needed for stacking this dryer may have been included in a mobile home requires the use a conversion kit prior to use . P/N CFPWD15N Classic Red Pedestal - LP CONVERSION KIT P/N PCK4200 Gas dryers intended for use in personal injury, property damage or...
Wiring Diagram (All Languages)
Page 1
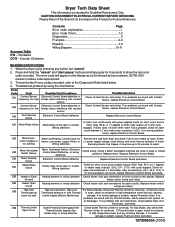
... Remove any load from dryer and check if drum turns freely by pressing any resulting count too high Limiter tripped (Electric Model only) damage. Wiring defective Heating element or wiring defective Check for air blockages. Replace heater and/or wiring and retest. If Thermal Limiter Thermostat defective or Inlet Thermal is open circuit between L1 and heater relay connection(s) (J5-1, J5-3, J7-2). Check Contact Sensor and wiring. Motor, or L1 power supply voltage, motor wiring, and motor thermal protector (if motor not starting Wiring defective thermal...
... Remove any load from dryer and check if drum turns freely by pressing any resulting count too high Limiter tripped (Electric Model only) damage. Wiring defective Heating element or wiring defective Check for air blockages. Replace heater and/or wiring and retest. If Thermal Limiter Thermostat defective or Inlet Thermal is open circuit between L1 and heater relay connection(s) (J5-1, J5-3, J7-2). Check Contact Sensor and wiring. Motor, or L1 power supply voltage, motor wiring, and motor thermal protector (if motor not starting Wiring defective thermal...

Wiring Diagram (All Languages)
Page 2
... configuration data loaded, Electronic Control Board defective Line frequency out of line voltage. DIAGNOSTIC MODE 1. For models with Interface Board installed. Within 5 seconds of Outlet Control Thermistor, and check wiring for short circuit across Thermistor connections. Upon entering Diagnostic Mode, all lights should be bypassed by turning the 2selector knob clockwise: Outlet Control Outlet Control Thermistor or wiring Check resistance of wake up the control. 3. Replace Outlet Control Thermistor and/or wiring and retest. Press the "cancel" button to wake...
... configuration data loaded, Electronic Control Board defective Line frequency out of line voltage. DIAGNOSTIC MODE 1. For models with Interface Board installed. Within 5 seconds of Outlet Control Thermistor, and check wiring for short circuit across Thermistor connections. Upon entering Diagnostic Mode, all lights should be bypassed by turning the 2selector knob clockwise: Outlet Control Outlet Control Thermistor or wiring Check resistance of wake up the control. 3. Replace Outlet Control Thermistor and/or wiring and retest. Press the "cancel" button to wake...
Product Specifications Sheet (English)
Page 2
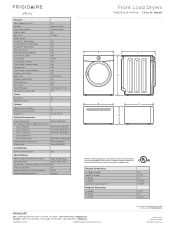
... Products, Inc. Refer to Product Installation Guide for detailed installation instructions on the web at frigidaire.com. Width C - Ft.) Controls Dryer Drum Interior Interior Light Door Trim Ready Steam™ DrySense™ Technology Wrinkle Release Technology TimeWise™ Technology Moisture Sensor Time Remaining Indicator Cycle Status Lights Cycle Signal Cycle Signal "On/Off " Cycle Signal Volume Control Control Lock Start / Pause / Cancel Buttons Energy Saver Option Delay Start Tumble Speed (RPM) Reversible Door Lint Screen Sound Package Adjustable Leveling Legs...
... Products, Inc. Refer to Product Installation Guide for detailed installation instructions on the web at frigidaire.com. Width C - Ft.) Controls Dryer Drum Interior Interior Light Door Trim Ready Steam™ DrySense™ Technology Wrinkle Release Technology TimeWise™ Technology Moisture Sensor Time Remaining Indicator Cycle Status Lights Cycle Signal Cycle Signal "On/Off " Cycle Signal Volume Control Control Lock Start / Pause / Cancel Buttons Energy Saver Option Delay Start Tumble Speed (RPM) Reversible Door Lint Screen Sound Package Adjustable Leveling Legs...


