
Wiring Diagram (All Languages)
Page 1
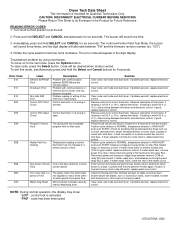
... heater circuit. If problem persists, replace electronic control. If problem persists, replace electronic control. If meter reads zero, wire between EEPROM and the microprocessor. Control NTC Open Control thermistor or its Envelope in closet with communications or memory did not check, one time. 3. Immediately press and hold the Select and Cancel buttons for blocked lint filter, blocked exhaust, air leaks around air duct, broken blower fan blades, worn or loose drum seals, dryer installed in moisture sensor bar circuit...
... heater circuit. If problem persists, replace electronic control. If problem persists, replace electronic control. If meter reads zero, wire between EEPROM and the microprocessor. Control NTC Open Control thermistor or its Envelope in closet with communications or memory did not check, one time. 3. Immediately press and hold the Select and Cancel buttons for blocked lint filter, blocked exhaust, air leaks around air duct, broken blower fan blades, worn or loose drum seals, dryer installed in moisture sensor bar circuit...
Complete Owner's Guide (English)
Page 2
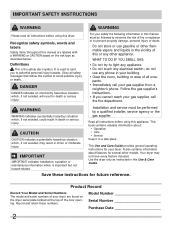
... the door opening. CAUTION CAUTION indicates a potentially hazardous situation which is used to alert you cannot reach your dryer are labeled with a WARNING or CAUTION based on the dryer serial plate located at the top of this or any electrical switch; Save these numbers. Follow the gas supplier's instructions. • If you to potential personal injury hazards. Model Number Serial Number Purchase Date 2 IMPORTANT SAFETY INSTRUCTIONS WARNING...
... the door opening. CAUTION CAUTION indicates a potentially hazardous situation which is used to alert you cannot reach your dryer are labeled with a WARNING or CAUTION based on the dryer serial plate located at the top of this or any electrical switch; Save these numbers. Follow the gas supplier's instructions. • If you to potential personal injury hazards. Model Number Serial Number Purchase Date 2 IMPORTANT SAFETY INSTRUCTIONS WARNING...
Complete Owner's Guide (English)
Page 3
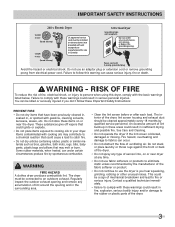
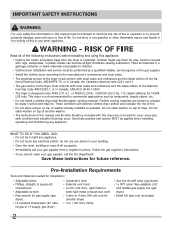
... recommended by qualified service personnel. IMPORTANT SAFETY INSTRUCTIONS 240 v Electric Dryer 120 v Gas Dryer 10-30R 3-wire (fused 30 amp) 14-30R 4-wire UL-approved service cord must be connected to the rubber or plastic parts of the dryer. 3 Do not store these areas could cause a load to use an adaptor plug or extension cord or remove grounding prong from electrical power cord. Some rubber materials, when heated, can be killed or...
... recommended by qualified service personnel. IMPORTANT SAFETY INSTRUCTIONS 240 v Electric Dryer 120 v Gas Dryer 10-30R 3-wire (fused 30 amp) 14-30R 4-wire UL-approved service cord must be connected to the rubber or plastic parts of the dryer. 3 Do not store these areas could cause a load to use an adaptor plug or extension cord or remove grounding prong from electrical power cord. Some rubber materials, when heated, can be killed or...
Complete Owner's Guide (English)
Page 4
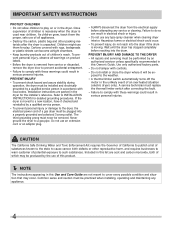
.... • A thermal limiter switch automatically turns off the motor in the dryer. Use only authorized factory parts. • Do not tamper with controls. • Do not install or store the dryer where it checked and reinstalled by the use any type spray cleanser when cleaning dryer interior. IMPORTANT SAFETY INSTRUCTIONS PROTECT CHILDREN • Do not allow children to INSTALLATION INSTRUCTIONS for detailed grounding procedures. Cartons covered with local codes. Refer...
.... • A thermal limiter switch automatically turns off the motor in the dryer. Use only authorized factory parts. • Do not tamper with controls. • Do not install or store the dryer where it checked and reinstalled by the use any type spray cleanser when cleaning dryer interior. IMPORTANT SAFETY INSTRUCTIONS PROTECT CHILDREN • Do not allow children to INSTALLATION INSTRUCTIONS for detailed grounding procedures. Cartons covered with local codes. Refer...
Complete Owner's Guide (English)
Page 6
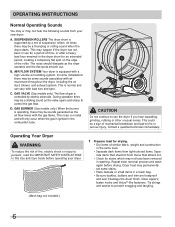
... roller. C. Dryer heat may permanently set of gas is supported by electric solenoids. AIR FLOW SYSTEM Your dryer is operating, there may be some stains. • Place delicate or small items in the combustion tube. During operation there may be sounds generated as the valve opens and closes to control the gas flow. GAS BURNER (Gas models only.) When the burner is equipped with load size and type. fasten hooks and...
... roller. C. Dryer heat may permanently set of gas is supported by electric solenoids. AIR FLOW SYSTEM Your dryer is operating, there may be some stains. • Place delicate or small items in the combustion tube. During operation there may be sounds generated as the valve opens and closes to control the gas flow. GAS BURNER (Gas models only.) When the burner is equipped with load size and type. fasten hooks and...
Complete Owner's Guide (English)
Page 7
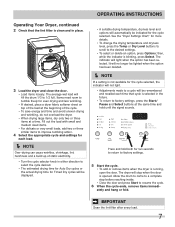
.... IMPORTANT Clean the lint filter after every load. 7 OPERATING INSTRUCTIONS Operating Your Dryer, continued 2 Check that cycle is selected in the future. • To return to factory settings, press the Start/ Pause and Select buttons at a time. The average wet load will stop before reaching inside. • Close the door and press Start to resume the cycle. 6 When the cycle ends, remove items immedi- Allow the drum to come to...
.... IMPORTANT Clean the lint filter after every load. 7 OPERATING INSTRUCTIONS Operating Your Dryer, continued 2 Check that cycle is selected in the future. • To return to factory settings, press the Start/ Pause and Select buttons at a time. The average wet load will stop before reaching inside. • Close the door and press Start to resume the cycle. 6 When the cycle ends, remove items immedi- Allow the drum to come to...
Complete Owner's Guide (English)
Page 8
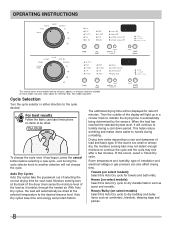
... Follow the fabric care label instructions on size and dampness of selecting the correct drying time for towels and bath mats. Auto Dry cycles save time and energy and protect fabrics. When the load has reached the selected dryness level, it will not change the cycle once it tumbles through the heated air. If this Auto Dry cycle for each load. This helps reduce wrinkling and makes items...
... Follow the fabric care label instructions on size and dampness of selecting the correct drying time for towels and bath mats. Auto Dry cycles save time and energy and protect fabrics. When the load has reached the selected dryness level, it will not change the cycle once it tumbles through the heated air. If this Auto Dry cycle for each load. This helps reduce wrinkling and makes items...
Complete Owner's Guide (English)
Page 11
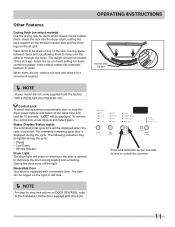
... air (no heat) setting for 10 seconds. Status Display/Status Lights The estimated total cycle time will be displayed. Closing the door turns off the light. The weight should not be lighted during the cycle: • Drying • Cool Down • Wrinkle Release Drum Light The drum light will be displayed when the cycle is equipped with a drying rack you may be tumble dried. Control Lock To avoid having someone accidentally start or stop the dryer...
... air (no heat) setting for 10 seconds. Status Display/Status Lights The estimated total cycle time will be displayed. Closing the door turns off the light. The weight should not be lighted during the cycle: • Drying • Cool Down • Wrinkle Release Drum Light The drum light will be displayed when the cycle is equipped with a drying rack you may be tumble dried. Control Lock To avoid having someone accidentally start or stop the dryer...
Complete Owner's Guide (English)
Page 15
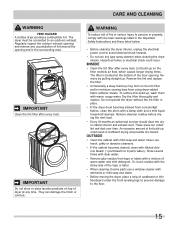
... • Clean the lint filter after every load. Lint build-up . Remove cleanser residue before drying the next load. • Every 18 months an authorized servicer should clean the dryer cabinet interior and exhaust duct. OUTSIDE • Clean the cabinet with a mixture of fire or serious injury to 8 parts water). Rinse several times with clear water. • Remove glue residue from using dryer-added fabric softener sheets. These areas...
... • Clean the lint filter after every load. Lint build-up . Remove cleanser residue before drying the next load. • Every 18 months an authorized servicer should clean the dryer cabinet interior and exhaust duct. OUTSIDE • Clean the cabinet with a mixture of fire or serious injury to 8 parts water). Rinse several times with clear water. • Remove glue residue from using dryer-added fabric softener sheets. These areas...
Complete Owner's Guide (English)
Page 17
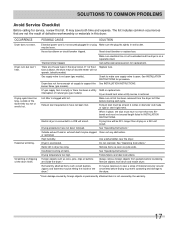
... in INSTALLATION INSTRUCTIONS. Excessive wrinkling. Scratching or chipping of natural gas (gas models). LP gas supply tank is connected to the dryer. *Drum damage caused by the warranty. 17 interruption of the drum finish. Outside exhaust hood or exhaust duct may turn but won't heat. Use a dehumidifier near the dryer. Follow fabric care label instructions. House fuse blown or circuit breaker tripped. Drying cycle takes too long, outside of items. See "Operating Instructions." Thermal limiter tripped. fuses is not open . Dryer...
... in INSTALLATION INSTRUCTIONS. Excessive wrinkling. Scratching or chipping of natural gas (gas models). LP gas supply tank is connected to the dryer. *Drum damage caused by the warranty. 17 interruption of the drum finish. Outside exhaust hood or exhaust duct may turn but won't heat. Use a dehumidifier near the dryer. Follow fabric care label instructions. House fuse blown or circuit breaker tripped. Drying cycle takes too long, outside of items. See "Operating Instructions." Thermal limiter tripped. fuses is not open . Dryer...
Installation Instructions (All Languages)
Page 2
... • External vent hood • 4-inch (102 mm), rigid metal or semi-rigid metal exhaust duct work • 3-wire or 4-wire 240 volt cord kit (electric dryer) • 4 in your gas supplier from a neighbor's phone. do not use gasoline or other flammable vapors and liquids in the vicinity of washer already installed on pedestal. Place all other appliance. These conditions will obstruct clothes dryer airflow...
... • External vent hood • 4-inch (102 mm), rigid metal or semi-rigid metal exhaust duct work • 3-wire or 4-wire 240 volt cord kit (electric dryer) • 4 in your gas supplier from a neighbor's phone. do not use gasoline or other flammable vapors and liquids in the vicinity of washer already installed on pedestal. Place all other appliance. These conditions will obstruct clothes dryer airflow...
Installation Instructions (All Languages)
Page 3
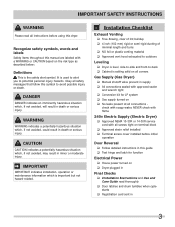
... ‰ Conversion kit for function Electrical Power ‰ House power turned on ‰ Dryer plugged in Final Checks ‰ Installation Instructions and Use and Care Guide read all instructions before initial operation Door Reversal ‰ Follow detailed instructions in this guide ‰ Test hinge and latch for LP system ‰ Gas supply turned on ‰ No leaks present at all connections - IMPORTANT SAFETY INSTRUCTIONS WARNING Please read thoroughly ‰ Door latches and drum tumbles when cycle starts ‰ Registration...
... ‰ Conversion kit for function Electrical Power ‰ House power turned on ‰ Dryer plugged in Final Checks ‰ Installation Instructions and Use and Care Guide read all instructions before initial operation Door Reversal ‰ Follow detailed instructions in this guide ‰ Test hinge and latch for LP system ‰ Gas supply turned on ‰ No leaks present at all connections - IMPORTANT SAFETY INSTRUCTIONS WARNING Please read thoroughly ‰ Door latches and drum tumbles when cycle starts ‰ Registration...

Installation Instructions (All Languages)
Page 4
..., 4-wire power supply cord (NEMA 14-30R). 4 DO NOT operate a washer and a dryer on the same circuit. Individual 30 amp. GROUNDING CONNECTION - time delay fuses or circuit breakers. branch circuit fused with 30 amp. Electrical requirements for washer and dryer. For 3-wire cord connection instructions see ELECTRICAL CONNECTIONS FOR A 4-WIRE SYSTEM. Í NOTE Dryers manufactured for sale in Canada. INSTALLATION REQUIREMENTS Í NOTE Because of potentially inconsistent voltage capabilities, the use of this dryer with power created by gas powered generators, solar powered...
..., 4-wire power supply cord (NEMA 14-30R). 4 DO NOT operate a washer and a dryer on the same circuit. Individual 30 amp. GROUNDING CONNECTION - time delay fuses or circuit breakers. branch circuit fused with 30 amp. Electrical requirements for washer and dryer. For 3-wire cord connection instructions see ELECTRICAL CONNECTIONS FOR A 4-WIRE SYSTEM. Í NOTE Dryers manufactured for sale in Canada. INSTALLATION REQUIREMENTS Í NOTE Because of potentially inconsistent voltage capabilities, the use of this dryer with power created by gas powered generators, solar powered...

Installation Instructions (All Languages)
Page 5
... test pressures equal to natural gas, causing gas leaks. The dryer is equipped with ground, 120 volt, single phase, 60 Hz, Alternating Current. branch circuit fused with the Standard for Connectors for Gas Appliances, ANSI Z21.24. 5 POWER SUPPLY CORD - GROUNDING CONNECTION - Use ONLY black iron, stainless steel, or plastic-coated brass piping for gas dryer CIRCUIT - Individual, properly polarized and grounded 15 amp. time delay fuse or circuit breaker...
... test pressures equal to natural gas, causing gas leaks. The dryer is equipped with ground, 120 volt, single phase, 60 Hz, Alternating Current. branch circuit fused with the Standard for Connectors for Gas Appliances, ANSI Z21.24. 5 POWER SUPPLY CORD - GROUNDING CONNECTION - Use ONLY black iron, stainless steel, or plastic-coated brass piping for gas dryer CIRCUIT - Individual, properly polarized and grounded 15 amp. time delay fuse or circuit breaker...

Installation Instructions (All Languages)
Page 7
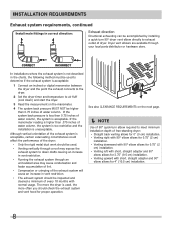
... combustible materials (for example: clothing, draperies/curtains, paper) to assemble the exhaust system. Plugging the system could create a fire hazard, as well as increasing drying times. Regularly inspect the outdoor exhaust opening and in contact with duct tape. MAXIMUM LENGTH of 4" (102mm) Rigid Metal Duct VENT HOOD TYPE (Preferred) Number of lint in the screen, on the screws or rivets, clogging the duct work and creating a fi...
... combustible materials (for example: clothing, draperies/curtains, paper) to assemble the exhaust system. Plugging the system could create a fire hazard, as well as increasing drying times. Regularly inspect the outdoor exhaust opening and in contact with duct tape. MAXIMUM LENGTH of 4" (102mm) Rigid Metal Duct VENT HOOD TYPE (Preferred) Number of lint in the screen, on the screws or rivets, clogging the duct work and creating a fi...
Installation Instructions (All Languages)
Page 8
... exhaust connects to the dryer. 2 Set the dryer timer and temperature to exhaust outlet of water column, the system is used . • Venting vertically through a roof may expose the exhaust system to down ) and start the dryer. 3 Read the measurement on the next page. Í NOTE Use of 90° quick-turn 90° dryer vent elbow directly to air fluff (cool down drafts causing an increase in vent restriction. • Running the exhaust...
... exhaust connects to the dryer. 2 Set the dryer timer and temperature to exhaust outlet of water column, the system is used . • Venting vertically through a roof may expose the exhaust system to down ) and start the dryer. 3 Read the measurement on the next page. Í NOTE Use of 90° quick-turn 90° dryer vent elbow directly to air fluff (cool down drafts causing an increase in vent restriction. • Running the exhaust...

Installation Instructions (All Languages)
Page 17
... instructions in your Use & Care Guide before plugging the power cord into an outlet. 3 Plug the power cord into a grounded outlet. 4 Turn on top of the legs until the dryer is off at the circuit breaker/fuse box. 5 Read the Use & Care Guide provided with 3-prong grounded plug 17 The dryer MUST be level and resting solidly on all four legs. Remove and discard door tape. INSTALLATION INSTRUCTIONS General installation 1 Connect the exhaust duct to check A for future reference. Í NOTE A wiring diagram and technical data sheet...
... instructions in your Use & Care Guide before plugging the power cord into an outlet. 3 Plug the power cord into a grounded outlet. 4 Turn on top of the legs until the dryer is off at the circuit breaker/fuse box. 5 Read the Use & Care Guide provided with 3-prong grounded plug 17 The dryer MUST be level and resting solidly on all four legs. Remove and discard door tape. INSTALLATION INSTRUCTIONS General installation 1 Connect the exhaust duct to check A for future reference. Í NOTE A wiring diagram and technical data sheet...
Installation Instructions (All Languages)
Page 22
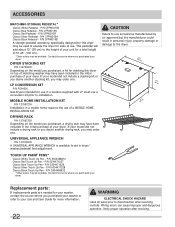
... used to elevate the dryer for use in a mobile home requires the use a conversion kit prior to installation. P/N 5304468812 Classic Red Touch Up Pen - P/N 5304458932 *Other colors may order one . Replacement parts: If replacements parts are needed for your washer, contact the source where you purchased your washer or refer to your Use and Care Guide for stacking this dryer may be available. Wiring errors can cause improper and dangerous operation. LP CONVERSION KIT P/N PCK4200 Gas dryers...
... used to elevate the dryer for use in a mobile home requires the use a conversion kit prior to installation. P/N 5304468812 Classic Red Touch Up Pen - P/N 5304458932 *Other colors may order one . Replacement parts: If replacements parts are needed for your washer, contact the source where you purchased your washer or refer to your Use and Care Guide for stacking this dryer may be available. Wiring errors can cause improper and dangerous operation. LP CONVERSION KIT P/N PCK4200 Gas dryers...

Product Specifications Sheet (English)
Page 2
...-8352 • frigidaire.ca FAQE7001L 04/11 © 2011 Electrolux Home Products, Inc. Height (Single) Height (Stacked) B - Ft.) Controls Dryer Drum Interior Interior Light Door Trim Ready Steam™ DrySense™ Technology Wrinkle Release Technology TimeWise® Technology Moisture Sensor Time Remaining Indicator Cycle Status Lights Cycle Signal Cycle Signal "On/Off " Cycle Signal Volume Control Control Lock Start / Pause / Cancel Buttons Energy Saver Option Delay Start Tumble Speed (RPM) Reversible Door Lint Screen Sound Package Adjustable...
...-8352 • frigidaire.ca FAQE7001L 04/11 © 2011 Electrolux Home Products, Inc. Height (Single) Height (Stacked) B - Ft.) Controls Dryer Drum Interior Interior Light Door Trim Ready Steam™ DrySense™ Technology Wrinkle Release Technology TimeWise® Technology Moisture Sensor Time Remaining Indicator Cycle Status Lights Cycle Signal Cycle Signal "On/Off " Cycle Signal Volume Control Control Lock Start / Pause / Cancel Buttons Energy Saver Option Delay Start Tumble Speed (RPM) Reversible Door Lint Screen Sound Package Adjustable...
Product Specifications Sheet (English)
Page 3
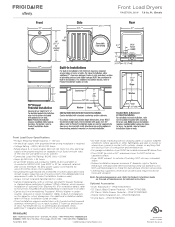
...; Drying Rack - (PN # 137067300). Allow additional 1" clearance between fronts of optional Dryer Stacking Kit. (For installation details, refer to instructions included with optional pedestal or stacking kit or on web.) • Can be located minimum 18" above matching Frigidaire® Affinity Washer, which requires installation of units and closed door. • Do NOT install in undercounter, recessed or closet installation. (Refer to dripping water or outdoor weather conditions; or where dryer comes...
...; Drying Rack - (PN # 137067300). Allow additional 1" clearance between fronts of optional Dryer Stacking Kit. (For installation details, refer to instructions included with optional pedestal or stacking kit or on web.) • Can be located minimum 18" above matching Frigidaire® Affinity Washer, which requires installation of units and closed door. • Do NOT install in undercounter, recessed or closet installation. (Refer to dripping water or outdoor weather conditions; or where dryer comes...


