Use and Care Manual
Page 1
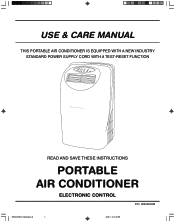
USE & CARE MANUAL THIS PORTABLE AIR CONDITIONER IS EQUIPPED WITH A NEW INDUSTRY STANDARD POWER SUPPLY CORD WITH A TEST-RESET FUNCTION READ AND SAVE THESE INSTRUCTIONS PORTABLE AIR CONDITIONER ELECTRONIC CONTROL P/N 220250d396 SZ000373(En)-YaoKong(p1-5) 1 2004.11.10, 4:54 PM
USE & CARE MANUAL THIS PORTABLE AIR CONDITIONER IS EQUIPPED WITH A NEW INDUSTRY STANDARD POWER SUPPLY CORD WITH A TEST-RESET FUNCTION READ AND SAVE THESE INSTRUCTIONS PORTABLE AIR CONDITIONER ELECTRONIC CONTROL P/N 220250d396 SZ000373(En)-YaoKong(p1-5) 1 2004.11.10, 4:54 PM
Use and Care Manual
Page 2
... authorized servicers to perform service under this warranty must be performed by Frigidaire Consumer Services or an authorized Frigidaire servicer. All of the provisions of parts other than Frigidaire Genuine Renewal Parts; Proper use of the full and limited warranties above . Proper connection to a grounded power supply of sufficient voltage, replacement of blown fuses, repair of God. 4. You may not apply to products in house wiring. 4. ROOM AIR CONDITIONER WARRANTY Your product is...
... authorized servicers to perform service under this warranty must be performed by Frigidaire Consumer Services or an authorized Frigidaire servicer. All of the provisions of parts other than Frigidaire Genuine Renewal Parts; Proper use of the full and limited warranties above . Proper connection to a grounded power supply of sufficient voltage, replacement of blown fuses, repair of God. 4. You may not apply to products in house wiring. 4. ROOM AIR CONDITIONER WARRANTY Your product is...
Use and Care Manual
Page 3
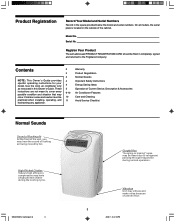
... unit, you may vibrate and make noise because of the cabinet. On all models, the serial plate is located on the outside of uneven floor. 3 2004.11.10, 4:54 PM Model No. Common sense and caution must be heard due to refrigerant passing through evaporator during the cooling cycle. Use the room air conditioner only as instructed in this Owner's Guide. Contents 2 3 3 NOTE: This Owner's Guide provides specific operating instructions...
... unit, you may vibrate and make noise because of the cabinet. On all models, the serial plate is located on the outside of uneven floor. 3 2004.11.10, 4:54 PM Model No. Common sense and caution must be heard due to refrigerant passing through evaporator during the cooling cycle. Use the room air conditioner only as instructed in this Owner's Guide. Contents 2 3 3 NOTE: This Owner's Guide provides specific operating instructions...

Use and Care Manual
Page 4
... circuit breaker, have chosen. To minimize shock and fire hazards, proper grounding is properly grounded. The power cord is a triple-track type with a three-prong grounding plug for details. This could result in removing or reinstalling this manual and the installation instructions for efficient and satisfactory operation. • Install the room air conditioner on the side of the cabinet and behind the grille. • If the air conditioner...
... circuit breaker, have chosen. To minimize shock and fire hazards, proper grounding is properly grounded. The power cord is a triple-track type with a three-prong grounding plug for details. This could result in removing or reinstalling this manual and the installation instructions for efficient and satisfactory operation. • Install the room air conditioner on the side of the cabinet and behind the grille. • If the air conditioner...
Use and Care Manual
Page 5
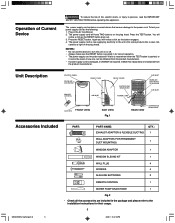
... following: 1. Plug in the Air Conditioner. 2. Press the TEST button. Unit Description CONTROL PANEL ROOM AIR DISCHARGE REMOTE CONTROL REAR COVER AIR INLET FRONT COVER WATER PUMP DRAIN HOSE POWER CORD AIR INLET WARM AIR DISCHARGE TO OUTSIDE AIR INLET CASTORS FRONT VIEW SIDE VIEW Fig.1 REAR VIEW CONTINUOUS DRAIN HOSE Accessories Included PART: PART NAME: QTY.: EXHAUST ADAPTOR & FLEXIBLE DUCTING 1 WALL ADAPTOR (FOR PERMANENT DUCT MOUNTING) 1 WINDOW ADAPTOR 1 WINDOW SLIDING KIT 1 WALL PLUG 4 SCREWS 4 ALKALINE BATTERIES 2 REMOTE CONTROL 1 WATER PUMP DRAIN HOSE 1 Fig...
... following: 1. Plug in the Air Conditioner. 2. Press the TEST button. Unit Description CONTROL PANEL ROOM AIR DISCHARGE REMOTE CONTROL REAR COVER AIR INLET FRONT COVER WATER PUMP DRAIN HOSE POWER CORD AIR INLET WARM AIR DISCHARGE TO OUTSIDE AIR INLET CASTORS FRONT VIEW SIDE VIEW Fig.1 REAR VIEW CONTINUOUS DRAIN HOSE Accessories Included PART: PART NAME: QTY.: EXHAUST ADAPTOR & FLEXIBLE DUCTING 1 WALL ADAPTOR (FOR PERMANENT DUCT MOUNTING) 1 WINDOW ADAPTOR 1 WINDOW SLIDING KIT 1 WALL PLUG 4 SCREWS 4 ALKALINE BATTERIES 2 REMOTE CONTROL 1 WATER PUMP DRAIN HOSE 1 Fig...
Use and Care Manual
Page 6
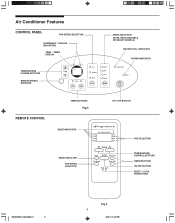
Air Conditioner Features CONTROL PANEL FAN SPEED SELECTION FAHRENHEIT / CELSIUS INDICATORS TEMP / TIMER DISPLAY TEMPERATURE CHANGE BUTTONS REMOTE SIGNAL RECEIVER REMOTE CONTROL TIMER BUTTONS Fig.3 MODE INDICATION MODE SELECTOR FAN SPEED SELECTOR MODE SELECTION (NOTE: HEAT AVAILABLE ON SELECT MODELS) BUCKET FULL INDICATOR POWER INDICATOR ON / OFF BUTTON FAN SELECTION TEMPERATURE CONTROL BUTTONS TIMER BUTTONS ON/OFF BUTTON RESET + LOCK PIN BUTTONS SZ000373(En)-YaoKong(p6-11) 6 Fig.4 6 2004.11.8, 4:02 PM
Air Conditioner Features CONTROL PANEL FAN SPEED SELECTION FAHRENHEIT / CELSIUS INDICATORS TEMP / TIMER DISPLAY TEMPERATURE CHANGE BUTTONS REMOTE SIGNAL RECEIVER REMOTE CONTROL TIMER BUTTONS Fig.3 MODE INDICATION MODE SELECTOR FAN SPEED SELECTOR MODE SELECTION (NOTE: HEAT AVAILABLE ON SELECT MODELS) BUCKET FULL INDICATOR POWER INDICATOR ON / OFF BUTTON FAN SELECTION TEMPERATURE CONTROL BUTTONS TIMER BUTTONS ON/OFF BUTTON RESET + LOCK PIN BUTTONS SZ000373(En)-YaoKong(p6-11) 6 Fig.4 6 2004.11.8, 4:02 PM
Use and Care Manual
Page 7
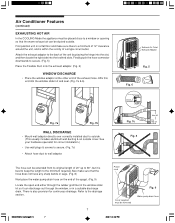
... correct installation.) • Use wall plugs & screws to secure. (Fig. 7c) • Attach hose duct to the minimum required. First position unit on the end of 20" up to a window or opening so that the hose does not have any sharp bends or sags. (Fig. 8) Next place the water pump drain hose on a flat floor and make sure that the warm exhaust air can be removed Water pump drain hose...
... correct installation.) • Use wall plugs & screws to secure. (Fig. 7c) • Attach hose duct to the minimum required. First position unit on the end of 20" up to a window or opening so that the hose does not have any sharp bends or sags. (Fig. 8) Next place the water pump drain hose on a flat floor and make sure that the warm exhaust air can be removed Water pump drain hose...
Use and Care Manual
Page 8
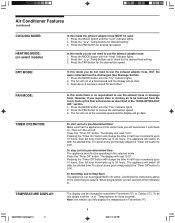
... for desired fan speed. Air Conditioner Features (continued) COOLING MODE: HEATING MODE: (on select models) DRY MODE: In this mode the exhaust adaptor hose MUST be operating in the selected mode. Press the MODE button until the "Heat" indicator lights. 2. The fan will run at any point simply adjust the "Timer Off" button to choose the desired fan speed. 3. The appliance will need when it turns back on after the allotted time. To stop unit at a pre...
... for desired fan speed. Air Conditioner Features (continued) COOLING MODE: HEATING MODE: (on select models) DRY MODE: In this mode the exhaust adaptor hose MUST be operating in the selected mode. Press the MODE button until the "Heat" indicator lights. 2. The fan will run at any point simply adjust the "Timer Off" button to choose the desired fan speed. 3. The appliance will need when it turns back on after the allotted time. To stop unit at a pre...
Use and Care Manual
Page 9
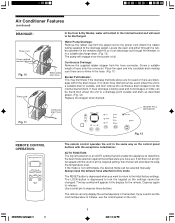
Air Conditioner Features (continued) DRAINAGE: Power cord Cover supplied must be removed Fig. 10 Power cord In the Cool & Dry Modes, water will collect in the internal bucket and will need to the drainage spigot. Locate the open end into a suitable drain making sure there are blockages within the drain hoses. Continuous drain hose BUCKET FULL INDICATOR Fig. 11 REMOTE CONTROL OPERATION: Fig. 12 The remote control operates the unit in the same way as described above are not used , wheel...
Air Conditioner Features (continued) DRAINAGE: Power cord Cover supplied must be removed Fig. 10 Power cord In the Cool & Dry Modes, water will collect in the internal bucket and will need to the drainage spigot. Locate the open end into a suitable drain making sure there are blockages within the drain hoses. Continuous drain hose BUCKET FULL INDICATOR Fig. 11 REMOTE CONTROL OPERATION: Fig. 12 The remote control operates the unit in the same way as described above are not used , wheel...
Use and Care Manual
Page 10
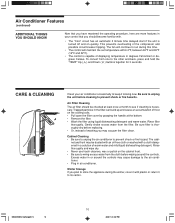
... filter cover by grasping the handle at least once a month to wring excess water from the filter. Air Filter Cleaning The air filter should become familiar with. • The "Cool" circuit has an automatic 3 minute time delayed start if the unit is thoroughly dry before cleaning to the other and back, press and hold the "TEMP" Up ( ) and Down ( ) buttons together for 3 seconds. The fan will maintain the set temperature...
... filter cover by grasping the handle at least once a month to wring excess water from the filter. Air Filter Cleaning The air filter should become familiar with. • The "Cool" circuit has an automatic 3 minute time delayed start if the unit is thoroughly dry before cleaning to the other and back, press and hold the "TEMP" Up ( ) and Down ( ) buttons together for 3 seconds. The fan will maintain the set temperature...
Use and Care Manual
Page 11
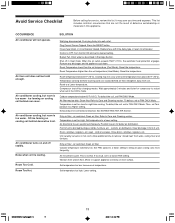
... set too high. Push plug firmly into wall outlet. House fuse blown or circuit breaker tripped. Turn Control ON and set to FAN ONLY Mode. Bucket Full. Straighten away from unit does not feel cold enough. Reset to a lower setting. Compressor shut-off by drapes, blinds, furniture, etc. - Air filter may be dirty. Exhaust duct not connected or blocked. Clean air filter. Doors, windows, registers, etc. air restricted. Room Too Cold. Press the RESET button. Drain water as described in Heat mode...
... set too high. Push plug firmly into wall outlet. House fuse blown or circuit breaker tripped. Turn Control ON and set to FAN ONLY Mode. Bucket Full. Straighten away from unit does not feel cold enough. Reset to a lower setting. Compressor shut-off by drapes, blinds, furniture, etc. - Air filter may be dirty. Exhaust duct not connected or blocked. Clean air filter. Doors, windows, registers, etc. air restricted. Room Too Cold. Press the RESET button. Drain water as described in Heat mode...


