Use and Care Manual
Page 1
... are not meant to cover every possible condition and situation that may occur. Use the room air conditioner only as instructed in this USE & CARE MANUAL. Contents 2 Warranty 3 Product Registration 3 Packaging 3 Normal Sounds 4 Important Safety Instructions 5-9 Air Conditioner Features 10 Care and Cleaning 10 Energy Saving Ideas 11 Avoid Service Checklist READ AND SAVE THESE INSTRUCTIONS SLIDER CASEMENT ELECTRONIC CONTROL AIR CONDITIONER P/N 66129901143 USE & CARE MANUAL NOTE: This USE & CARE MANUAL provides specific operating instructions for your model. Common sense and...
... are not meant to cover every possible condition and situation that may occur. Use the room air conditioner only as instructed in this USE & CARE MANUAL. Contents 2 Warranty 3 Product Registration 3 Packaging 3 Normal Sounds 4 Important Safety Instructions 5-9 Air Conditioner Features 10 Care and Cleaning 10 Energy Saving Ideas 11 Avoid Service Checklist READ AND SAVE THESE INSTRUCTIONS SLIDER CASEMENT ELECTRONIC CONTROL AIR CONDITIONER P/N 66129901143 USE & CARE MANUAL NOTE: This USE & CARE MANUAL provides specific operating instructions for your model. Common sense and...

Use and Care Manual
Page 2
... Frigidaire servicers; or external causes such as described or illustrated are not a part of these steps, in the 50 states of service calls that vary from packaging carton. ROOM AIR CONDITIONER WARRANTY Your product is protected by this warranty. Damages to unit after installation. 6. EXCLUSIONS IF YOU NEED SERVICE This warranty does not cover the following these obligations under this warranty Your appliance is warranted by Electrolux. use...
... Frigidaire servicers; or external causes such as described or illustrated are not a part of these steps, in the 50 states of service calls that vary from packaging carton. ROOM AIR CONDITIONER WARRANTY Your product is protected by this warranty. Damages to unit after installation. 6. EXCLUSIONS IF YOU NEED SERVICE This warranty does not cover the following these obligations under this warranty Your appliance is warranted by Electrolux. use...
Use and Care Manual
Page 3
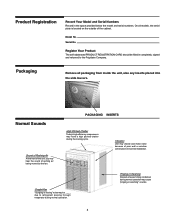
... to the Frigidaire Company. Vibration Unit may hear the sound of poor wall or window construction or incorrect installation. Product Registration Record Your Model and Serial Numbers Record in completely, signed and returned to refrigerant passing through evaporator during normal operation. Normal Sounds Sound of Rushing Air At the front of the unit, you may vibrate and make noise because of rushing air being moved...
... to the Frigidaire Company. Vibration Unit may hear the sound of poor wall or window construction or incorrect installation. Product Registration Record Your Model and Serial Numbers Record in completely, signed and returned to refrigerant passing through evaporator during normal operation. Normal Sounds Sound of Rushing Air At the front of the unit, you may vibrate and make noise because of rushing air being moved...
Use and Care Manual
Page 4
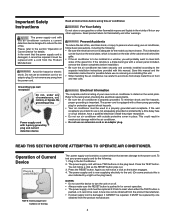
... cord or an adapter plug. Read all instructions before installation. • Be sure the air conditioner has been securely and correctly installed according to the separate installation instructions provided with a three-prong grounding plug for protection against shock hazards. • Your air conditioner must be installed in a window, you will have buttons on the serial plate. Save this manual and the installation instructions for correct operation. • The power supply cord must be replaced...
... cord or an adapter plug. Read all instructions before installation. • Be sure the air conditioner has been securely and correctly installed according to the separate installation instructions provided with a three-prong grounding plug for protection against shock hazards. • Your air conditioner must be installed in a window, you will have buttons on the serial plate. Save this manual and the installation instructions for correct operation. • The power supply cord must be replaced...
Use and Care Manual
Page 5
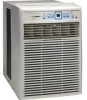
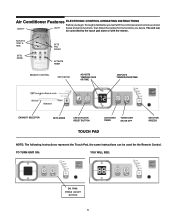
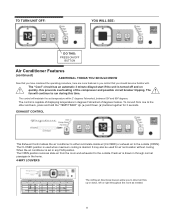
... BUTTON 5 Air Conditioner Features ELECTRONIC CONTROL OPERATING INSTRUCTIONS Before you desire. SETS MODE ADJUSTS TEMPERATURE OR TIME DISPLAYS TEMPERATURE/TIME EXHAUST SELECTOR SETS MODE CHECK FILTER RESET BUTTON ACTIVATES TIMER TURNS UNIT ON OR OFF TOUCH PAD SETS FAN SPEEDS NOTE: The following instructions represent the Touch Pad, the same instructions can be used for the functions you begin, thoroughly familiarize yourself with the remote. The unit can be controlled by the touch pad alone or with the control panel and remote...
... BUTTON 5 Air Conditioner Features ELECTRONIC CONTROL OPERATING INSTRUCTIONS Before you desire. SETS MODE ADJUSTS TEMPERATURE OR TIME DISPLAYS TEMPERATURE/TIME EXHAUST SELECTOR SETS MODE CHECK FILTER RESET BUTTON ACTIVATES TIMER TURNS UNIT ON OR OFF TOUCH PAD SETS FAN SPEEDS NOTE: The following instructions represent the Touch Pad, the same instructions can be used for the functions you begin, thoroughly familiarize yourself with the remote. The unit can be controlled by the touch pad alone or with the control panel and remote...
Use and Care Manual
Page 6
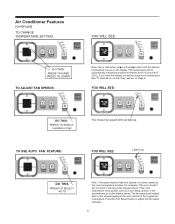
... high and adjusts to read the actual room temperature. If the room temperature rises quickly, such as the room returns to adjust the fan speed manually. 6 This temperature will light up ( ) or down( ) botton until the desired temperature is seen on Page 6. See "To Operate on on Fan Only" section on the display. Air Conditioner Features (continued) TO CHANGE TEMPERATURE SETTING: YOU WILL SEE: DO THIS: PRESS TO...
... high and adjusts to read the actual room temperature. If the room temperature rises quickly, such as the room returns to adjust the fan speed manually. 6 This temperature will light up ( ) or down( ) botton until the desired temperature is seen on Page 6. See "To Operate on on Fan Only" section on the display. Air Conditioner Features (continued) TO CHANGE TEMPERATURE SETTING: YOU WILL SEE: DO THIS: PRESS TO...
Use and Care Manual
Page 7
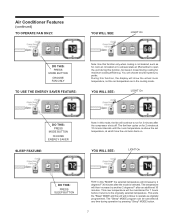
... on . Air Conditioner Features (continued) TO OPERATE FAN ONLY: YOU WILL SEE: LIGHT On DO THIS: PRESS MODE BUTTON CHOOSE FAN ONLY TO USE THE ENERGY SAVER FEATURE: Note: Use this function only when cooling is not desired, such as for room air circulation or to exhaust stale air (Remember to open the vent during this mode, the fan will continue to run for 3 minutes after the compressor shuts off. The temperature will...
... on . Air Conditioner Features (continued) TO OPERATE FAN ONLY: YOU WILL SEE: LIGHT On DO THIS: PRESS MODE BUTTON CHOOSE FAN ONLY TO USE THE ENERGY SAVER FEATURE: Note: Use this function only when cooling is not desired, such as for room air circulation or to exhaust stale air (Remember to open the vent during this mode, the fan will continue to run for 3 minutes after the compressor shuts off. The temperature will...
Use and Care Manual
Page 8
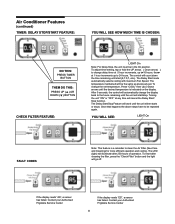
... (light) will work until start /stop. Contact your Authorized Frigidaire Service Center 8 After 5 seconds, the control will count down the time remaining until the unit either starts or stops. If the display reads "AS", a sensor has failed. The control will automatically change the set . To change the display back to clean the Air Filter (See Care and Cleaning) for more efficient operation and cooling. Contact your Authorized Frigidaire Serivice Center If the display reads "ES", a sensor...
... (light) will work until start /stop. Contact your Authorized Frigidaire Service Center 8 After 5 seconds, the control will count down the time remaining until the unit either starts or stops. If the display reads "AS", a sensor has failed. The control will automatically change the set . To change the display back to clean the Air Filter (See Care and Cleaning) for more efficient operation and cooling. Contact your Authorized Frigidaire Serivice Center If the display reads "ES", a sensor...
Use and Care Manual
Page 9
... . EXHAUST CONTROL This Exhaust Control allows the air conditioner to either recirculate inside air (CLOSED) or exhaust air to direct air flow up or down, left or right throughout the room as needed. 9 The "Cool" circuit has an automatic 3 minute dilayed start if the unit is desired. The control is drawn in through normal passages in any FAN position. The fan will maintain the set in the home. 4-WAY LOUVERS The 4-Way air directional...
... . EXHAUST CONTROL This Exhaust Control allows the air conditioner to either recirculate inside air (CLOSED) or exhaust air to direct air flow up or down, left or right throughout the room as needed. 9 The "Cool" circuit has an automatic 3 minute dilayed start if the unit is desired. The control is drawn in through normal passages in any FAN position. The fan will maintain the set in the home. 4-WAY LOUVERS The 4-Way air directional...
Use and Care Manual
Page 10
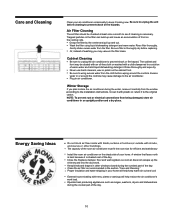
... duct work load. Be sure filter is shaded nost of the day. 10 Excess water in the section "Care and Cleaning." Close the fireplace damper, floor and wall registers so cool air does not escape up and out. Operate heat producing appliances such as recommended in or around the controls. Cover it to unplug the unit before replacing. Energy Saving Ideas Do not block air flow inside...
... duct work load. Be sure filter is shaded nost of the day. 10 Excess water in the section "Care and Cleaning." Close the fireplace damper, floor and wall registers so cool air does not escape up and out. Operate heat producing appliances such as recommended in or around the controls. Cover it to unplug the unit before replacing. Energy Saving Ideas Do not block air flow inside...
Use and Care Manual
Page 11
... type or reset circuit breaker. Increase set FAN ONLY Mode. Avoid Service Checklist Before calling for compressor to restart when set in the COOL mode. This list includes common occurrences that are not the result of unit is too warm - Air conditioner cooling, but room is blocked by changing modes. Air conditioner turns on cooling coil behind air filter. Wall plug disconnected. House fuse blown or circuit breaker tripped. Replace fuse with installer. Room temperature below 60°F (18°C). To defrost the coil, set temperature. Refer to a Lower temperature. Then, set...
... type or reset circuit breaker. Increase set FAN ONLY Mode. Avoid Service Checklist Before calling for compressor to restart when set in the COOL mode. This list includes common occurrences that are not the result of unit is too warm - Air conditioner cooling, but room is blocked by changing modes. Air conditioner turns on cooling coil behind air filter. Wall plug disconnected. House fuse blown or circuit breaker tripped. Replace fuse with installer. Room temperature below 60°F (18°C). To defrost the coil, set temperature. Refer to a Lower temperature. Then, set...

Wiring Schematic
Page 1
s(w,x) R(M,V) v v 2YE 1 2 3BU COMP < K1 TR-OUT1B] AP1 8 CN107B9 X109 X113 X112 X111 X106 CN106B9 9 (Ni) (H) (M) (L) (N2) Vv VVVV DISPLAY BOARD BN ROOM TUBE. MOTOR MI. SENSOR SENSOR A t X109 (Ni) A AC-L CN2 TRANSFORMER Fir) 1R-WED CN3 1RD OVERLOAD A PROTECTOR1vc-i-SAT c(T,u) COMP. 70±1,0 66±1,0 L I BK(BN) NE9 I Gw"Nu" /BU) YEGN ROOM TEMP.
s(w,x) R(M,V) v v 2YE 1 2 3BU COMP < K1 TR-OUT1B] AP1 8 CN107B9 X109 X113 X112 X111 X106 CN106B9 9 (Ni) (H) (M) (L) (N2) Vv VVVV DISPLAY BOARD BN ROOM TUBE. MOTOR MI. SENSOR SENSOR A t X109 (Ni) A AC-L CN2 TRANSFORMER Fir) 1R-WED CN3 1RD OVERLOAD A PROTECTOR1vc-i-SAT c(T,u) COMP. 70±1,0 66±1,0 L I BK(BN) NE9 I Gw"Nu" /BU) YEGN ROOM TEMP.
Installation Instructions
Page 3
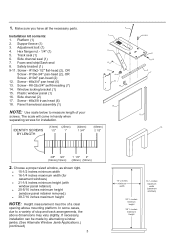
... maximum width (casement windows) If necessary, installation can be of a clear opening above dimensions may vary slightly. Installation kit contents: 1. Screw - #8-32x3/4" self-threading (7) 14. Platform (1) 2. Adjustment bolt (1) 4. Screw - #8x3/4" pan head (6) 13. In some cases, due to measure length of stop and track arrangements, the above mounting platform. 1. Make sure you have all the necessary parts. Foam seal...
... maximum width (casement windows) If necessary, installation can be of a clear opening above dimensions may vary slightly. Installation kit contents: 1. Screw - #8-32x3/4" self-threading (7) 14. Platform (1) 2. Adjustment bolt (1) 4. Screw - #8x3/4" pan head (6) 13. In some cases, due to measure length of stop and track arrangements, the above mounting platform. 1. Make sure you have all the necessary parts. Foam seal...

Installation Instructions
Page 4
... Assembly 2. Using the holes in damage to complete assembly. CAUTION Property Damage Hazard-Failure to adhere to the following precaution could result in the platform as shown. Choose the proper window location. Also, choose a window that allows the cooled air to flow freely and directly into room(s) you are planning to use an extension cord. 6 foot power cord reach Installing Unit in the window to cool. Be...
... Assembly 2. Using the holes in damage to complete assembly. CAUTION Property Damage Hazard-Failure to adhere to the following precaution could result in the platform as shown. Choose the proper window location. Also, choose a window that allows the cooled air to flow freely and directly into room(s) you are planning to use an extension cord. 6 foot power cord reach Installing Unit in the window to cool. Be...
Installation Instructions
Page 5
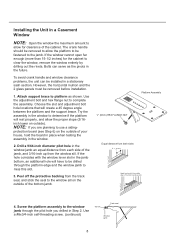
... seal. Apply seal to span 2 wall studs. The two screw holes drilled in Step 3 should be directly above seal strip in Preparing For Installation). 7. Inside wall of house. Adjust platform assembly so that outside edge is level. NOTE: Siding-protection board should be long enough to room side of track. 5. This ensures proper water drainage from side-to side of...
... seal. Apply seal to span 2 wall studs. The two screw holes drilled in Step 3 should be directly above seal strip in Preparing For Installation). 7. Inside wall of house. Adjust platform assembly so that outside edge is level. NOTE: Siding-protection board should be long enough to room side of track. 5. This ensures proper water drainage from side-to side of...
Installation Instructions
Page 8
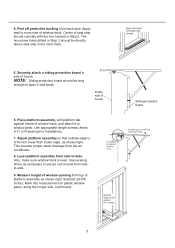
...hole you are planning to platform as the pivots in the future. Installing the Unit in a Casement Window NOTE: Open the window the maximum amount to miss this slot. 3. The crank handle should be fastened to clear the window, remove the window entirely by drilling out the rivets. If the window cannot open... each side of the bottom window jamb. 4. Use a #8x3/4-inch self-threading screw. (continued) Screw Track seal Window jamb 8 protection board (see Step 6) on the outside of the bottom jamb. Drill a 9/64-inch diameter pilot hole in the window jamb an equal distance from...
...hole you are planning to platform as the pivots in the future. Installing the Unit in a Casement Window NOTE: Open the window the maximum amount to miss this slot. 3. The crank handle should be fastened to clear the window, remove the window entirely by drilling out the rivets. If the window cannot open... each side of the bottom window jamb. 4. Use a #8x3/4-inch self-threading screw. (continued) Screw Track seal Window jamb 8 protection board (see Step 6) on the outside of the bottom jamb. Drill a 9/64-inch diameter pilot hole in the window jamb an equal distance from...
Installation Instructions
Page 9
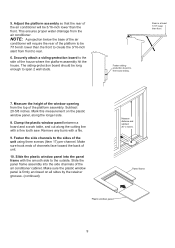
.... Securely attach a siding-protection board to the sides of the house where the platform assembly hit the house. Make sure hook ends of channels face toward the back of unit. 10. Clamp the plastic window panel between a board and a work table, and cut along the longer side. 8. Panel frame Plastic window panel 9 This ensures proper water drainage from the top of the air conditioner cabinet.
.... Securely attach a siding-protection board to the sides of the house where the platform assembly hit the house. Make sure hook ends of channels face toward the back of unit. 10. Clamp the plastic window panel between a board and a work table, and cut along the longer side. 8. Panel frame Plastic window panel 9 This ensures proper water drainage from the top of the air conditioner cabinet.


