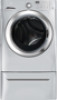
Complete Owner's Guide (English)
Page 2
... washer are labeled with a WARNING or CAUTION based on the risk type as instructed in this manual are found on the washer serial plate located on the inside of all safety messages that follow this manual must be followed to light any appliance. • Do not touch any phone in your gas...
Complete Owner's Guide (English)
Page 4
... not combine laundry products for detailed grounding procedures. Power cord with an electrical overload protector. Failure to 30 minutes, if the washer has not been manually turned off during operation, the washer must never be plugged into the washer while parts are packed in this appliance from the power supply before...
Complete Owner's Guide (English)
Page 11
... fabric care label instructions on items to : • Quick Sanitize • Jeans • Pet Beds • Kids Wear • Stuffed Toys • Active Wear This manual covers many models and not all cycles, options, or features listed are available on select models) Specialty Cycles may include, but not limited to be...
Complete Owner's Guide (English)
Page 18
... washer, perform the Clean Washer cycle. This maintenance cycle uses hot water and two rinses to remove residue that may press the Cancel button to manually perform the cycle at the end of the cycle if this option is recommended for 5 seconds. Control Lock To lock the controls between cycles, press...
Complete Owner's Guide (English)
Page 19
... the latch arm and then (3) press the arm down onto the plastic door strike, snapping it in an outward position. by pulling door out and manually returning latch arm to lower position or by utilizing your washer's vent latch feature. Washer will be displayed at the hinge location.
Complete Owner's Guide (English)
Page 20
.... IMPORTANT Items left after the Clean Washer cycle. Í NOTE If the Clean Washer cycle is cancelled or paused during automated reminder mode or manually select the cycle by following these directions: Rotate cycle knob to Rinse & Spin (or Spin Only, if your models does not have Rinse &..., remove the "MAIN WASH - LIQUID ONLY" cup from the dispenser. Turn cycle selector to Rinse & Spin and then press Clean Washer button to manually perform the cycle at another time. To begin the cycle, press Select when prompted during the cycle, the washer will automatically prompt you to begin...
Complete Owner's Guide (English)
Page 26
... Washer cycle. REMOVE "LIQUID ONLY" DISPENSER CUP IMPORTANT Items left after use or whenever the washer is cancelled or paused during automated reminder mode or manually select the cycle by following these directions: Rotate cycle knob to enter Clean Washer cycle. "MAIN WASH" COMPARTMENT WARNING HARMFUL VAPOR HAZARD Do not use...
Complete Owner's Guide (English)
Page 33
... local electric company. Close door completely. It may produce a thumping sound. To prevent unnecessary noise and damage to 30 minutes (if washer has not been manually turned off). Shipping bolts and foam block have it becomes overheated. OPERATING Washer does not start. in pump. Do not increase fuse capacity. Add 1 or...
Installation Instructions (All Languages)
Page 2
..., operation or maintenance information which , if not avoided, could result in minor or moderate injury. Recognize safety symbols, words and labels Safety items throughout this manual are installed in NEW inlet hoses (shipped in drum) are labeled with cable tie (shipped in drum) Electrical Power House power turned on ...
Installation Instructions (All Languages)
Page 3
...are understood and practiced as a routine with this or any electrical switch; do not use any appliance. IMPORTANT The instructions in this manual must conform with rugs, bedspreads, or plastic sheets can become airtight chambers causing suffocation. IMPORTANT SAFETY INSTRUCTIONS Í NOTE The electrical ..., call your building. • Clear the room, building or area of the National Electrical Code, ANSI/NFPA 70, or in this manual and all occupants. • Immediately call the fire department. Tools and materials needed for future reference. Do not store or use...