Complete Owner's Guide (English)
Page 4
... or stand on the washer. PREVENT INJURY AND DAMAGE TO THE APPLIANCE To prevent serious personal injury and damage to the laundry center, the electrical power cord of electric shock, disconnect this warning can produce poisonous gas - Refer to a complete stop the cycle. Allow the wash tub or dryer drum to coast to INSTALLATION INSTRUCTIONS for use an adaptor plug or extension cord or remove grounding prong from the...
... or stand on the washer. PREVENT INJURY AND DAMAGE TO THE APPLIANCE To prevent serious personal injury and damage to the laundry center, the electrical power cord of electric shock, disconnect this warning can produce poisonous gas - Refer to a complete stop the cycle. Allow the wash tub or dryer drum to coast to INSTALLATION INSTRUCTIONS for use an adaptor plug or extension cord or remove grounding prong from the...
Complete Owner's Guide (English)
Page 8
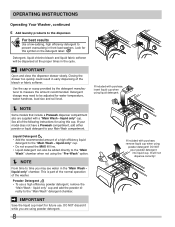
... for water temperature, water hardness, load size and soil level. See all of the bleach or fabric softener. It will be added directly to the "Main Wash" chamber when not using this symbol on the detergent label: Detergent, liquid chlorine bleach and liquid fabric softener will not dispense correctly! If included with purchase, remove liquid cup when using powder detergent. 8 Closing the drawer too quickly could result in front load washers. This is part of the normal operation of a high efficiency liquid detergent...
... for water temperature, water hardness, load size and soil level. See all of the bleach or fabric softener. It will be added directly to the "Main Wash" chamber when not using this symbol on the detergent label: Detergent, liquid chlorine bleach and liquid fabric softener will not dispense correctly! If included with purchase, remove liquid cup when using powder detergent. 8 Closing the drawer too quickly could result in front load washers. This is part of the normal operation of a high efficiency liquid detergent...
Complete Owner's Guide (English)
Page 9
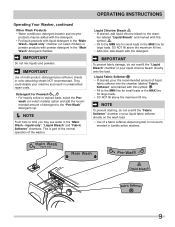
...;ll the "Fabric Softener" chamber or pour liquid fabric softener directly on select models) or powder products with liquid detergent in the "Main Wash - Liquid Chlorine Bleach • If desired, add liquid chlorine bleach to the MIN line for small loads or the MAX line for large loads. liquid only" chamber (on the wash load. • Use of a fabric softener-dispensing ball is part of the normal operation of detergent to the "Pre-Wash" detergent cup. Í NOTE From time to time you may...
...;ll the "Fabric Softener" chamber or pour liquid fabric softener directly on select models) or powder products with liquid detergent in the "Main Wash - Liquid Chlorine Bleach • If desired, add liquid chlorine bleach to the MIN line for small loads or the MAX line for large loads. liquid only" chamber (on the wash load. • Use of a fabric softener-dispensing ball is part of the normal operation of detergent to the "Pre-Wash" detergent cup. Í NOTE From time to time you may...

Complete Owner's Guide (English)
Page 12
...-Sized Clothes Washers The wash water is extra large, the cycle time will occur before the door can be reduced. It is heating, the final temperature of 152° F (67° C) as a follow-up to a no spin if you want to perform a drain only cycle. Please check fabric care labels to prevent damage. Í NOTE Only sanitizing cycles have been omitted in a regular cycle. sanitize Use the...
...-Sized Clothes Washers The wash water is extra large, the cycle time will occur before the door can be reduced. It is heating, the final temperature of 152° F (67° C) as a follow-up to a no spin if you want to perform a drain only cycle. Please check fabric care labels to prevent damage. Í NOTE Only sanitizing cycles have been omitted in a regular cycle. sanitize Use the...

Complete Owner's Guide (English)
Page 13
... cycle. hand wash Use this specialty cycle. quick sanitize Use the quick sanitize cycle to prevent clogging washer drain pump. NSF Protocol P172 Sanitization Performance of steam to prevent deformation of pet hair as an option. Fresh rinse and low spin speed to release stubborn stains. No bleach or harsh chemicals are needed, but higher temperatures are preset selections. IMPORTANT Remove as much of toys are default presets. Wash temperature is cold...
... cycle. hand wash Use this specialty cycle. quick sanitize Use the quick sanitize cycle to prevent clogging washer drain pump. NSF Protocol P172 Sanitization Performance of steam to prevent deformation of pet hair as an option. Fresh rinse and low spin speed to release stubborn stains. No bleach or harsh chemicals are needed, but higher temperatures are preset selections. IMPORTANT Remove as much of toys are default presets. Wash temperature is cold...
Complete Owner's Guide (English)
Page 14
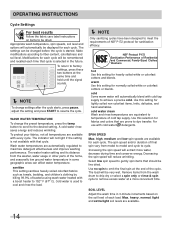
... temp button to scroll to resume the cycle. warm Use this setting for each cycle. The load will reduce wrinkling. The settings can affect water temperature. The spin speed and/or duration of final spin vary from the wash drum to drip dry or select a spin only or rinse & spin cycle to dye transfer. OPERATING INSTRUCTIONS Cycle Settings For best results Follow the fabric care label instructions on the soil level of each time that cycle...
... temp button to scroll to resume the cycle. warm Use this setting for each cycle. The load will reduce wrinkling. The settings can affect water temperature. The spin speed and/or duration of final spin vary from the wash drum to drip dry or select a spin only or rinse & spin cycle to dye transfer. OPERATING INSTRUCTIONS Cycle Settings For best results Follow the fabric care label instructions on the soil level of each time that cycle...
Complete Owner's Guide (English)
Page 16
... washer - delay start Press delay start to select a wash time convenient to your schedule or during loading and unloading. It is normal and not cause for the toughest stains. This maintenance cycle uses hot water and two rinses to remove residue that may press the cancel button to manually perform the cycle at the end of the cycle if this option is opened to illuminate the drum during off the light. control lock...
... washer - delay start Press delay start to select a wash time convenient to your schedule or during loading and unloading. It is normal and not cause for the toughest stains. This maintenance cycle uses hot water and two rinses to remove residue that may press the cancel button to manually perform the cycle at the end of the cycle if this option is opened to illuminate the drum during off the light. control lock...
Complete Owner's Guide (English)
Page 18
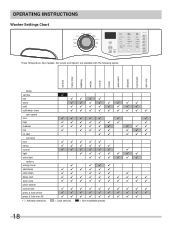
OPERATING INSTRUCTIONS Washer Settings Chart These Temperature, Spin Speeds, Soil Levels and Options are available with the following cycles: sanitize heavy duty bedding whites normal casual quick wash delicates hand wash spin only temp sanitize hot warm cold cold water clean spin speed max high medium low no spin soil level max heavy normal light extra light options energy saver add steam stain clean delay start fresh rinse clean washer control lock press & hold chime press & hold max fill 9 = Available selections. 9 9999 99999999 99999999 999999999...
OPERATING INSTRUCTIONS Washer Settings Chart These Temperature, Spin Speeds, Soil Levels and Options are available with the following cycles: sanitize heavy duty bedding whites normal casual quick wash delicates hand wash spin only temp sanitize hot warm cold cold water clean spin speed max high medium low no spin soil level max heavy normal light extra light options energy saver add steam stain clean delay start fresh rinse clean washer control lock press & hold chime press & hold max fill 9 = Available selections. 9 9999 99999999 99999999 999999999...

Complete Owner's Guide (English)
Page 19
Washer Settings Chart OPERATING INSTRUCTIONS These Temperature, Spin Speeds, Soil Levels and Options are available with the following cycles: specialty cycles sanitize bedding heavy duty whites normal casual quick wash delicates rinse & spin quick sanitize jeans pet beds kids wear stuffed toys hand wash temp sanitize hot warm cold cold water clean spin speed max high medium low no spin soil level max heavy normal light extra light options allergy energy saver add steam stain pretreat pre wash delay start fresh rinse clean washer control lock press & hold light press...
Washer Settings Chart OPERATING INSTRUCTIONS These Temperature, Spin Speeds, Soil Levels and Options are available with the following cycles: specialty cycles sanitize bedding heavy duty whites normal casual quick wash delicates rinse & spin quick sanitize jeans pet beds kids wear stuffed toys hand wash temp sanitize hot warm cold cold water clean spin speed max high medium low no spin soil level max heavy normal light extra light options allergy energy saver add steam stain pretreat pre wash delay start fresh rinse clean washer control lock press & hold light press...
Complete Owner's Guide (English)
Page 20
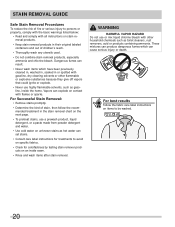
..., use a prewash product, liquid detergent, or a paste made from powder detergent and water. • Use cold water on unknown stains as gasoline, inside seam. • Rinse and wash items after stain removal. For Successful Stain Removal: • Remove stains promptly. • Determine the kind of stain, then follow the recommended treatment in or spotted with flames or sparks. For best results Follow the fabric care label instructions...
..., use a prewash product, liquid detergent, or a paste made from powder detergent and water. • Use cold water on unknown stains as gasoline, inside seam. • Rinse and wash items after stain removal. For Successful Stain Removal: • Remove stains promptly. • Determine the kind of stain, then follow the recommended treatment in or spotted with flames or sparks. For best results Follow the fabric care label instructions...
Complete Owner's Guide (English)
Page 22
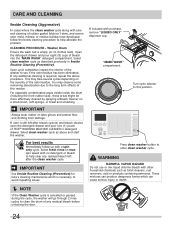
... bleach with purchase, remove "LIQUID ONLY" dispenser cup. If installed, remove the "MAIN WASH - Press clean washer button to this position. For best results use both. "MAIN WASH" compartment. DO NOT use the clean washer cycle once a month. Press START to begin the cycle, press clean washer and then START when prompted during the cycle, the washer will display "SYSTEM CLEAN". Select fresh rinse on max spin speed with no small children present, you may leave the door...
... bleach with purchase, remove "LIQUID ONLY" dispenser cup. If installed, remove the "MAIN WASH - Press clean washer button to this position. For best results use both. "MAIN WASH" compartment. DO NOT use the clean washer cycle once a month. Press START to begin the cycle, press clean washer and then START when prompted during the cycle, the washer will display "SYSTEM CLEAN". Select fresh rinse on max spin speed with no small children present, you may leave the door...
Complete Owner's Guide (English)
Page 24
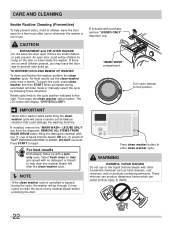
Washer Drum Ensure the wash tub is still left after bleach cycle(s) and bleach cleaner, open the detergent drawer and pour one (1) pouch of TIDE® WASHING MACHINE CLEANER in Inside Routine Cleaning (Preventive). If any residual bleach before unlocking the door. Select fresh rinse on a scrub brush, soft sponge, or towel and scrubbing. "MAIN WASH" compartment. IMPORTANT Always wear rubber or latex gloves and protect floor and clothing from...
Washer Drum Ensure the wash tub is still left after bleach cycle(s) and bleach cleaner, open the detergent drawer and pour one (1) pouch of TIDE® WASHING MACHINE CLEANER in Inside Routine Cleaning (Preventive). If any residual bleach before unlocking the door. Select fresh rinse on a scrub brush, soft sponge, or towel and scrubbing. "MAIN WASH" compartment. IMPORTANT Always wear rubber or latex gloves and protect floor and clothing from...
Complete Owner's Guide (English)
Page 25
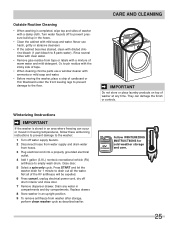
... soap and water. Press START and let the washer drain for cold weather storage and care. 25 Drain any time. Never use a window cleaner with a damp cloth. Rinse several times with clear water. • Remove glue residue from washer after storage, perform clean washer cycle as described earlier. Turn water faucets off drum interior and close door. 7 Remove dispenser drawer. Winterizing Instructions IMPORTANT If the washer is completed, wipe top and sides of washer with ammonia or mild soap and water...
... soap and water. Press START and let the washer drain for cold weather storage and care. 25 Drain any time. Never use a window cleaner with a damp cloth. Rinse several times with clear water. • Remove glue residue from washer after storage, perform clean washer cycle as described earlier. Turn water faucets off drum interior and close door. 7 Remove dispenser drawer. Winterizing Instructions IMPORTANT If the washer is completed, wipe top and sides of washer with ammonia or mild soap and water...
Complete Owner's Guide (English)
Page 29
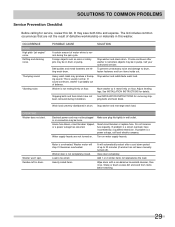
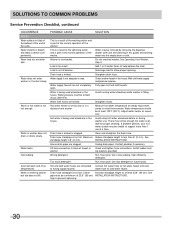
.... If problem is a circuit overload, have not been removed during the spin cycle. Washer won't spin. Residue left in drum. Washer door is usually normal. To prevent unnecessary noise and damage to help balance the load. Adjust leveling legs. Stop washer and redistribute wash load. See INSTALLATION INSTRUCTIONS for service, review this washer. Wash load unevenly distributed in drum. POSSIBLE CAUSE SOLUTION A certain amount of balance. Reset circuit breaker or replace fuse. Water supply faucets are hitting wash drum. Motor is a power outage, call...
.... If problem is a circuit overload, have not been removed during the spin cycle. Washer won't spin. Residue left in drum. Washer door is usually normal. To prevent unnecessary noise and damage to help balance the load. Adjust leveling legs. Stop washer and redistribute wash load. See INSTALLATION INSTRUCTIONS for service, review this washer. Wash load unevenly distributed in drum. POSSIBLE CAUSE SOLUTION A certain amount of balance. Reset circuit breaker or replace fuse. Water supply faucets are hitting wash drum. Motor is a power outage, call...
Complete Owner's Guide (English)
Page 30
... hot water hose to hot water faucet and cold to prevent siphoning. 30 open hot and cold faucets. House drain pipes are kinked. Too much detergent. Stand- Warm or hot water is out of the washer. Water in this guide) and draining water into the empty drum or sink. Washer is part of the normal operation of balance. Adjust water heater as necessary. Oversudsing. ing washers provided. Increase standpipe height to support more than 8' (2.4 m). Run rinse cycle. Water leaks. Water inlet hoses are clogged. Install rubber seal- Hot water...
... hot water hose to hot water faucet and cold to prevent siphoning. 30 open hot and cold faucets. House drain pipes are kinked. Too much detergent. Stand- Warm or hot water is out of the washer. Water in this guide) and draining water into the empty drum or sink. Washer is part of the normal operation of balance. Adjust water heater as necessary. Oversudsing. ing washers provided. Increase standpipe height to support more than 8' (2.4 m). Run rinse cycle. Water leaks. Water inlet hoses are clogged. Install rubber seal- Hot water...
Complete Owner's Guide (English)
Page 31
... authorizes no person to remote areas, including the state of the product (excluding labor) • Wash tub drive motor, non-cosmetic defects - Products purchased "as-is shipped from persons other cosmetic parts. 11. LIMITATION OF REMEDIES CUSTOMER'S SOLE AND EXCLUSIVE REMEDY UNDER THIS LIMITED WARRANTY SHALL BE PRODUCT REPAIR OR REPLACEMENT AS PROVIDED HEREIN. ELECTROLUX SHALL NOT BE LIABLE FOR CONSEQUENTIAL OR INCIDENTAL...
... authorizes no person to remote areas, including the state of the product (excluding labor) • Wash tub drive motor, non-cosmetic defects - Products purchased "as-is shipped from persons other cosmetic parts. 11. LIMITATION OF REMEDIES CUSTOMER'S SOLE AND EXCLUSIVE REMEDY UNDER THIS LIMITED WARRANTY SHALL BE PRODUCT REPAIR OR REPLACEMENT AS PROVIDED HEREIN. ELECTROLUX SHALL NOT BE LIABLE FOR CONSEQUENTIAL OR INCIDENTAL...
Installation Instructions (All Languages)
Page 2
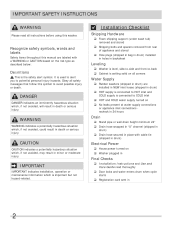
...; Rubber washers (shipped in drum) are labeled with cable tie (shipped in drum) CAUTION CAUTION indicates a potentially hazardous situation which , if not avoided, could result in death or serious injury. Electrical Power ‰ House power turned on ‰ Washer plugged in Final Checks ‰ Installation Instructions and Use and Care Guide read all safety messages that follow this washer. IMPORTANT SAFETY INSTRUCTIONS WARNING Please read thoroughly ‰ Door locks and water enters drum when cycle starts ‰...
...; Rubber washers (shipped in drum) are labeled with cable tie (shipped in drum) CAUTION CAUTION indicates a potentially hazardous situation which , if not avoided, could result in death or serious injury. Electrical Power ‰ House power turned on ‰ Washer plugged in Final Checks ‰ Installation Instructions and Use and Care Guide read all safety messages that follow this washer. IMPORTANT SAFETY INSTRUCTIONS WARNING Please read thoroughly ‰ Door locks and water enters drum when cycle starts ‰...

Installation Instructions (All Languages)
Page 4
... Drain hose attached to have a licensed electrician replace it with a properly grounded three prong grounding type receptacle. Í NOTE Because of local codes, with Power 3-prong gr grounded ounded plug Í NOTE GFI (Ground Fault Interrupter) receptacle is in doubt, call a licensed electrician. INSTALLATION REQUIREMENTS Electrical system requirements CIRCUIT - time delay fuse or circuit breaker. POWER SUPPLY - 2 wire, with power created by a path of your washer's water inlet...
... Drain hose attached to have a licensed electrician replace it with a properly grounded three prong grounding type receptacle. Í NOTE Because of local codes, with Power 3-prong gr grounded ounded plug Í NOTE GFI (Ground Fault Interrupter) receptacle is in doubt, call a licensed electrician. INSTALLATION REQUIREMENTS Electrical system requirements CIRCUIT - time delay fuse or circuit breaker. POWER SUPPLY - 2 wire, with power created by a path of your washer's water inlet...
Installation Instructions (All Languages)
Page 9
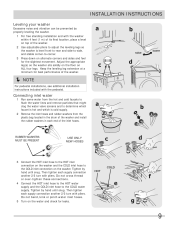
... HOT water supply and the COLD inlet hose to the COLD water supply. Do not bend, kink or pinch water inlet hoses. 5 Turn on the washer. INSTALLATION INSTRUCTIONS Leveling your washer Excessive noise and vibration can be prevented by properly leveling the washer. 1 For free standing installation and with the washer within 4 feet (1 m) of its final location, place a level on top of the washer. 2 Use adjustable pliers to adjust the leveling legs so the washer is cold supply. 2 Remove the inlet hoses and rubber washers...
... HOT water supply and the COLD inlet hose to the COLD water supply. Do not bend, kink or pinch water inlet hoses. 5 Turn on the washer. INSTALLATION INSTRUCTIONS Leveling your washer Excessive noise and vibration can be prevented by properly leveling the washer. 1 For free standing installation and with the washer within 4 feet (1 m) of its final location, place a level on top of the washer. 2 Use adjustable pliers to adjust the leveling legs so the washer is cold supply. 2 Remove the inlet hoses and rubber washers...

Installation Instructions (All Languages)
Page 10
... A wiring diagram and technical data sheet are located under any questions during initial operation, please review the "Service Prevention Checklist" in your Use & Care Guide before calling for service. 8 Place these instructions in a location near the washer for stability. Secure the drain hose with the washer. IMPORTANT Check to ensure the power is off at a circuit breaker/fuse box. 5 Carefully slide the washer to the standpipe, inlet hose, laundry tub, etc. Remove and discard door tape. 6 Read the Use & Care Guide provided...
... A wiring diagram and technical data sheet are located under any questions during initial operation, please review the "Service Prevention Checklist" in your Use & Care Guide before calling for service. 8 Place these instructions in a location near the washer for stability. Secure the drain hose with the washer. IMPORTANT Check to ensure the power is off at a circuit breaker/fuse box. 5 Carefully slide the washer to the standpipe, inlet hose, laundry tub, etc. Remove and discard door tape. 6 Read the Use & Care Guide provided...


