Use and Care Guide
Page 2
...Information For your model. Do not use or store flammable gases near the unit. 2 2009 Electrolux Home Products, Inc. Do not start or stop the operation, disconnect the power cord, and call an authorized Electrolux servicer for repairs. Do not cut or remove the round ground prong...outlet according to use gasoline or other heat related sources as instructed in the vicinity of a malfunction (sparks, burning smell, etc.), immediately stop the dehumidifier by an authorized Electrolux servicer. Always grip the plug firmly and pull straight out from bucket. Do not pinch, bend, ...
...Information For your model. Do not use or store flammable gases near the unit. 2 2009 Electrolux Home Products, Inc. Do not start or stop the operation, disconnect the power cord, and call an authorized Electrolux servicer for repairs. Do not cut or remove the round ground prong...outlet according to use gasoline or other heat related sources as instructed in the vicinity of a malfunction (sparks, burning smell, etc.), immediately stop the dehumidifier by an authorized Electrolux servicer. Always grip the plug firmly and pull straight out from bucket. Do not pinch, bend, ...
Use and Care Guide
Page 6
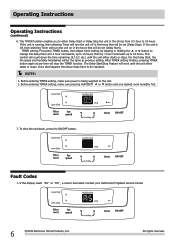
... has failed. Once that happens the above steps have to 24 hours. Contact your Authorized Frigidaire Service Center. 6 2009 Electrolux Home Products, Inc. For the Delay Start, the fan speed and humidity maintained will be set (Delay Stop). TIMER setting: First press TIMER button, then adjust timer setting, by 1 hour increments up to...
... has failed. Once that happens the above steps have to 24 hours. Contact your Authorized Frigidaire Service Center. 6 2009 Electrolux Home Products, Inc. For the Delay Start, the fan speed and humidity maintained will be set (Delay Stop). TIMER setting: First press TIMER button, then adjust timer setting, by 1 hour increments up to...
Use and Care Guide
Page 8
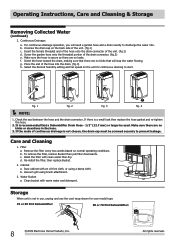
Continuous Drainage: a. For continuous drainage operation, you will stop the water flowing. fig. 1 fig. 2 fig. 3 fig. 4 NOTE: 1. If there is not chosen, the drain cap must be used. b. d. Clean bucket with clean water then ... of the unit. (fig.2) d. Re-install the filter, then replace Bucket. 2. Storage When unit is recommended that will need a garden hose and a drain nearby to start. b. Select the desired humidity setting and fan speed on the back side of the unit. (fig.1) c. Check the seal between the hose and the drain...
Continuous Drainage: a. For continuous drainage operation, you will stop the water flowing. fig. 1 fig. 2 fig. 3 fig. 4 NOTE: 1. If there is not chosen, the drain cap must be used. b. d. Clean bucket with clean water then ... of the unit. (fig.2) d. Re-install the filter, then replace Bucket. 2. Storage When unit is recommended that will need a garden hose and a drain nearby to start. b. Select the desired humidity setting and fan speed on the back side of the unit. (fig.1) c. Check the seal between the hose and the drain...


