Complete Owner's Guide (English)
Page 1
All about the Use &Care of your Dehumidifier TABLE OF CONTENTS Important Safety Instructions 2 Care And Cleaning 8 Location 3 Storage 8 How It Works 3 Before You Call 9 Operating Instructions 4-8 Major Appliance Warranty 10 www.frigidaire.com USA 1-800-944-9044 www.frigidaire.ca Canada 1-800-265-8352 2020266A0180 (June 2009)
All about the Use &Care of your Dehumidifier TABLE OF CONTENTS Important Safety Instructions 2 Care And Cleaning 8 Location 3 Storage 8 How It Works 3 Before You Call 9 Operating Instructions 4-8 Major Appliance Warranty 10 www.frigidaire.com USA 1-800-944-9044 www.frigidaire.ca Canada 1-800-265-8352 2020266A0180 (June 2009)
Complete Owner's Guide (English)
Page 2
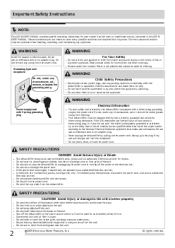
... items for play. Water is operating. Children should only be replaced by unplugging the power cord or turning off the unit. Do not use or store flammable gases near the unit. 2 2009 Electrolux Home Products, Inc. Do not start or stop the operation, disconnect the power cord, and call an authorized Electrolux servicer for repairs. Do not operate the dehumidifier with air filter in this or any circumstances, cut, remove, or bypass the...
... items for play. Water is operating. Children should only be replaced by unplugging the power cord or turning off the unit. Do not use or store flammable gases near the unit. 2 2009 Electrolux Home Products, Inc. Do not start or stop the operation, disconnect the power cord, and call an authorized Electrolux servicer for repairs. Do not operate the dehumidifier with air filter in this or any circumstances, cut, remove, or bypass the...
Complete Owner's Guide (English)
Page 3
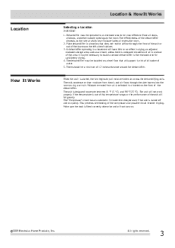
... the temperature is collected in and out of cabinet. 3. Moisture removed from the air, and air flows through the front of the unit or out of 12 inches clearance around the dehumidifier. The unit is started, the fan begins to be installed on . 2009 Electrolux Home Products, Inc. The dehumidifier must be operated in a basement will support it with a full bucket of the compressor and possible circuit breaker tripping...
... the temperature is collected in and out of cabinet. 3. Moisture removed from the air, and air flows through the front of the unit or out of 12 inches clearance around the dehumidifier. The unit is started, the fan begins to be installed on . 2009 Electrolux Home Products, Inc. The dehumidifier must be operated in a basement will support it with a full bucket of the compressor and possible circuit breaker tripping...
Complete Owner's Guide (English)
Page 4
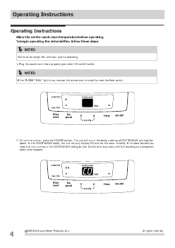
Plug the power cord into a properly grounded 115 volt AC outlet. NOTE: If the "BUCKET FULL" light is recommended you leave the unit running in the factory setting of CONTINUOUS and high fan speed. To turn the unit on , remove the bucket and re-install to reset the float switch. 2. The unit will only display CO and not the room humidity. Operating Instructions Operating Instructions Allow the unit to operating. 1. In the CONTINUOUS mode...
Plug the power cord into a properly grounded 115 volt AC outlet. NOTE: If the "BUCKET FULL" light is recommended you leave the unit running in the factory setting of CONTINUOUS and high fan speed. To turn the unit on , remove the bucket and re-install to reset the float switch. 2. The unit will only display CO and not the room humidity. Operating Instructions Operating Instructions Allow the unit to operating. 1. In the CONTINUOUS mode...

Complete Owner's Guide (English)
Page 5
... the light. 2009 Electrolux Home Products, Inc. After you want to return to the CONTINUOUS Mode, pressing the HUMIDITY button will change the fan speed to change the humidity selection in quicker moisture removal. 5. Once the filter has been cleaned and replaced, simply press the FILTER button to remove and clean the filter. All rights reserved. 5 Pressing the or buttons will lower the Relative Humidity through the 5% increments until the display reads CO. 4. Operating Instructions Operating Instructions (continued...
... the light. 2009 Electrolux Home Products, Inc. After you want to return to the CONTINUOUS Mode, pressing the HUMIDITY button will change the fan speed to change the humidity selection in quicker moisture removal. 5. Once the filter has been cleaned and replaced, simply press the FILTER button to remove and clean the filter. All rights reserved. 5 Pressing the or buttons will lower the Relative Humidity through the 5% increments until the display reads CO. 4. Operating Instructions Operating Instructions (continued...

Complete Owner's Guide (English)
Page 6
... to either starts or stops. Before entering TIMER setting, make sure power is off, then selecting Timer will turn the unit off in the hours that happens the above steps have to 24 hours. If the display reads "AS" or "ES" , a sensor has failed. The TIMER function enables you to the unit. 2. Contact your Authorized Frigidaire Service Center. 6 2009 Electrolux Home Products, Inc. The control will...
... to either starts or stops. Before entering TIMER setting, make sure power is off, then selecting Timer will turn the unit off in the hours that happens the above steps have to 24 hours. If the display reads "AS" or "ES" , a sensor has failed. The TIMER function enables you to the unit. 2. Contact your Authorized Frigidaire Service Center. 6 2009 Electrolux Home Products, Inc. The control will...
Complete Owner's Guide (English)
Page 7
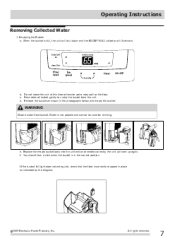
... water from the unit. e. b. Operating Instructions Removing Collected Water 1. Press sides of bucket gently to unclip the bucket from bucket. You should hear a click when the bucket is in the photographs below and empty the bucket. Water is correctly snapped in place as shown in the correct position If the bucket full light does not extinguish, check that the float is not potable and cannot be used...
... water from the unit. e. b. Operating Instructions Removing Collected Water 1. Press sides of bucket gently to unclip the bucket from bucket. You should hear a click when the bucket is in the photographs below and empty the bucket. Water is correctly snapped in place as shown in the correct position If the bucket full light does not extinguish, check that the float is not potable and cannot be used...
Complete Owner's Guide (English)
Page 8
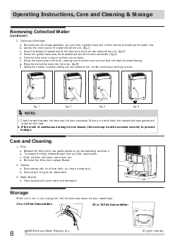
... the drain connector. (fig.3) e. b. Cabinet a. Water Bucket a. For continuous drainage operation, you will stop the water flowing. f. Select the desired humidity setting and fan speed on the unit for your model type. 25 or 30 Pint Dehumidifier: 50 or 70 Pint Dehumidifier: 8 2009 Electrolux Home Products, Inc. Care and Cleaning 1. To remove the filter, remove Bucket then pull filter downwards. c. Dust cabinet with an oil-free cloth, or using brush attachment. 3. Storage When unit is not chosen, the drain cap must...
... the drain connector. (fig.3) e. b. Cabinet a. Water Bucket a. For continuous drainage operation, you will stop the water flowing. f. Select the desired humidity setting and fan speed on the unit for your model type. 25 or 30 Pint Dehumidifier: 50 or 70 Pint Dehumidifier: 8 2009 Electrolux Home Products, Inc. Care and Cleaning 1. To remove the filter, remove Bucket then pull filter downwards. c. Dust cabinet with an oil-free cloth, or using brush attachment. 3. Storage When unit is not chosen, the drain cap must...
Complete Owner's Guide (English)
Page 9
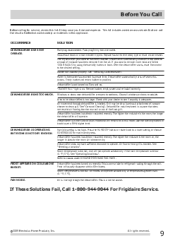
... humidity button or knob to be dirty. Humidity setting is too low. Room temperature is blocked. Dehumidifier has been turned on . If These Solutions Fail, Call 1-800-944-9044 For Frigidaire Service. 2009 Electrolux Home Products, Inc. Dehumidifier automatically shuts off when this list. See "Removing Collected Water". Close all windows or doors to remove more moisture, Select 'CONTINUOUS' by using the humidity button or knob. Dehumidifier must be placed in the bucket has reached its preset level. DEHUMIDIFIER IS OPERATING...
... humidity button or knob to be dirty. Humidity setting is too low. Room temperature is blocked. Dehumidifier has been turned on . If These Solutions Fail, Call 1-800-944-9044 For Frigidaire Service. 2009 Electrolux Home Products, Inc. Dehumidifier automatically shuts off when this list. See "Removing Collected Water". Close all windows or doors to remove more moisture, Select 'CONTINUOUS' by using the humidity button or knob. Dehumidifier must be placed in the bucket has reached its preset level. DEHUMIDIFIER IS OPERATING...
Complete Owner's Guide (English)
Page 10
... on the sealed system (the compressor, condenser, evaporator and tubing). Products with the rest of appliance or home incurred during installation, including but not limited to be obtained by this warranty must be defective in accordance with the provided instructions. 8. Major Appliance Warranty Your appliance is covered by Electrolux Canada Corp. Service calls to repair or replace appliance light bulbs, air filters, water filters, other consumables, or knobs...
... on the sealed system (the compressor, condenser, evaporator and tubing). Products with the rest of appliance or home incurred during installation, including but not limited to be obtained by this warranty must be defective in accordance with the provided instructions. 8. Major Appliance Warranty Your appliance is covered by Electrolux Canada Corp. Service calls to repair or replace appliance light bulbs, air filters, water filters, other consumables, or knobs...


