Use and Care Guide
Page 30
... the "Self-Cleaning" section for more detailed information. • Dirty front oven frame outside oven door gasket area. Review instructions for self-clean. These areas are present see "Broiling" in the socket. 30 Old grease or food spatters cause excessive smoking. • Oven control not set properly for "Quick Bake" in "Setting...
... the "Self-Cleaning" section for more detailed information. • Dirty front oven frame outside oven door gasket area. Review instructions for self-clean. These areas are present see "Broiling" in the socket. 30 Old grease or food spatters cause excessive smoking. • Oven control not set properly for "Quick Bake" in "Setting...

Installation Instructions
Page 3
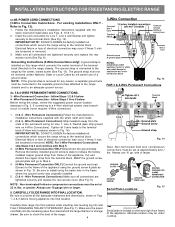
...loosened or removed. 3. Cord must be connected by means of the appliance with the eyelet to Fig.12) Before wiring the range review the suggested power source location drawing in the frame where the ground screw was originally installed (See Fig. 12). 5. for cord...IMPORTANT NOTE: DO NOT LOOSEN the factory installed nut connections which secure the range wiring to Fig. 9. Electrical failure or loss of wires must have strain relief properly installed. INSTALLATION INSTRUCTIONS FOR FREESTANDING ELECTRIC RANGE 2b. This appliance may occur if these 3 nuts are tightened securely and ...
...loosened or removed. 3. Cord must be connected by means of the appliance with the eyelet to Fig.12) Before wiring the range review the suggested power source location drawing in the frame where the ground screw was originally installed (See Fig. 12). 5. for cord...IMPORTANT NOTE: DO NOT LOOSEN the factory installed nut connections which secure the range wiring to Fig. 9. Electrical failure or loss of wires must have strain relief properly installed. INSTALLATION INSTRUCTIONS FOR FREESTANDING ELECTRIC RANGE 2b. This appliance may occur if these 3 nuts are tightened securely and ...
Installation Instructions
Page 4
... leveling leg into the remaining open floor area behind the range Warmer or storage drawer. Always use 10 ga. Be sure to the range by the center, lowest screw (See Fig. 13). INSTALLATION INSTRUCTIONS FOR FREESTANDING ELECTRIC RANGE or 4B. NOTE: If the ground strap is connected...) Disconnect the ground strap. POWER CORD CONNECTIONS (3-Wire Connection Instructions . Always use 10 gauge wire or larger. 5. Before wiring the range, review the suggested power source location drawings in Fig. 15. IMPORTANT NOTE: DO NOT LOOSEN the factory installed nut connections which secure the...
... leveling leg into the remaining open floor area behind the range Warmer or storage drawer. Always use 10 ga. Be sure to the range by the center, lowest screw (See Fig. 13). INSTALLATION INSTRUCTIONS FOR FREESTANDING ELECTRIC RANGE or 4B. NOTE: If the ground strap is connected...) Disconnect the ground strap. POWER CORD CONNECTIONS (3-Wire Connection Instructions . Always use 10 gauge wire or larger. 5. Before wiring the range, review the suggested power source location drawings in Fig. 15. IMPORTANT NOTE: DO NOT LOOSEN the factory installed nut connections which secure the...
