
Complete Owner's Guide
Page 1
All about the Use &Care of your Portable Air Conditioner TABLE OF CONTENTS Important Safety Instructions 2-3 Product Registration 4 Normal Sounds 4 Unit Description 5 Accessories Included 5 Installation Instructions 6-7 Air Conditioner Features 8 Operating Instructions 9-11 Care and Cleaning 11 Before You Call 12 Major Appliance Limited Warranty 13 www.frigidaire.com USA 1-800-944-9044 www.frigidaire.ca Canada 1-800-265-8352 2020252A1054 (June 2009)
All about the Use &Care of your Portable Air Conditioner TABLE OF CONTENTS Important Safety Instructions 2-3 Product Registration 4 Normal Sounds 4 Unit Description 5 Accessories Included 5 Installation Instructions 6-7 Air Conditioner Features 8 Operating Instructions 9-11 Care and Cleaning 11 Before You Call 12 Major Appliance Limited Warranty 13 www.frigidaire.com USA 1-800-944-9044 www.frigidaire.ca Canada 1-800-265-8352 2020252A1054 (June 2009)
Complete Owner's Guide
Page 2
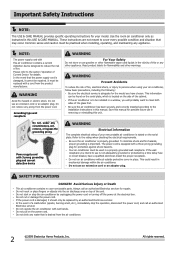
... appliance. WARNING Avoid fire hazard or electric shock. Grounding type wall receptacle Do not, under any prong from the product manufacturer. Do not run air conditioner without outside protective cover in mechanical damage within the air conditioner. SAFETY PRECAUTIONS DANGER! Do not operate the air conditioner with a cord from the power cord. Use the room air conditioner only as instructed in removing or reinstalling this air conditioner contains a current detection device designed to...
... appliance. WARNING Avoid fire hazard or electric shock. Grounding type wall receptacle Do not, under any prong from the product manufacturer. Do not run air conditioner without outside protective cover in mechanical damage within the air conditioner. SAFETY PRECAUTIONS DANGER! Do not operate the air conditioner with a cord from the power cord. Use the room air conditioner only as instructed in removing or reinstalling this air conditioner contains a current detection device designed to...

Complete Owner's Guide
Page 3
... product manufacturer. READ THIS SECTION BEFORE ATTEMPTING TO OPERATE AIR CONDITIONER. Unit must be used for any electrical/electronic equipment is pushed in & press RESET The power supply cord contains a current device that any damage. To test your power supply cord do the following: Plug in place. Press the RESET button. The power supply cord is damaged, it cannot be replaced by one hour prior to turn the unit on the plug...
... product manufacturer. READ THIS SECTION BEFORE ATTEMPTING TO OPERATE AIR CONDITIONER. Unit must be used for any electrical/electronic equipment is pushed in & press RESET The power supply cord contains a current device that any damage. To test your power supply cord do the following: Plug in place. Press the RESET button. The power supply cord is damaged, it cannot be replaced by one hour prior to turn the unit on the plug...
Complete Owner's Guide
Page 4
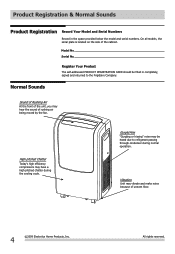
... the front of rushing air being moved by the fan. All rights reserved. Model No. Vibration Unit may have a high pitched chatter during normal operation. Serial No. Product Registration & Normal Sounds Product Registration Record Your Model and Serial Numbers Record in completely, signed and returned to refrigerant passing through condenser during the cooling cycle. High pitched Chatter Today's high efficiency compressors may vibrate and make...
... the front of rushing air being moved by the fan. All rights reserved. Model No. Vibration Unit may have a high pitched chatter during normal operation. Serial No. Product Registration & Normal Sounds Product Registration Record Your Model and Serial Numbers Record in completely, signed and returned to refrigerant passing through condenser during the cooling cycle. High pitched Chatter Today's high efficiency compressors may vibrate and make...
Complete Owner's Guide
Page 5
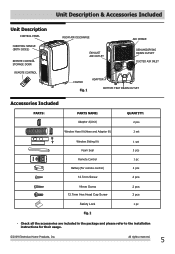
All rights reserved. 5 Unit Description & Accessories Included Unit Description CONTROL PANEL CARRYING HANDLE (BOTH SIDES) REMOTE CONTROL STORAGE DOOR REMOTE CONTROL ROOM AIR DISCHARGE EXHAUST AIR OUTLET AIR INTAKE DEHUMIDIFYING DRAIN OUTLET DUCTED AIR INLET CASTOR Fig. 1 ADAPTOR A BOTTOM TRAY DRAIN OUTLET Accessories Included PARTS: PARTS NAME: Adaptor A(Unit) QUANTITY: 2 pcs Window Hose Kit(Hose and Adaptor B) 2 set Window Sliding Kit Foam Seal Remote Control Battery(For remote control) 12.7mm Screw 19mm Screw 12.7mm Hex Head Cap Screw Safety...
All rights reserved. 5 Unit Description & Accessories Included Unit Description CONTROL PANEL CARRYING HANDLE (BOTH SIDES) REMOTE CONTROL STORAGE DOOR REMOTE CONTROL ROOM AIR DISCHARGE EXHAUST AIR OUTLET AIR INTAKE DEHUMIDIFYING DRAIN OUTLET DUCTED AIR INLET CASTOR Fig. 1 ADAPTOR A BOTTOM TRAY DRAIN OUTLET Accessories Included PARTS: PARTS NAME: Adaptor A(Unit) QUANTITY: 2 pcs Window Hose Kit(Hose and Adaptor B) 2 set Window Sliding Kit Foam Seal Remote Control Battery(For remote control) 12.7mm Screw 19mm Screw 12.7mm Hex Head Cap Screw Safety...

Complete Owner's Guide
Page 6
... sure that the air outside could be ducted inside the unit and the warm exhaust air can be ducted outside. Extend the other end(without adaptor) of the hoses (Fig. 4) and screw it is within the vicinity of a single circuit outlet power source. 1. Installation Instructions Installation Instructions HOSES INSTALLATION In the COOLING Mode the appliance must be placed close to a window or opening so that the hose does not...
... sure that the air outside could be ducted inside the unit and the warm exhaust air can be ducted outside. Extend the other end(without adaptor) of the hoses (Fig. 4) and screw it is within the vicinity of a single circuit outlet power source. 1. Installation Instructions Installation Instructions HOSES INSTALLATION In the COOLING Mode the appliance must be placed close to a window or opening so that the hose does not...

Complete Owner's Guide
Page 7
...open gap between the top window sash and outer window sash, as shown.(Fig.20) Foam seal (adhesive type) Window stool 67.5cm~123cm Window stool Fig. 12 Fig. 16 Window slider kit screws Fig. 17 Window slider kit Foam seal Fig. 19 2009 Electrolux Home Products, Inc. Drive two 12.7 mm screws to secure the window slider kit to the window...window sash securely against the window slider kit. (Fig. 18) 4. See Fig.17. Screw down the two screws on the window slider kit. Cut the foam seal to the height of window. Installation Instructions Installation Instructions (continued) Installation ...
...open gap between the top window sash and outer window sash, as shown.(Fig.20) Foam seal (adhesive type) Window stool 67.5cm~123cm Window stool Fig. 12 Fig. 16 Window slider kit screws Fig. 17 Window slider kit Foam seal Fig. 19 2009 Electrolux Home Products, Inc. Drive two 12.7 mm screws to secure the window slider kit to the window...window sash securely against the window slider kit. (Fig. 18) 4. See Fig.17. Screw down the two screws on the window slider kit. Cut the foam seal to the height of window. Installation Instructions Installation Instructions (continued) Installation ...
Complete Owner's Guide
Page 8
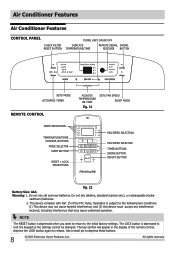
.... Air Conditioner Features Air Conditioner Features CONTROL PANEL CHECK FILTER RESET BUTTON TURNS UNIT ON OR OFF DISPLAYS TEMPERATURE/TIME REMOTE SIGNAL SWING RECEIVER BUTTON SETS MODE ACTIVATES TIMER REMOTE CONTROL ADJUSTS TEMPERATURE OR TIME Fig. 21 SETS FAN SPEED SLEEP MODE MODE INDICATION TEMPERATURE/TIMER CONTROL BUTTONS MODE SELECTOR SLEEP BUTTON RESET + LOCK PIN BUTTONS FAN SPEED SELECTION FAN SPEED SELECTOR TIMER BUTTONS SWING BUTTON ON/OFF BUTTON Fig. 22 Battery Size: AAA Warning: 1. Operation is subject to depress these buttons. 8 2009 Electrolux Home Products, Inc...
.... Air Conditioner Features Air Conditioner Features CONTROL PANEL CHECK FILTER RESET BUTTON TURNS UNIT ON OR OFF DISPLAYS TEMPERATURE/TIME REMOTE SIGNAL SWING RECEIVER BUTTON SETS MODE ACTIVATES TIMER REMOTE CONTROL ADJUSTS TEMPERATURE OR TIME Fig. 21 SETS FAN SPEED SLEEP MODE MODE INDICATION TEMPERATURE/TIMER CONTROL BUTTONS MODE SELECTOR SLEEP BUTTON RESET + LOCK PIN BUTTONS FAN SPEED SELECTION FAN SPEED SELECTOR TIMER BUTTONS SWING BUTTON ON/OFF BUTTON Fig. 22 Battery Size: AAA Warning: 1. Operation is subject to depress these buttons. 8 2009 Electrolux Home Products, Inc...
Complete Owner's Guide
Page 9
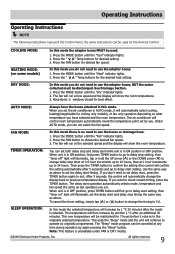
... Products, Inc. AUTO MODE: Always have selected and the room temperature. The delay start operation automatically selects mode, temperature and fan speed the same as originally programmed. Press the FAN button for 7 hours before it will control room temperature automatically round the temperature point set by 1 °C 30 minutes after an additional 30 minutes. Press the MODE button until the "Cool" indicator lights. 2. The air conditioner will automatically select cooling, heating(inapplicable for cooling only models), or fan...
... Products, Inc. AUTO MODE: Always have selected and the room temperature. The delay start operation automatically selects mode, temperature and fan speed the same as originally programmed. Press the FAN button for 7 hours before it will control room temperature automatically round the temperature point set by 1 °C 30 minutes after an additional 30 minutes. Press the MODE button until the "Cool" indicator lights. 2. The air conditioner will automatically select cooling, heating(inapplicable for cooling only models), or fan...
Complete Owner's Guide
Page 10
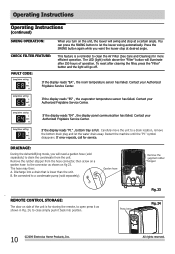
... hose Remove the supplied rubber stopper REMOTE CONTROL STORAGE: The door on side of operation. You can press the SWING button to a drain location, remove the bottom drain plug and let the water drain away. This feature is lower than the unit. To reset after cleaning the filter, press the "Filter" button and the light will illuminate after 250 hours of the unit is full. If the display reads "EA" , the room temperature sensor has...
... hose Remove the supplied rubber stopper REMOTE CONTROL STORAGE: The door on side of operation. You can press the SWING button to a drain location, remove the bottom drain plug and let the water drain away. This feature is lower than the unit. To reset after cleaning the filter, press the "Filter" button and the light will illuminate after 250 hours of the unit is full. If the display reads "EA" , the room temperature sensor has...
Complete Owner's Guide
Page 11
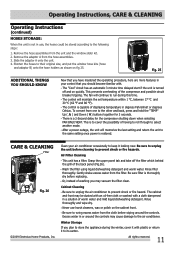
..., instead of the back panel (Fig.26). Winter Storage If you plan to the other and back, press and hold the "TEMP" Up ( ) and Down ( ) buttons together for the compressor shutting down when selecting FAN ONLY/HEAT. CARE & CLEANING Filter Fig. 26 2009 Electrolux Home Products, Inc. Operating Instructions, CARE & CLEANING Operating Instructions (continued) HOSES STORAGE: When the unit is thoroughly dry before replacing. Fig. 25 ADDITIONAL THINGS...
..., instead of the back panel (Fig.26). Winter Storage If you plan to the other and back, press and hold the "TEMP" Up ( ) and Down ( ) buttons together for the compressor shutting down when selecting FAN ONLY/HEAT. CARE & CLEANING Filter Fig. 26 2009 Electrolux Home Products, Inc. Operating Instructions, CARE & CLEANING Operating Instructions (continued) HOSES STORAGE: When the unit is thoroughly dry before replacing. Fig. 25 ADDITIONAL THINGS...
Complete Owner's Guide
Page 12
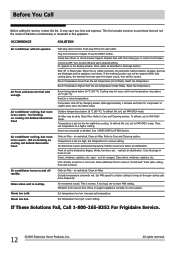
... changing modes. Noise when unit is normal. Wall plug disconnected. Push plug firmly into wall outlet. Drain water as described in Heat mode. If the heating function can not be dirty. Room temperature below 16 °C (60 °F). Clean filter. air restricted. Air directional louvers positioned improperly. air restricted. This is cooling. lncrease set FAN ONLY mode. All rights reserved. NO ice forming on cooling coil behind decorative front. Room too hot. Press the RESET button. Replace fuse with time delay type or reset circuit breaker...
... changing modes. Noise when unit is normal. Wall plug disconnected. Push plug firmly into wall outlet. Drain water as described in Heat mode. If the heating function can not be dirty. Room temperature below 16 °C (60 °F). Clean filter. air restricted. Air directional louvers positioned improperly. air restricted. This is cooling. lncrease set FAN ONLY mode. All rights reserved. NO ice forming on cooling coil behind decorative front. Room too hot. Press the RESET button. Replace fuse with time delay type or reset circuit breaker...
Complete Owner's Guide
Page 13
... for service and parts under this warranty must be required. Exclusions This warranty does not cover the following: 1. Products with the provided instructions. Service calls to correct the installation of your appliance is warranted by unauthorized service companies; Service calls to repair or replace appliance light bulbs, air filters, water filters, other consumables, or knobs, handles, or other than those covered under the Sealed Refrigeration System 5-year warranty. Damages to any removal, transportation...
... for service and parts under this warranty must be required. Exclusions This warranty does not cover the following: 1. Products with the provided instructions. Service calls to correct the installation of your appliance is warranted by unauthorized service companies; Service calls to repair or replace appliance light bulbs, air filters, water filters, other consumables, or knobs, handles, or other than those covered under the Sealed Refrigeration System 5-year warranty. Damages to any removal, transportation...


