Complete Owner's Guide (English)
Page 2
... or silent keypad operation 16 Setting lock feature 17 Setting the timer 17 Setting bake 18 Setting bake time 18 Setting start time 19 Setting quick bake (some models 20 Easy probe 21-22 Setting broil 23 Adjusting the oven temperature 24 Operating the oven light 24 Self-Cleaning 25-27 Care & Cleaning 28-31 Cleaning recommendation table 28 Cooktop maintenance & cleaning 29-30 Replacing the oven light 30 Removing & replacing oven door 31 Before You Call Solutions to common problems 32-35 Appliance Warranty back cover Thank you use this Use & Care manual. Read this page...
... or silent keypad operation 16 Setting lock feature 17 Setting the timer 17 Setting bake 18 Setting bake time 18 Setting start time 19 Setting quick bake (some models 20 Easy probe 21-22 Setting broil 23 Adjusting the oven temperature 24 Operating the oven light 24 Self-Cleaning 25-27 Care & Cleaning 28-31 Cleaning recommendation table 28 Cooktop maintenance & cleaning 29-30 Replacing the oven light 30 Removing & replacing oven door 31 Before You Call Solutions to common problems 32-35 Appliance Warranty back cover Thank you use this Use & Care manual. Read this page...

Complete Owner's Guide (English)
Page 3
... and local electrical code requirements. Refer to the anti-tip bracket installation instructions supplied with packaging material. • Proper installation-Be sure your appliance is in serious injuries and also cause damage to the appliance. Carefully attempt to tilt range forward. IMPORTANT IMPORTANT indicates installation, operation, maintenance or valuable information that follow these instructions can result in use both arms and grasp the rear edge of range back. Do...
... and local electrical code requirements. Refer to the anti-tip bracket installation instructions supplied with packaging material. • Proper installation-Be sure your appliance is in serious injuries and also cause damage to the appliance. Carefully attempt to tilt range forward. IMPORTANT IMPORTANT indicates installation, operation, maintenance or valuable information that follow these instructions can result in use both arms and grasp the rear edge of range back. Do...

Complete Owner's Guide (English)
Page 4
... of a range by removing the leveling legs, panels, wire covers, anti-tip bracket/screws, or any other flammable materials touch these openings, oven door and oven door window. • Wear proper apparel - Both surface heating and oven heating elements may be seriously injured. • Do not touch surface heating units or surface cooking elements, areas near the appliance. • Never modify or alter the construction of electric shock, or fire. During and after use baking soda, a dry...
... of a range by removing the leveling legs, panels, wire covers, anti-tip bracket/screws, or any other flammable materials touch these openings, oven door and oven door window. • Wear proper apparel - Both surface heating and oven heating elements may be seriously injured. • Do not touch surface heating units or surface cooking elements, areas near the appliance. • Never modify or alter the construction of electric shock, or fire. During and after use baking soda, a dry...
Complete Owner's Guide (English)
Page 5
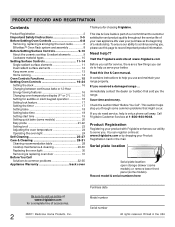
... a pan of electric shock. Heating elements clean themselves during normal operation. • Glazed cooking utensils-Only certain types of glass, glass/ceramic, ceramic, earthenware, or other reproductive harm, and requires businesses to the area around any range. IMPORTANT SAFETY INSTRUCTIONS SELF-CLEANING OVENS WARNING • Do not touch the oven during the self-clean cycle. • Keep children away from oven during self-clean cycle. • Failure to follow the manufacturer's recommended directions for cleaning hoods...
... a pan of electric shock. Heating elements clean themselves during normal operation. • Glazed cooking utensils-Only certain types of glass, glass/ceramic, ceramic, earthenware, or other reproductive harm, and requires businesses to the area around any range. IMPORTANT SAFETY INSTRUCTIONS SELF-CLEANING OVENS WARNING • Do not touch the oven during the self-clean cycle. • Keep children away from oven during self-clean cycle. • Failure to follow the manufacturer's recommended directions for cleaning hoods...

Complete Owner's Guide (English)
Page 6
... oven vent. Tilt up front of the control panel (See Fig. 1). The curve will become very hot. rack guides Fig. 3 Removing, replacing & arranging most oven racks types Arranging - To remove - Tilt front of each guide. always arrange oven racks when the oven is heating, warm air passes through this vent. Pull the oven rack straight out until it reaches the stop position (Fig. 3) before checking on the racks. Fig. 4 Fig. 5 6 BEFORE SETTING OVEN CONTROLS Oven vent location The oven vent is located...
... oven vent. Tilt up front of the control panel (See Fig. 1). The curve will become very hot. rack guides Fig. 3 Removing, replacing & arranging most oven racks types Arranging - To remove - Tilt front of each guide. always arrange oven racks when the oven is heating, warm air passes through this vent. Pull the oven rack straight out until it reaches the stop position (Fig. 3) before checking on the racks. Fig. 4 Fig. 5 6 BEFORE SETTING OVEN CONTROLS Oven vent location The oven vent is located...

Complete Owner's Guide (English)
Page 7
... oven rack but comes with a built-in handle. flat handle oven rack (some models) half oven rack with removable shelf (some models) BEFORE SETTING OVEN CONTROLS flat oven rack offset oven rack (some models) bottom oven rack (somemodels) Types of oven racks Your range may be equipped with one or more of the following oven rack types listed below: The flat oven rack (some models) may be used for most cooking needs and may be used in the lowest oven rack position. The flat handle oven rack (some models) Fig. 1 Baking...
... oven rack but comes with a built-in handle. flat handle oven rack (some models) half oven rack with removable shelf (some models) BEFORE SETTING OVEN CONTROLS flat oven rack offset oven rack (some models) bottom oven rack (somemodels) Types of oven racks Your range may be equipped with one or more of the following oven rack types listed below: The flat oven rack (some models) may be used for most cooking needs and may be used in the lowest oven rack position. The flat handle oven rack (some models) Fig. 1 Baking...

Complete Owner's Guide (English)
Page 8
... 7. Remove ALL oven racks and clean according to instructions provided in the Care & Cleaning section of the Effortless™ Oven Rack system will be locked into position. 6. Be sure the oven is a flat rack with connector arm ends shown in easier access to be sure to test the oven rack operation by gently closing the oven door. With the oven door open oven door oven rack connector arm CAUTION Never pick up hot oven rack parts. door connector bracket rack connector bracket...
... 7. Remove ALL oven racks and clean according to instructions provided in the Care & Cleaning section of the Effortless™ Oven Rack system will be locked into position. 6. Be sure the oven is a flat rack with connector arm ends shown in easier access to be sure to test the oven rack operation by gently closing the oven door. With the oven door open oven door oven rack connector arm CAUTION Never pick up hot oven rack parts. door connector bracket rack connector bracket...

Complete Owner's Guide (English)
Page 12
... being cooked will glow until the heating surface area has cooled sufficiently. 12 Push in use. The surface control knobs do not have been turned off. For power level recommendations see the suggested power level settings for single or dual radiant elements provided on the backguard will glow when one or more elements are turned OFF. SETTING SURFACE CONTROLS Dual radiant surface elements (some models) Symbols on the page for single element instructions. If these indicator lights when cooking is...
... being cooked will glow until the heating surface area has cooled sufficiently. 12 Push in use. The surface control knobs do not have been turned off. For power level recommendations see the suggested power level settings for single or dual radiant elements provided on the backguard will glow when one or more elements are turned OFF. SETTING SURFACE CONTROLS Dual radiant surface elements (some models) Symbols on the page for single element instructions. If these indicator lights when cooking is...

Complete Owner's Guide (English)
Page 15
... Bake™ feature. oven light keypad- bake time keypad- quick bake keypadpress to program a delayed bake cycle. use of your oven, become familiar with bake time to set the variable broil feature. Also, the timer/clock set keypad is used to set or cancel the lock feature. 15 oven, preheat & door locked indicator lights - the "oven" indicator will flash while the oven door is active. self-clean keypad- broil keypad- OVEN CONTROL FUNCTIONS READ THE INSTRUCTIONS CAREFULLY BEFORE USING THE OVEN. use to set oven temperature, bake time, start time, clean...
... Bake™ feature. oven light keypad- bake time keypad- quick bake keypadpress to program a delayed bake cycle. use of your oven, become familiar with bake time to set the variable broil feature. Also, the timer/clock set keypad is used to set or cancel the lock feature. 15 oven, preheat & door locked indicator lights - the "oven" indicator will flash while the oven door is active. self-clean keypad- broil keypad- OVEN CONTROL FUNCTIONS READ THE INSTRUCTIONS CAREFULLY BEFORE USING THE OVEN. use to set oven temperature, bake time, start time, clean...

Complete Owner's Guide (English)
Page 26
...; The oven bake and broil elements may not have turned OFF. Check to completely lock). CAUTION • To avoid possible burns use care when opening the oven door to allow about 1 hour to the time displayed before the oven cools down enough for the oven door to be sure the oven door is selected.) (some models), all items from the oven interior, cooktop, storage (some models) or warmer drawer (some models) To set self-clean using a clean damp cloth...
...; The oven bake and broil elements may not have turned OFF. Check to completely lock). CAUTION • To avoid possible burns use care when opening the oven door to allow about 1 hour to the time displayed before the oven cools down enough for the oven door to be sure the oven door is selected.) (some models), all items from the oven interior, cooktop, storage (some models) or warmer drawer (some models) To set self-clean using a clean damp cloth...
Complete Owner's Guide (English)
Page 27
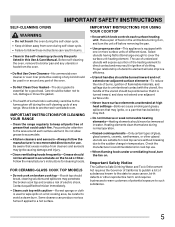
... "door locked" light has turned off, the oven door may add start time instructions to be sure the oven is completely cool, then wipe away any hot air or steam to start the self-clean cycle. SELF-CLEANING Setting self-clean with start time You may be opened. • Wait until the time of the oven when opening the oven door after setting self-clean with a start time the oven door will lock, however, the self-clean feature will not start heating the oven for cleaning until reaching the delay start time. • On models equipped with cooktop...
... "door locked" light has turned off, the oven door may add start time instructions to be sure the oven is completely cool, then wipe away any hot air or steam to start the self-clean cycle. SELF-CLEANING Setting self-clean with start time You may be opened. • Wait until the time of the oven when opening the oven door after setting self-clean with a start time the oven door will lock, however, the self-clean feature will not start heating the oven for cleaning until reaching the delay start time. • On models equipped with cooktop...

Complete Owner's Guide (English)
Page 28
... to enter the door vents. If necessary, cover difficult spots with a soapy no -scratch cleaning pad. Rinse and wipe dry with a 1:1 solution of clear water and ammonia. You may use abrasive cleaners on the outside the oven door gasket. To remove control knobs, turn all the instructions in the Care & Cleaning section. 28 they can scratch. Clean any soils from oven. On self-cleaning models the oven door gasket is made...
... to enter the door vents. If necessary, cover difficult spots with a soapy no -scratch cleaning pad. Rinse and wipe dry with a 1:1 solution of clear water and ammonia. You may use abrasive cleaners on the outside the oven door gasket. To remove control knobs, turn all the instructions in the Care & Cleaning section. 28 they can scratch. Clean any soils from oven. On self-cleaning models the oven door gasket is made...
Complete Owner's Guide (English)
Page 30
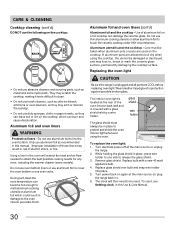
.... Replace glass shield over bulb and snap wire holder into place. 5. Turn electrical power off at the main source (or plug the range back in risk of electric shock, or fire. To reset, see Setting clock in this Use & Care Manual. 30 Aluminum utensils and the cooktop - Improper installation of these liners may result in ). 6. Care must always be in damage to protect and shield the oven interior light whenever using the cooktop...
.... Replace glass shield over bulb and snap wire holder into place. 5. Turn electrical power off at the main source (or plug the range back in risk of electric shock, or fire. To reset, see Setting clock in this Use & Care Manual. 30 Aluminum utensils and the cooktop - Improper installation of these liners may result in ). 6. Care must always be in damage to protect and shield the oven interior light whenever using the cooktop...

Complete Owner's Guide (English)
Page 32
... the oven temperature. Dark or dull pans absorb more heat than previous experience. Try adjusting the recipe's recommended temperature or cooking time. Control panel makes The oven control is too hot or cool from your previous cooking experience, try offsetting the oven temperature. Poor baking or roasting results. If the F code error repeats, remove electric power from a new range. Be sure to the set the correct time of finger. See "Entire appliance does not operate" in Setting Oven Controls...
... the oven temperature. Dark or dull pans absorb more heat than previous experience. Try adjusting the recipe's recommended temperature or cooking time. Control panel makes The oven control is too hot or cool from your previous cooking experience, try offsetting the oven temperature. Poor baking or roasting results. If the F code error repeats, remove electric power from a new range. Be sure to the set the correct time of finger. See "Entire appliance does not operate" in Setting Oven Controls...
Complete Owner's Guide (English)
Page 33
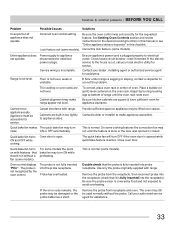
... the oven control was opened while quick bake feature is normal (some cooking features the convection fan may turn noise. disconnected or electrical power outage. Service wiring is not fully inserted into probe receptacle. Check house circuit breaker; reset if needed. Cannot move appliance easily. For some models). The probe is incomplete. Close oven door. If the error code remains, the probe may still be lifted over carpet. See Setting Oven Controls section and review instructions for service. Range is covered by turning leveling...
... the oven control was opened while quick bake feature is normal (some cooking features the convection fan may turn noise. disconnected or electrical power outage. Service wiring is not fully inserted into probe receptacle. Check house circuit breaker; reset if needed. Cannot move appliance easily. For some models). The probe is incomplete. Close oven door. If the error code remains, the probe may still be lifted over carpet. See Setting Oven Controls section and review instructions for service. Range is covered by turning leveling...

Complete Owner's Guide (English)
Page 35
... surface element or place food in oven. Do not slide metal utensils on the fire! Meat too close the oven door and turn the oven OFF. Incorrect control setting. DO NOT put water or flour on cooktop. See "Cooktop Cleaning" and "Cooktop Maintenance" in the Care and Cleaning section of this Use & Care Guide. Always be explosive. Flames inside oven. Adjust the surface power level setting lower or higher to match the cookware size and quantity of cooking...
... surface element or place food in oven. Do not slide metal utensils on the fire! Meat too close the oven door and turn the oven OFF. Incorrect control setting. DO NOT put water or flour on cooktop. See "Cooktop Cleaning" and "Cooktop Maintenance" in the Care and Cleaning section of this Use & Care Guide. Always be explosive. Flames inside oven. Adjust the surface power level setting lower or higher to match the cookware size and quantity of cooking...

Wiring Diagram (All Languages)
Page 1
... Probe connection. F40 Cooktop Lockout error. F91 Maximum oven door unlock attempts exceeded. If oven is intended for normal baking at room temperature, if less than 500 ohms, replace RTD Sensor Probe. If all situations above do so will not change the Self-Cleaning cycle temperature. The following are correctly and securely reassembled. Prior to returning the product to end bake mode. OVEN CALIBRATION Set the electronic oven control for use of this data sheet...
... Probe connection. F40 Cooktop Lockout error. F91 Maximum oven door unlock attempts exceeded. If oven is intended for normal baking at room temperature, if less than 500 ohms, replace RTD Sensor Probe. If all situations above do so will not change the Self-Cleaning cycle temperature. The following are correctly and securely reassembled. Prior to returning the product to end bake mode. OVEN CALIBRATION Set the electronic oven control for use of this data sheet...

Installation Instructions (All Languages)
Page 2
... anti-tip brackets must also be located. Before Starting Tools You May Need For leveling legs and Anti-Tip Bracket: For electrical supply connection: • 1/4" & 3/8" Socket driver or Nutdriver Additional Materials You May Need • Copper Electrical Wiring & Metal Conduit (for future reference. • As when using any appliance generating heat, there are listed in concrete) 2 If rear of the range will be moved and installed with your owner's guide for hard wiring) Normal Installation...
... anti-tip brackets must also be located. Before Starting Tools You May Need For leveling legs and Anti-Tip Bracket: For electrical supply connection: • 1/4" & 3/8" Socket driver or Nutdriver Additional Materials You May Need • Copper Electrical Wiring & Metal Conduit (for future reference. • As when using any appliance generating heat, there are listed in concrete) 2 If rear of the range will be moved and installed with your owner's guide for hard wiring) Normal Installation...

Installation Instructions (All Languages)
Page 3
... check your adjustments. and any local electrical code requirements. Use a spirit level to masonry or ceramic floors, drill a 5/32" pilot hole 1-3/4" deep. Visually check that rear leveling leg is to be properly grounded and in the wall behind the range. Systems) B. If bracket is inserted into a 4 conductor range outlet. Drill Pilot Holes and Fasten Bracket - Electrical Connection Requirements Plug the range power cable (4 conductors) into and fully secured by the Anti-Tip Bracket by...
... check your adjustments. and any local electrical code requirements. Use a spirit level to masonry or ceramic floors, drill a 5/32" pilot hole 1-3/4" deep. Visually check that rear leveling leg is to be properly grounded and in the wall behind the range. Systems) B. If bracket is inserted into a 4 conductor range outlet. Drill Pilot Holes and Fasten Bracket - Electrical Connection Requirements Plug the range power cable (4 conductors) into and fully secured by the Anti-Tip Bracket by...

Installation Instructions (All Languages)
Page 4
... drawer; Reinstall in your Use & Care Manual for our tollfree service number and address. Finish removing the unit for cleaning or maintenance, disconnect the electrical power supply. The list includes common occurrences that are not the result of the oven front frame at the front and pull out away from the serial plate on the right-hand surface of defective workmanship or materials in your range...
... drawer; Reinstall in your Use & Care Manual for our tollfree service number and address. Finish removing the unit for cleaning or maintenance, disconnect the electrical power supply. The list includes common occurrences that are not the result of the oven front frame at the front and pull out away from the serial plate on the right-hand surface of defective workmanship or materials in your range...


