Use and Care Guide
Page 2
.... Products used other than in your best interest to another party or removed outside the USA or Canada. 3. Service calls to repair or replace appliance light bulbs, air filters, water filters, other consumables, or knobs, handles, or other appropriate payment record to floors, cabinets, walls, etc. 13. USA 1.800.944.9044 Electrolux Major Appliances North America P.O. THIS WRITTEN WARRANTY GIVES YOU SPECIFIC LEGAL RIGHTS...
.... Products used other than in your best interest to another party or removed outside the USA or Canada. 3. Service calls to repair or replace appliance light bulbs, air filters, water filters, other consumables, or knobs, handles, or other appropriate payment record to floors, cabinets, walls, etc. 13. USA 1.800.944.9044 Electrolux Major Appliances North America P.O. THIS WRITTEN WARRANTY GIVES YOU SPECIFIC LEGAL RIGHTS...
Use and Care Guide
Page 3
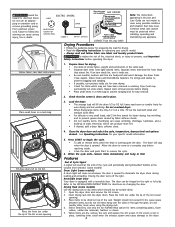
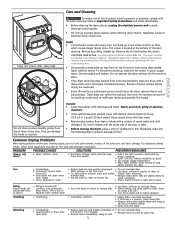
... dryer where it checked and reinstalled by a qualified service person. All safety of the dryer. The dryer must be exposed to do not reach into a properly grounded and polarized 3-prong outlet. Before the dryer is very important. The third grounding prong must never be used near dryer at any type of this Use & Care Guide and the Operating Instructions included with gasoline, cleaning solvents, kerosene, waxes, etc. Pedestal A pedestal accessory, Model...
... dryer where it checked and reinstalled by a qualified service person. All safety of the dryer. The dryer must be exposed to do not reach into a properly grounded and polarized 3-prong outlet. Before the dryer is very important. The third grounding prong must never be used near dryer at any type of this Use & Care Guide and the Operating Instructions included with gasoline, cleaning solvents, kerosene, waxes, etc. Pedestal A pedestal accessory, Model...
Use and Care Guide
Page 4
... drying rack. 4. Power supply cord with 3-prong grounding plug CORRECT Use this Use and Care Guide are dry, remove the rack and replace the lint screen. Follow fabric care label instructions. 1. Check that lint screen is running open the door. Fill out the load with a reversible door. Place the front bar under the lip of the lint screen opening . 3. When the cycle ends, remove items immediately and hang or fold. Close zippers, fasten hooks and Velcro®-like materials, feathers or down. 5. Fill dryer drum...
... drying rack. 4. Power supply cord with 3-prong grounding plug CORRECT Use this Use and Care Guide are dry, remove the rack and replace the lint screen. Follow fabric care label instructions. 1. Check that lint screen is running open the door. Fill out the load with a reversible door. Place the front bar under the lip of the lint screen opening . 3. When the cycle ends, remove items immediately and hang or fold. Close zippers, fasten hooks and Velcro®-like materials, feathers or down. 5. Fill dryer drum...
Use and Care Guide
Page 5
... as cycle ends. 5 The screen is a concern, check load often. • Remove items while slightly damp and hang or lay flat to complete drying. • Block knits into shape. • Reduce load size and tumble at the bottom of the door opening and in the surrounding area. • Occasionally a waxy build-up in warm, soapy water. Remove the lint and replace the screen. A clothes dryer produces combustible lint. These...
... as cycle ends. 5 The screen is a concern, check load often. • Remove items while slightly damp and hang or lay flat to complete drying. • Block knits into shape. • Reduce load size and tumble at the bottom of the door opening and in the surrounding area. • Occasionally a waxy build-up in warm, soapy water. Remove the lint and replace the screen. A clothes dryer produces combustible lint. These...
Use and Care Guide
Page 6
... securely plugged in INSTALLATION INSTRUCTIONS. Drying procedures have anough air supply to support the burner flame (gas models). Make sure all lint has been removed from pockets before laundering. Drying time will not operate. Excessive wrinkling. or buttons are not the result of natural gas (gas models). Drum damage caused by the warranty. 6 Make sure electrical line is not overloaded and the dryer is blown, the drum may save both time and expense. Dryer runs but the heater will...
... securely plugged in INSTALLATION INSTRUCTIONS. Drying procedures have anough air supply to support the burner flame (gas models). Make sure all lint has been removed from pockets before laundering. Drying time will not operate. Excessive wrinkling. or buttons are not the result of natural gas (gas models). Drum damage caused by the warranty. 6 Make sure electrical line is not overloaded and the dryer is blown, the drum may save both time and expense. Dryer runs but the heater will...


