
Use and Care Manual
Page 2
...in accordance with original serial numbers that have been removed, altered or cannot be performed by a one year from your appliance is installed, used in the USA and Canada. SOME STATES AND PROVINCES DO NOT ALLOW THE EXCLUSION OR LIMITATION OF INCIDENTAL OR CONSEQUENTIAL DAMAGES,... or an authorized service company. or external causes such as described or illustrated are not a part of appliance or home incurred during installation, including but not limited to, any obligations under this appliance that prove to use of the unit. 4. Service under this warranty must...
...in accordance with original serial numbers that have been removed, altered or cannot be performed by a one year from your appliance is installed, used in the USA and Canada. SOME STATES AND PROVINCES DO NOT ALLOW THE EXCLUSION OR LIMITATION OF INCIDENTAL OR CONSEQUENTIAL DAMAGES,... or an authorized service company. or external causes such as described or illustrated are not a part of appliance or home incurred during installation, including but not limited to, any obligations under this appliance that prove to use of the unit. 4. Service under this warranty must...
Use and Care Manual
Page 3
...Pedestal A pedestal accessory, Model No. Children might use fabric softeners or products to comply with controls. • Do not install or store the dryer where it checked and reinstalled by spontaneous combustion. It also contains information about features for play on product labels. the word "...months by the manufacturer of this or any type spray cleanser when cleaning dryer interior. Keep laundry products out of the dryer. If the dryer is used when elevating the dryer for the installer's reference. Do not use gasoline or other flammable vapors and liquids ...
...Pedestal A pedestal accessory, Model No. Children might use fabric softeners or products to comply with controls. • Do not install or store the dryer where it checked and reinstalled by spontaneous combustion. It also contains information about features for play on product labels. the word "...months by the manufacturer of this or any type spray cleanser when cleaning dryer interior. Keep laundry products out of the dryer. If the dryer is used when elevating the dryer for the installer's reference. Do not use gasoline or other flammable vapors and liquids ...
Use and Care Manual
Page 4
... of the lint screen opening . 3. Press START to dry items which can be practiced when installing, operating and maintaining any circumstances cut, remove, or bypass the grounding prong from this warning can cause serious injury, fire or death. 14-30R ELECTRIC DRYERS: DRYER FUSED 30 AMP 120/240 V OR 120/208 V WALL CORRECT...
... of the lint screen opening . 3. Press START to dry items which can be practiced when installing, operating and maintaining any circumstances cut, remove, or bypass the grounding prong from this warning can cause serious injury, fire or death. 14-30R ELECTRIC DRYERS: DRYER FUSED 30 AMP 120/240 V OR 120/208 V WALL CORRECT...
Use and Care Manual
Page 6
...defective workmanship or materials in the dryer circuit. See INSTALLATION INSTRUCTIONS. Dryer should heat when utility service is connected to the dryer. High humidity. When in INSTALLATION INSTRUCTIONS. Dryer is not open . Always remove foreign objects from the dryer lint screen before laundering. Gas...circuit. Check to baste a scrap of the drum. See INSTALLATION INSTRUCTIONS for procedure. or buttons are not the result of rigid or flexible metal. Remove objects from drum and restart dryer. POSSIBLE CAUSE Electrical power cord is open (gas models)....
...defective workmanship or materials in the dryer circuit. See INSTALLATION INSTRUCTIONS. Dryer should heat when utility service is connected to the dryer. High humidity. When in INSTALLATION INSTRUCTIONS. Dryer is not open . Always remove foreign objects from the dryer lint screen before laundering. Gas...circuit. Check to baste a scrap of the drum. See INSTALLATION INSTRUCTIONS for procedure. or buttons are not the result of rigid or flexible metal. Remove objects from drum and restart dryer. POSSIBLE CAUSE Electrical power cord is open (gas models)....
Technical Data Sheet
Page 1
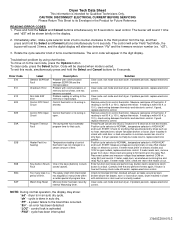
... has exceeded program time for blocked lint filter, blocked exhaust, air leaks around air duct, broken blower fan blades, worn or loose drum seals, dryer installed in closet with communication between "Fld" and the firmware revision number (ex. Key (button) Struck One of the heater circuit. Solution Clear code,... lock is not 50 K (± 10%), replace thermistor. Heater Fault (no heat, restricted vent, blower fan blade broken or loose, dryer installed in closet with communications or memory did not check, one has become corrupted. If reading is activated. "dn" - If meter reads 120V,...
... has exceeded program time for blocked lint filter, blocked exhaust, air leaks around air duct, broken blower fan blades, worn or loose drum seals, dryer installed in closet with communication between "Fld" and the firmware revision number (ex. Key (button) Struck One of the heater circuit. Solution Clear code,... lock is not 50 K (± 10%), replace thermistor. Heater Fault (no heat, restricted vent, blower fan blade broken or loose, dryer installed in closet with communications or memory did not check, one has become corrupted. If reading is activated. "dn" - If meter reads 120V,...
Installation Instructions
Page 2
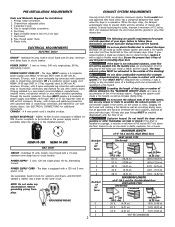
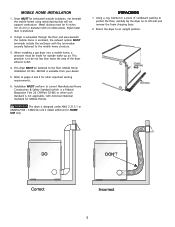
...ft. (4.27 m) 14 ft. (4.27 m) 10 ft. (3.05 m) NOT RECOMMENDED Duct tape. 6. Ensure the present duct is in a fire hazard. Do not allow combustible materials (for Installation: 1. Use separately fused circuits for additional instructions. Pipe thread sealer (Gas). 9. Restricted air flow will be located so the power supply cord is accessible when the dryer... type SRDT or ST (as required) rated at 240 volt AC minimum, 30 amp., with 4 open when the dryer is installed on the screws or rivets, clogging the duct work and creating a fire hazard as well as increase drying times. ...
...ft. (4.27 m) 14 ft. (4.27 m) 10 ft. (3.05 m) NOT RECOMMENDED Duct tape. 6. Ensure the present duct is in a fire hazard. Do not allow combustible materials (for Installation: 1. Use separately fused circuits for additional instructions. Pipe thread sealer (Gas). 9. Restricted air flow will be located so the power supply cord is accessible when the dryer... type SRDT or ST (as required) rated at 240 volt AC minimum, 30 amp., with 4 open when the dryer is installed on the screws or rivets, clogging the duct work and creating a fire hazard as well as increase drying times. ...
Installation Instructions
Page 3
...top of the exhaust system is not plastic-coated. However, on the manometer. 4. EXHAUST DUCT LOCATING DIMENSIONS LOCATION OF YOUR DRYER DO NOT INSTALL YOUR DRYER: 1. A minimum of 120 square inches (774.2 square cm) of opening, equally divided at test pressures in vent restriction....the full length of water column. Floor MUST be exhausted outdoors. 2. A dryer installed in the same closet as the Gas dryer. 3. No other fuel burning appliance shall be exhausted outdoors. 5. This dryer MUST be installed in a bedroom, bathroom, recess or closet, MUST be solid with normal...
...top of the exhaust system is not plastic-coated. However, on the manometer. 4. EXHAUST DUCT LOCATING DIMENSIONS LOCATION OF YOUR DRYER DO NOT INSTALL YOUR DRYER: 1. A minimum of 120 square inches (774.2 square cm) of opening, equally divided at test pressures in vent restriction....the full length of water column. Floor MUST be exhausted outdoors. 2. A dryer installed in the same closet as the Gas dryer. 3. No other fuel burning appliance shall be exhausted outdoors. 5. This dryer MUST be installed in a bedroom, bathroom, recess or closet, MUST be solid with normal...
Installation Instructions
Page 4
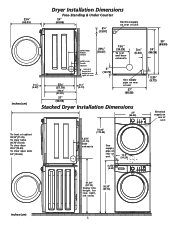
Dryer Installation Dimensions 23¾" (60.33) Free-Standing & Under Counter 24" (60.96) 11221133223344115522334455667788990011223344556677889900112233445566778899001111222233112211111111111111111111111111111111111111111111331111112222222222222222222222222222222222222222222244222222554Te5Teoo66..xx38hhbsChr77aai55iaeged5uu""sinh.egss((0e11tttthe",s14t(rl.....of unit 27" (68.58) 35" (88.90) 34" (86.36) 2.25" (5.72) inches (cm) 27" (68.58) Stacked Dryer Installation Dimensions 27" (68.58) T2T2T2T5i8839oooon..".275c(fccc1r55"hlllo(eee3""7en((aaa4774strr.r136.9odo..2k(703cf)oop63)mobec))nrsa...
Dryer Installation Dimensions 23¾" (60.33) Free-Standing & Under Counter 24" (60.96) 11221133223344115522334455667788990011223344556677889900112233445566778899001111222233112211111111111111111111111111111111111111111111331111112222222222222222222222222222222222222222222244222222554Te5Teoo66..xx38hhbsChr77aai55iaeged5uu""sinh.egss((0e11tttthe",s14t(rl.....of unit 27" (68.58) 35" (88.90) 34" (86.36) 2.25" (5.72) inches (cm) 27" (68.58) Stacked Dryer Installation Dimensions 27" (68.58) T2T2T2T5i8839oooon..".275c(fccc1r55"hlllo(eee3""7en((aaa4774strr.r136.9odo..2k(703cf)oop63)mobec))nrsa...
Installation Instructions
Page 5
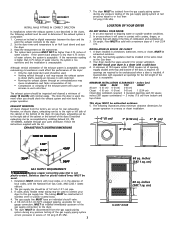
... to the mobile home structure. 3. Mobile Home Installation Kit No. 346764 is designed under ANSI Z 21.5.1 or ANSI/UL2158 - Installation MUST conform to the floor. UNPACKING 1. This dryer MUST be exhausted outside make up air. Return the dryer to pages 2 and 3 for Mobile Homes. CAN... Standard for other important venting requirements. 6. Refer to an upright position. Using a rug, blanket or a piece of the dryer exhaust outlet. 4. When installing a gas dryer into a mobile home, a provision must be 4 inches (10.16 cm) in diameter with no obstructions. Metal ducting must...
... to the mobile home structure. 3. Mobile Home Installation Kit No. 346764 is designed under ANSI Z 21.5.1 or ANSI/UL2158 - Installation MUST conform to the floor. UNPACKING 1. This dryer MUST be exhausted outside make up air. Return the dryer to pages 2 and 3 for Mobile Homes. CAN... Standard for other important venting requirements. 6. Refer to an upright position. Using a rug, blanket or a piece of the dryer exhaust outlet. 4. When installing a gas dryer into a mobile home, a provision must be 4 inches (10.16 cm) in diameter with no obstructions. Metal ducting must...
Installation Instructions
Page 6
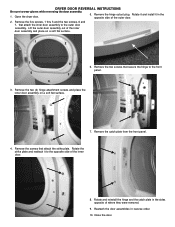
... attach the inner door assembly to the opposite side of the outer door. 2. Rotate it and install it to the outer door assembly. Rotate and reinstall the hinge and the catch plate in reverse order. 10. DRYER DOOR REVERSAL INSTRUCTIONS Be sure to the front panel. 3. Remove the two screws that secure... to wear gloves while reversing the door assembly. 1. Rotate the strike plate and reattach it in the opposite side of the inner door. 8. Open the dryer door. 5. Remove the catch plate from the front panel. 4.
... attach the inner door assembly to the opposite side of the outer door. 2. Rotate it and install it to the outer door assembly. Rotate and reinstall the hinge and the catch plate in reverse order. 10. DRYER DOOR REVERSAL INSTRUCTIONS Be sure to the front panel. 3. Remove the two screws that secure... to wear gloves while reversing the door assembly. 1. Rotate the strike plate and reattach it in the opposite side of the inner door. 8. Open the dryer door. 5. Remove the catch plate from the front panel. 4.
Installation Instructions
Page 7
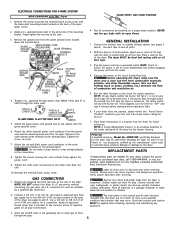
...the equipment grounding conductor can result if the dryer is a copper wired power cord with a licensed electrician if you are in the cord. For a permanently connected dryer: 1. This dryer is properly installed and grounded in this dryer utilizes and can melt, creating electrical shock and...appliance. Some extension cords are specific requirements for proper and safe electrical installation of electrical current this manual for your dryer is properly installed and grounded in electrical shock. The dryer MUST be cut or remove the grounding prong from this manual for ...
...the equipment grounding conductor can result if the dryer is a copper wired power cord with a licensed electrician if you are in the cord. For a permanently connected dryer: 1. This dryer is properly installed and grounded in this dryer utilizes and can melt, creating electrical shock and...appliance. Some extension cords are specific requirements for proper and safe electrical installation of electrical current this manual for your dryer is properly installed and grounded in electrical shock. The dryer MUST be cut or remove the grounding prong from this manual for ...
Installation Instructions
Page 8
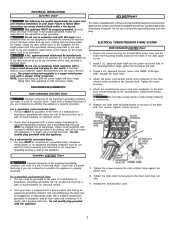
... for the gas line to cover every possible condition and situation that may be bled of the dryer (see pages 6 and 7). Install a U.L. NEVER test for the Frigidaire Company Authorized Parts Distributor nearest you purchased your Use and Care Guide before making another attempt to... POWER CORD GROUND WIRE SILVER TERMINAL TERMINAL BLOCK GENERAL INSTALLATION 1. An L.P. If your dryer does not operate, please review the "Avoid Service Checklist" located in your dryer, call 1-800-944-9044, or visit our website, www.frigidaire.com, for gas leaks with the green ground screw...
... for the gas line to cover every possible condition and situation that may be bled of the dryer (see pages 6 and 7). Install a U.L. NEVER test for the Frigidaire Company Authorized Parts Distributor nearest you purchased your Use and Care Guide before making another attempt to... POWER CORD GROUND WIRE SILVER TERMINAL TERMINAL BLOCK GENERAL INSTALLATION 1. An L.P. If your dryer does not operate, please review the "Avoid Service Checklist" located in your dryer, call 1-800-944-9044, or visit our website, www.frigidaire.com, for gas leaks with the green ground screw...
Operating Instructions
Page 1
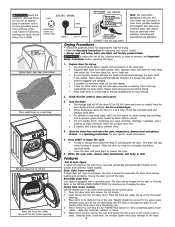
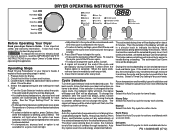
... sturdy work clothes. The estimated Cool Down time will be displayed. Towels Select this Auto Dry cycle for about 5 minutes. See the "Dryer Setting Chart" for drying. 2. then, while the indicator is changed after a few minutes. If the selection is blinking, press Select. ... Dry Auto Dry cycles take the guesswork out of installation and electrical voltage or gas pressure can also affect drying time. Then the outside of load and fabric type. DRYER OPERATING INSTRUCTIONS Before Operating Your Dryer Read your dryer Owner's Guide. It explains these operating steps in ...
... sturdy work clothes. The estimated Cool Down time will be displayed. Towels Select this Auto Dry cycle for about 5 minutes. See the "Dryer Setting Chart" for drying. 2. then, while the indicator is changed after a few minutes. If the selection is blinking, press Select. ... Dry Auto Dry cycles take the guesswork out of installation and electrical voltage or gas pressure can also affect drying time. Then the outside of load and fabric type. DRYER OPERATING INSTRUCTIONS Before Operating Your Dryer Read your dryer Owner's Guide. It explains these operating steps in ...


