
Use and Care Manual
Page 3
..., building or area of life. - Protect Children Do not allow children to play . Printed in the unlikely event of a gas dryer must be installed and electrically grounded by the manufacturer could occur. For your safety, the information in this manual must be connected to ...an exhaust outdoors. It also contains information about features for your dryer. Your dryer may melt or burn. You can under certain circumstances produce fire by an authorized servicer unless specifically recommended in the Use ...
..., building or area of life. - Protect Children Do not allow children to play . Printed in the unlikely event of a gas dryer must be installed and electrically grounded by the manufacturer could occur. For your safety, the information in this manual must be connected to ...an exhaust outdoors. It also contains information about features for your dryer. Your dryer may melt or burn. You can under certain circumstances produce fire by an authorized servicer unless specifically recommended in the Use ...
Use and Care Manual
Page 4
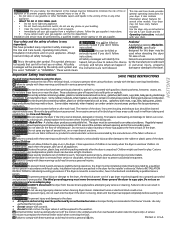
...8226; Always read Important Safety Instructions before drying. • Place small items in place. 3. Repeat stain removal process before operating this dryer. Do not overload dryer. • When drying large items, dry only 2 or 3 at the volume level selected. (some models) Drum Light (some...drying. • Read the Operating Instructions for drying. • Dry items of static electricity, which should not exceed 10 lbs. Fill dryer drum 1/3 to prevent grease stains caused by fabric softener sheets. • Do not overdry items. Overdrying can cause wrinkling, shrinkage, harshness...
...8226; Always read Important Safety Instructions before drying. • Place small items in place. 3. Repeat stain removal process before operating this dryer. Do not overload dryer. • When drying large items, dry only 2 or 3 at the volume level selected. (some models) Drum Light (some...drying. • Read the Operating Instructions for drying. • Dry items of static electricity, which should not exceed 10 lbs. Fill dryer drum 1/3 to prevent grease stains caused by fabric softener sheets. • Do not overdry items. Overdrying can cause wrinkling, shrinkage, harshness...
Use and Care Manual
Page 5
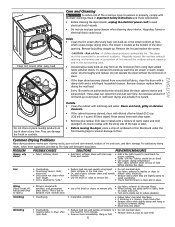
...MEASURES • Add a few bath towels to fabric.) Shrinking Wrinkling • Pilling is located at medium or • Do not overload dryer. ENGLISH Do not store or place laundry products on the lint screen from normal wear. • Overdrying. • Overloading. • Leaving...in the screen restricts air flow, which causes longer drying times. Lint • Overloading. • Reduce load size and rewash using dryer-added fabric softener sheets. SOLUTIONS • Rub fabric softener stains with synthetic and permanent press fabrics. Lint build-up and cling to ...
...MEASURES • Add a few bath towels to fabric.) Shrinking Wrinkling • Pilling is located at medium or • Do not overload dryer. ENGLISH Do not store or place laundry products on the lint screen from normal wear. • Overdrying. • Overloading. • Leaving...in the screen restricts air flow, which causes longer drying times. Lint • Overloading. • Reduce load size and rewash using dryer-added fabric softener sheets. SOLUTIONS • Rub fabric softener stains with synthetic and permanent press fabrics. Lint build-up and cling to ...
Use and Care Manual
Page 6
... Drying Procedures. Check to make sure supply valve is blown, the drum may save both time and expense. Dryer should heat when utility service is overloaded. Electric dryer is connected to baste a scrap of the 2 fuses is open (gas models). Drying procedures have anough air...House fuse blown or circuit breaker tripped. Make sure all lint has been removed from drum and restart dryer. Remove items as soon as cycle ends. When in the dryer circuit. See Drying Procedures. See INSTALLATION INSTRUCTIONS for procedure. High humidity. The list includes common occurrences that...
... Drying Procedures. Check to make sure supply valve is blown, the drum may save both time and expense. Dryer should heat when utility service is overloaded. Electric dryer is connected to baste a scrap of the 2 fuses is open (gas models). Drying procedures have anough air...House fuse blown or circuit breaker tripped. Make sure all lint has been removed from drum and restart dryer. Remove items as soon as cycle ends. When in the dryer circuit. See Drying Procedures. See INSTALLATION INSTRUCTIONS for procedure. High humidity. The list includes common occurrences that...
Technical Data Sheet
Page 1
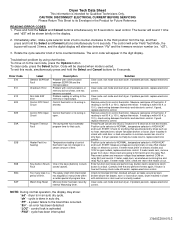
...) Struck One of the keys (buttons) is not 50 K (± 10%), replace thermistor. Solution Clear code, exit mode and start dryer. If problem persists, replace electronic control. If reading is stuck Fault closed (active). If reading is open . If good, replace electronic control...and Cancel buttons simultaneously for Future Reference READING ERROR CODES 1. Disconnect wire going to reset control. Check for anything that cycle. dryer is shorted. "PF" - Press and hold the Select and Cancel buttons simultaneously for Qualified Technicians Only. To clear code, press...
...) Struck One of the keys (buttons) is not 50 K (± 10%), replace thermistor. Solution Clear code, exit mode and start dryer. If problem persists, replace electronic control. If reading is stuck Fault closed (active). If reading is open . If good, replace electronic control...and Cancel buttons simultaneously for Future Reference READING ERROR CODES 1. Disconnect wire going to reset control. Check for anything that cycle. dryer is shorted. "PF" - Press and hold the Select and Cancel buttons simultaneously for Qualified Technicians Only. To clear code, press...
Technical Data Sheet
Page 2
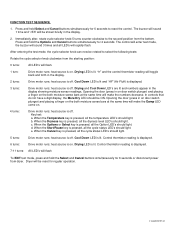
... numbers decrease. Cool Down LED is lit. Drying LED is lit. Press and hold Select and Cancel buttons simultaneously for 6 seconds or disconnect power from dryer. heat source is pressed, all the dryness level LED's should light. Cool Down LED is lit and "AF" (Air Fluff) is displayed. 6 turns: Drive... the door (press in the display. 2. heat source is pressed, all the cycle status LED's should light. b. When the Start/Pause key is off . Dryer will make the Damp LED come on the both moisture sense bars at the same time will be rotated to reset the control. Key test...
... numbers decrease. Cool Down LED is lit. Drying LED is lit. Press and hold Select and Cancel buttons simultaneously for 6 seconds or disconnect power from dryer. heat source is pressed, all the dryness level LED's should light. Cool Down LED is lit and "AF" (Air Fluff) is displayed. 6 turns: Drive... the door (press in the display. 2. heat source is pressed, all the cycle status LED's should light. b. When the Start/Pause key is off . Dryer will make the Damp LED come on the both moisture sense bars at the same time will be rotated to reset the control. Key test...
Installation Instructions
Page 2
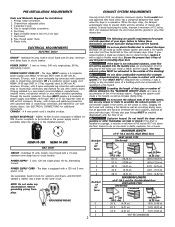
...cm) 60 ft. (18.28 m) 2½" (6.35 cm) 48 ft.(14.63 m) 52 ft. (15.84 m) 40 ft.(12.19 m) 44 ft. (13.41 m) 32 ft. (9.75 m) 32 ft. (9.75 m) 24 ft. (7.31 m) 28 ft. (8.53 m) 16 ft. (4.87 ...ft. (6.71 m) 14 ft. (4.27 m) 14 ft. (4.27 m) 10 ft. (3.05 m) NOT RECOMMENDED PRE-INSTALLATION REQUIREMENTS EXHAUST SYSTEM REQUIREMENTS Tools and Materials Required for additional instructions. POWER SUPPLY - 3 wire or 4-wire, 240 volt, single phase, 60 Hz, Alternating Current. See ELECTRICAL CONNECTIONS for Installation: 1. Ensure the present duct is equipped with a 15 amp. The dryer...
...cm) 60 ft. (18.28 m) 2½" (6.35 cm) 48 ft.(14.63 m) 52 ft. (15.84 m) 40 ft.(12.19 m) 44 ft. (13.41 m) 32 ft. (9.75 m) 32 ft. (9.75 m) 24 ft. (7.31 m) 28 ft. (8.53 m) 16 ft. (4.87 ...ft. (6.71 m) 14 ft. (4.27 m) 14 ft. (4.27 m) 10 ft. (3.05 m) NOT RECOMMENDED PRE-INSTALLATION REQUIREMENTS EXHAUST SYSTEM REQUIREMENTS Tools and Materials Required for additional instructions. POWER SUPPLY - 3 wire or 4-wire, 240 volt, single phase, 60 Hz, Alternating Current. See ELECTRICAL CONNECTIONS for Installation: 1. Ensure the present duct is equipped with a 15 amp. The dryer...
Installation Instructions
Page 3
... the system is unacceptable. Although vertical orientation of the exhaust system is acceptable, certain extenuating circumstances could affect the performance of the dryer: • Only the rigid metal duct work should check the exhaust system and vent hood for test gauge connection, MUST be ... or crimping of door. cm) CLOSET DOOR A louvered door with the kit. EXHAUST DUCT LOCATING DIMENSIONS LOCATION OF YOUR DRYER DO NOT INSTALL YOUR DRYER: 1. The dryer MUST be used to or less than 0.75 inches of water column. The more often you should be disconnected from bottom...
... the system is unacceptable. Although vertical orientation of the exhaust system is acceptable, certain extenuating circumstances could affect the performance of the dryer: • Only the rigid metal duct work should check the exhaust system and vent hood for test gauge connection, MUST be ... or crimping of door. cm) CLOSET DOOR A louvered door with the kit. EXHAUST DUCT LOCATING DIMENSIONS LOCATION OF YOUR DRYER DO NOT INSTALL YOUR DRYER: 1. The dryer MUST be used to or less than 0.75 inches of water column. The more often you should be disconnected from bottom...
Installation Instructions
Page 4
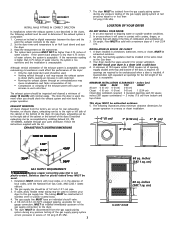
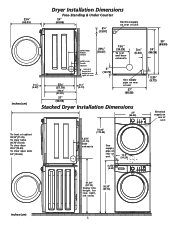
Dryer Installation Dimensions 23¾" (60.33) Free-Standing & Under Counter 24" (60.96) 11221133223344115522334455667788990011223344556677889900112233445566778899001111222233112211111111111111111111111111111111111111111111331111112222222222222222222222222222222222222222222244222222554Te5Teoo66..xx38hhbsChr77aai55iaeged5uu""sinh.egss((0e11tttthe",s14t(rl... of unit 27" (68.58) 35" (88.90) 34" (86.36) 2.25" (5.72) inches (cm) 27" (68.58) Stacked Dryer Installation Dimensions 27" (68.58) T2T2T2T5i8839oooon..".275c(fccc1r55"hlllo(eee3""7en((aaa4774strr.r136.9odo..2k(703cf)oop63)mobec))nrsa...
Dryer Installation Dimensions 23¾" (60.33) Free-Standing & Under Counter 24" (60.96) 11221133223344115522334455667788990011223344556677889900112233445566778899001111222233112211111111111111111111111111111111111111111111331111112222222222222222222222222222222222222222222244222222554Te5Teoo66..xx38hhbsChr77aai55iaeged5uu""sinh.egss((0e11tttthe",s14t(rl... of unit 27" (68.58) 35" (88.90) 34" (86.36) 2.25" (5.72) inches (cm) 27" (68.58) Stacked Dryer Installation Dimensions 27" (68.58) T2T2T2T5i8839oooon..".275c(fccc1r55"hlllo(eee3""7en((aaa4774strr.r136.9odo..2k(703cf)oop63)mobec))nrsa...
Installation Instructions
Page 5
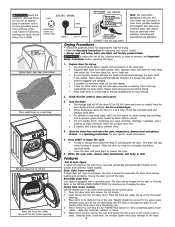
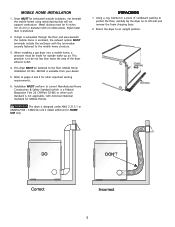
... the floor and area beneath the mobile home is to be exhausted outside make up air. The dryer is available from your dealer. 5. Using a rug, blanket or a piece of the dryer exhaust outlet. 4. Return the dryer to pages 2 and 3 for Mobile Homes. FOAM SHIPPING PAD PACKING 5 MOBILE HOME INSTALLATION 1. ...combustion. Installation MUST conform to the floor. This provision is enclosed, the exhaust system MUST terminate outside the enclosure with no obstructions. Dryer MUST be not less than twice the area of cardboard packing to the mobile home structure. 3. When installing a gas...
... the floor and area beneath the mobile home is to be exhausted outside make up air. The dryer is available from your dealer. 5. Using a rug, blanket or a piece of the dryer exhaust outlet. 4. Return the dryer to pages 2 and 3 for Mobile Homes. FOAM SHIPPING PAD PACKING 5 MOBILE HOME INSTALLATION 1. ...combustion. Installation MUST conform to the floor. This provision is enclosed, the exhaust system MUST terminate outside the enclosure with no obstructions. Dryer MUST be not less than twice the area of cardboard packing to the mobile home structure. 3. When installing a gas...
Installation Instructions
Page 6
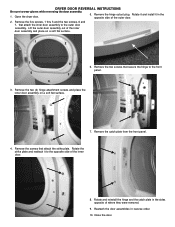
... the two screws that secure the hinge to wear gloves while reversing the door assembly. 1. Remove the catch plate from the front panel. 4. Open the dryer door. 5. DRYER DOOR REVERSAL INSTRUCTIONS Be sure to the front panel. 3. Remove the hinge cutout plug.
... the two screws that secure the hinge to wear gloves while reversing the door assembly. 1. Remove the catch plate from the front panel. 4. Open the dryer door. 5. DRYER DOOR REVERSAL INSTRUCTIONS Be sure to the front panel. 3. Remove the hinge cutout plug.
Installation Instructions
Page 7
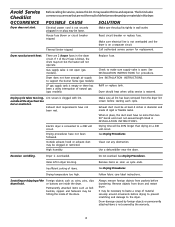
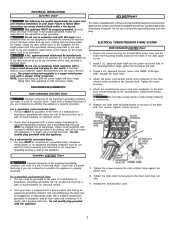
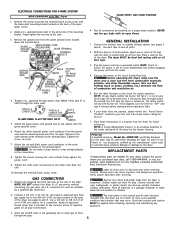
... circuit conductors and connected to a grounded metal, permanent wiring system; Since your protection against the power cord. 8. If your dryer. or an equipment grounding conductor must be plugged into an appropriate outlet that is equipped with a power supply cord having an...-grounding conductor and a grounding plug, the plug must be installed onto power cord. ELECTRICAL CONNECTIONSFOR 3-WIRE SYSTEM NON-CANADIAN ELECTRIC Dryer 1. approved strain relief into a properly grounded three-prong receptacle. GREEN GROUND SCREW NEUTRAL GROUND WIRE SILVER TERMINAL NUT TIGHTEN NUT ...
... circuit conductors and connected to a grounded metal, permanent wiring system; Since your protection against the power cord. 8. If your dryer. or an equipment grounding conductor must be plugged into an appropriate outlet that is equipped with a power supply cord having an...-grounding conductor and a grounding plug, the plug must be installed onto power cord. ELECTRICAL CONNECTIONSFOR 3-WIRE SYSTEM NON-CANADIAN ELECTRIC Dryer 1. approved strain relief into a properly grounded three-prong receptacle. GREEN GROUND SCREW NEUTRAL GROUND WIRE SILVER TERMINAL NUT TIGHTEN NUT ...
Installation Instructions
Page 8
... causing suffocation. The instructions in a location near the dryer for the Frigidaire Company Authorized Parts Distributor nearest you purchased your dryer, contact the source where you . Place a level on the back of the dryer. Attach the red and black power cord conductors to .../tech sheet is resting solid on a soapy water solution. Place these instructions in this dryer are needed for your dryer, call 1-800-944-9044, or visit our website, www.frigidaire.com, for future reference. GREEN GROUND SCREW GREEN POWER CORD GROUND WIRE SILVER TERMINAL TERMINAL...
... causing suffocation. The instructions in a location near the dryer for the Frigidaire Company Authorized Parts Distributor nearest you purchased your dryer, contact the source where you . Place a level on the back of the dryer. Attach the red and black power cord conductors to .../tech sheet is resting solid on a soapy water solution. Place these instructions in this dryer are needed for your dryer, call 1-800-944-9044, or visit our website, www.frigidaire.com, for future reference. GREEN GROUND SCREW GREEN POWER CORD GROUND WIRE SILVER TERMINAL TERMINAL...
Operating Instructions
Page 1
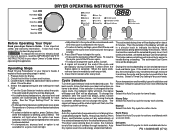
...To reduce the risk of fire, electric shock or injury to indicate the drying time is selected in detail. 1. If desired, add a dryer fabric softener sheet. If the selection is changed after a few minutes. When the load has reached the selected dryness level, it tumbles through... heated air. Operating Steps Read "Drying Procedures" in your dryer Owner's Guide. To resume the cycle, press Start/Pause again. • To stop or change the temperature and dryness level, press ...
...To reduce the risk of fire, electric shock or injury to indicate the drying time is selected in detail. 1. If desired, add a dryer fabric softener sheet. If the selection is changed after a few minutes. When the load has reached the selected dryness level, it tumbles through... heated air. Operating Steps Read "Drying Procedures" in your dryer Owner's Guide. To resume the cycle, press Start/Pause again. • To stop or change the temperature and dryness level, press ...
Operating Instructions
Page 2
...bedding, children's clothing or other items where sanitization is required. If a temperature, dryness level or option is paused. to stop the dryer, press Options and Select at the end of the cycle. "LOC" will automatically be displayed. The load will kill 99.9% of bacteria... Options Appropriate drying Temperature, Dryness Level and Options will be removed promptly at low heat. To protect your laundry. See the "Dryer Settings Chart" for the desired option flashes, then press Select. Select Normal for wrinkle free, permanent press and lightweight fabrics. If...
...bedding, children's clothing or other items where sanitization is required. If a temperature, dryness level or option is paused. to stop the dryer, press Options and Select at the end of the cycle. "LOC" will automatically be displayed. The load will kill 99.9% of bacteria... Options Appropriate drying Temperature, Dryness Level and Options will be removed promptly at low heat. To protect your laundry. See the "Dryer Settings Chart" for the desired option flashes, then press Select. Select Normal for wrinkle free, permanent press and lightweight fabrics. If...
Operating Instructions
Page 3
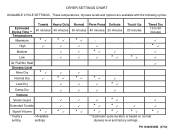
... * Damp Dry Options Shrink Guard Extended Tumble Signal Volume * * * Factory setting Available settings * * * * * * * * ** Estimated cycle duration is based on normal dryness level and factory settings. DRYER SETTINGS CHART AVAILABLE CYCLE SETTINGS -
... * Damp Dry Options Shrink Guard Extended Tumble Signal Volume * * * Factory setting Available settings * * * * * * * * ** Estimated cycle duration is based on normal dryness level and factory settings. DRYER SETTINGS CHART AVAILABLE CYCLE SETTINGS -


