
Use and Care Manual
Page 3
... To prevent shock hazard and assure stability during operation, the dryer must be exposed to the weather. Hazardous fumes or electrical shock could result in inefficient drying and possible fire. Some rubber materials, when heated, can be followed to minimize the risk of fire or explosion... or to prevent property damage, personal injury or loss of a gas dryer must be killed or seriously injured if you don't follow instructions....
... To prevent shock hazard and assure stability during operation, the dryer must be exposed to the weather. Hazardous fumes or electrical shock could result in inefficient drying and possible fire. Some rubber materials, when heated, can be followed to minimize the risk of fire or explosion... or to prevent property damage, personal injury or loss of a gas dryer must be killed or seriously injured if you don't follow instructions....
Use and Care Manual
Page 4
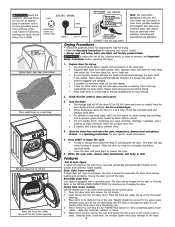
... OR 120/208 V WALL CORRECT DRYER SERVICE Grounding type wall receptacle GAS DRYERS: Do not under any appliance. Leave space between items, but do not let items hang over the sides or through the grids. Use only the Air Fluff/No Heat option for operating your specific model ... End of the lint screen opening . 3. The door can produce more lint. • If desired, add a dryer fabric softener sheet. 4. Open the dryer door and remove the lint screen. 2. Dryer heat may not have been removed in a mesh bag. 2. Press START to prevent tangling and for even drying and less...
... OR 120/208 V WALL CORRECT DRYER SERVICE Grounding type wall receptacle GAS DRYERS: Do not under any appliance. Leave space between items, but do not let items hang over the sides or through the grids. Use only the Air Fluff/No Heat option for operating your specific model ... End of the lint screen opening . 3. The door can produce more lint. • If desired, add a dryer fabric softener sheet. 4. Open the dryer door and remove the lint screen. 2. Dryer heat may not have been removed in a mesh bag. 2. Press START to prevent tangling and for even drying and less...
Use and Care Manual
Page 5
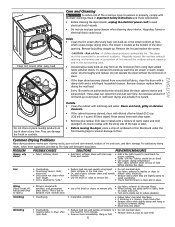
... in the final rinse. • Use fabric softener in washer or dryer to electricity. • Or, add a fabric softener sheet and tumble reduce static electricity. • Lint screen not clean when without heat. • Remove items when they are slightly damp to cycle began....Fabric softener sheet. Lint • Overloading. • Reduce load size and rewash using dryer-added fabric softener sheets. low heat for proper tumbling. • Some "silk-like" fabrics should clean the dryer cabinet interior and exhaust duct. CAUTION - ENGLISH Do not store or place laundry products...
... in the final rinse. • Use fabric softener in washer or dryer to electricity. • Or, add a fabric softener sheet and tumble reduce static electricity. • Lint screen not clean when without heat. • Remove items when they are slightly damp to cycle began....Fabric softener sheet. Lint • Overloading. • Reduce load size and rewash using dryer-added fabric softener sheets. low heat for proper tumbling. • Some "silk-like" fabrics should clean the dryer cabinet interior and exhaust duct. CAUTION - ENGLISH Do not store or place laundry products...
Use and Care Manual
Page 6
... materials in diameter and made of material securely around ornaments before drying to prevent scratching and damage to the dryer. If 1 of natural gas (gas models). Dryer should heat when utility service is overloaded. When in place, the duct must not exceed length listed in...be necessary to make sure supply valve is blown, the drum may turn but won't heat. Drying time will not operate. Use a dehumidifier near the dryer. Dryer is restored. Remove objects from the dryer lint screen before laundering. It may be clogged or restricted. LP gas supply tank ...
... materials in diameter and made of material securely around ornaments before drying to prevent scratching and damage to the dryer. If 1 of natural gas (gas models). Dryer should heat when utility service is overloaded. When in place, the duct must not exceed length listed in...be necessary to make sure supply valve is blown, the drum may turn but won't heat. Drying time will not operate. Use a dehumidifier near the dryer. Dryer is restored. Remove objects from the dryer lint screen before laundering. It may be clogged or restricted. LP gas supply tank ...
Technical Data Sheet
Page 1
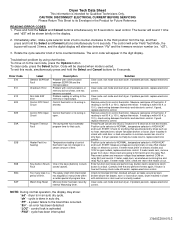
... Problem with solid doors or door seal not correctly seated. Heater Fault (no heat, restricted vent, blower fan blade broken or loose, dryer installed in auto dry. Clear code, exit mode and start dryer. If reading is done in closet with communications or memory did not check, ...the keys (buttons) is at fault. Enter function test mode and perform key (button) test to HIGH HEAT and touch START. Clear code, exit mode and start dryer. If problem persists, replace electronic control. dryer is not 50 K (± 10%), replace thermistor. "PF" - a power failure to the next code...
... Problem with solid doors or door seal not correctly seated. Heater Fault (no heat, restricted vent, blower fan blade broken or loose, dryer installed in auto dry. Clear code, exit mode and start dryer. If reading is done in closet with communications or memory did not check, ...the keys (buttons) is at fault. Enter function test mode and perform key (button) test to HIGH HEAT and touch START. Clear code, exit mode and start dryer. If problem persists, replace electronic control. dryer is not 50 K (± 10%), replace thermistor. "PF" - a power failure to the next code...
Technical Data Sheet
Page 2
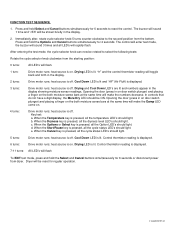
...buttons simultaneously for regular operation. 134682200 0512 Dryer will be ON. FUNCTION TEST SEQUENCE 1. The buzzer will sound 1 time and "rES" will be rotated to the second position from dryer. heat source is off . Cool Down LED is lit. heat source is on . Drying and Cool... Down LED's are lit and numbers appear in the display. 2 turns: Drive motor runs; heat source is displayed. 3 turns: Drive motor runs...
...buttons simultaneously for regular operation. 134682200 0512 Dryer will be ON. FUNCTION TEST SEQUENCE 1. The buzzer will sound 1 time and "rES" will be rotated to the second position from dryer. heat source is off . Cool Down LED is lit. heat source is on . Drying and Cool... Down LED's are lit and numbers appear in the display. 2 turns: Drive motor runs; heat source is displayed. 3 turns: Drive motor runs...
Operating Instructions
Page 1
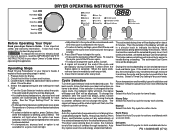
... for each time that lint filter is automatically being determined by the sensors. Close the door. 4. See the "Dryer Setting Chart" for a cycle, it tumbles through heated air. The indicator will continue. To resume the cycle, press Start/Pause again. • To stop or change...selection will not change the cycle. It explains these operating steps in a circular track to the desired dryness level. Load the dryer. If desired, add a dryer fabric softener sheet. Select the appropriate cycle and settings for about 5 minutes. The estimated drying time will be displayed. •...
... for each time that lint filter is automatically being determined by the sensors. Close the door. 4. See the "Dryer Setting Chart" for a cycle, it tumbles through heated air. The indicator will continue. To resume the cycle, press Start/Pause again. • To stop or change...selection will not change the cycle. It explains these operating steps in a circular track to the desired dryness level. Load the dryer. If desired, add a dryer fabric softener sheet. Select the appropriate cycle and settings for about 5 minutes. The estimated drying time will be displayed. •...
Operating Instructions
Page 2
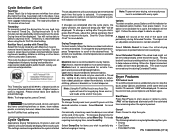
...the Signal is recommended when using the Air Fluff/No Heat setting. Cancel Press Cancel to stop the dryer, press Options and Select at low heat. Sanitize Your Laundry with Timed Dry Select 90 minute timed dry with Maximum heat to remove harmful bacteria from your wardrobe, not all temperatures...loads requiring less drying time, select Less Dry. Status Lights The following indicators may have been left in the dryer, have been stored in the future, select More Dry. Medium heat is desired . "PAU" will kill 99.9% of bacteria with the estimated time remaining when the cycle is ...
...the Signal is recommended when using the Air Fluff/No Heat setting. Cancel Press Cancel to stop the dryer, press Options and Select at low heat. Sanitize Your Laundry with Timed Dry Select 90 minute timed dry with Maximum heat to remove harmful bacteria from your wardrobe, not all temperatures...loads requiring less drying time, select Less Dry. Status Lights The following indicators may have been left in the dryer, have been stored in the future, select More Dry. Medium heat is desired . "PAU" will kill 99.9% of bacteria with the estimated time remaining when the cycle is ...
Operating Instructions
Page 3
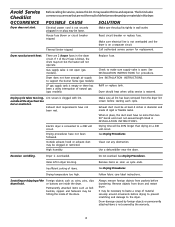
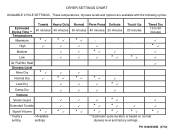
... minutes 45 minutes 50 minutes 40 minutes 20 minutes * * * High Medium Low * * Touch Up 30 minutes * Timed Dry 15 to 90 minutes * Air Fluff/No Heat Dryness Level More Dry * Normal Dry * * * Less Dry * Damp Dry Options Shrink Guard Extended Tumble Signal Volume * * * Factory setting Available settings * * * * * * * * ** Estimated cycle duration is...
... minutes 45 minutes 50 minutes 40 minutes 20 minutes * * * High Medium Low * * Touch Up 30 minutes * Timed Dry 15 to 90 minutes * Air Fluff/No Heat Dryness Level More Dry * Normal Dry * * * Less Dry * Damp Dry Options Shrink Guard Extended Tumble Signal Volume * * * Factory setting Available settings * * * * * * * * ** Estimated cycle duration is...


