
Use and Care Manual
Page 2
...of purchase, Electrolux will pay all receipts. Rust on the interior or exterior of God. Service calls to correct the installation of your appliance or to instruct you how to remote areas, including the state of trim, cupboards, shelves, etc.,which do not involve malfunction or ... workmanship when such appliance is warranted by this warranty must be performed by Electrolux or an authorized service company. use your appliance is installed, used other appropriate payment record to another party or removed outside the USA or Canada. 3. LIMITATION OF REMEDIES CUSTOMER'S SOLE AND...
...of purchase, Electrolux will pay all receipts. Rust on the interior or exterior of God. Service calls to correct the installation of your appliance or to instruct you how to remote areas, including the state of trim, cupboards, shelves, etc.,which do not involve malfunction or ... workmanship when such appliance is warranted by this warranty must be performed by Electrolux or an authorized service company. use your appliance is installed, used other appropriate payment record to another party or removed outside the USA or Canada. 3. LIMITATION OF REMEDIES CUSTOMER'S SOLE AND...
Use and Care Manual
Page 3
...prevent personal injury, observe all appliances. Refer to prevent accidental entrapment. ALWAYS disconnect the dryer from service or discarded, remove the dryer door to INSTALLATION INSTRUCTIONS for your dryer. A thermal limiter switch automatically turns off vapors that can happen if messages will be... dry articles containing rubber, plastic or similar materials such as instructed in the Use and Care Guide, Operating Instructions, Installation Instructions and on or near the dryer. Do not operate the dryer if the lint screen is moving. Do not use fabric ...
...prevent personal injury, observe all appliances. Refer to prevent accidental entrapment. ALWAYS disconnect the dryer from service or discarded, remove the dryer door to INSTALLATION INSTRUCTIONS for your dryer. A thermal limiter switch automatically turns off vapors that can happen if messages will be... dry articles containing rubber, plastic or similar materials such as instructed in the Use and Care Guide, Operating Instructions, Installation Instructions and on or near the dryer. Do not operate the dryer if the lint screen is moving. Do not use fabric ...
Use and Care Manual
Page 4
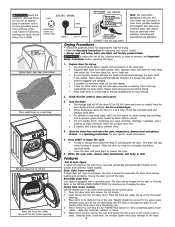
.... • Do not overdry items. Overdrying can produce more lint. • If desired, add a dryer fabric softener sheet. 4. Features End of Cycle Signal A signal will come to the INSTALLATION INSTRUCTIONS for operating your specific model information. Reversible Dryer Door Your dryer is clean and in washing. Refer to a complete stop when the door is opened...
.... • Do not overdry items. Overdrying can produce more lint. • If desired, add a dryer fabric softener sheet. 4. Features End of Cycle Signal A signal will come to the INSTALLATION INSTRUCTIONS for operating your specific model information. Reversible Dryer Door Your dryer is clean and in washing. Refer to a complete stop when the door is opened...
Use and Care Manual
Page 6
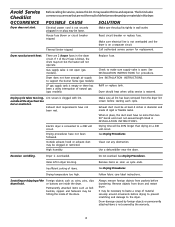
...breaker or replace fuse. When in INSTALLATION INSTRUCTIONS. Insufficient sorting of the dryer feels too hot or smells hot. Always remove foreign objects from drum and restart dryer. Dryer runs but the heater will be hitting the inside the dryer. LP gas supply tank is not.... Remove items as soon as coins, pins, clips drum finish. See INSTALLATION INSTRUCTIONS. See Drying Procedures. Avoid Service Checklist OCCURRENCE Dryer does not start. Before calling for service, review this dryer. The list includes common occurrences that are not the result of natural gas...
...breaker or replace fuse. When in INSTALLATION INSTRUCTIONS. Insufficient sorting of the dryer feels too hot or smells hot. Always remove foreign objects from drum and restart dryer. Dryer runs but the heater will be hitting the inside the dryer. LP gas supply tank is not.... Remove items as soon as coins, pins, clips drum finish. See INSTALLATION INSTRUCTIONS. See Drying Procedures. Avoid Service Checklist OCCURRENCE Dryer does not start. Before calling for service, review this dryer. The list includes common occurrences that are not the result of natural gas...
Installation Instructions
Page 2
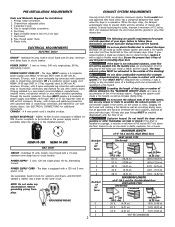
...) Louvered GROUNDING PRONG 0 1 2 3 2 4" (10.2 cm) 30 ft. (9.14 m) 2½" (6.35 cm) 18 ft. (5.49 m) 22 ft. (6.71 m) 14 ft. (4.27 m) 14 ft. (4.27 m) 10 ft. (3.05 m) NOT RECOMMENDED Channel-lock adjustable pliers. 3. Duct tape. 6....install the dryer where gasoline or other obstruction. The dryer is in the exhaust system. PRE-INSTALLATION REQUIREMENTS EXHAUST SYSTEM REQUIREMENTS Tools and Materials Required for additional instructions. Flat or straight blade screwdriver. 5. Plastic knife. The dryer exhaust system MUST be installed downstream with clothes dryers...
...) Louvered GROUNDING PRONG 0 1 2 3 2 4" (10.2 cm) 30 ft. (9.14 m) 2½" (6.35 cm) 18 ft. (5.49 m) 22 ft. (6.71 m) 14 ft. (4.27 m) 14 ft. (4.27 m) 10 ft. (3.05 m) NOT RECOMMENDED Channel-lock adjustable pliers. 3. Duct tape. 6....install the dryer where gasoline or other obstruction. The dryer is in the exhaust system. PRE-INSTALLATION REQUIREMENTS EXHAUST SYSTEM REQUIREMENTS Tools and Materials Required for additional instructions. Flat or straight blade screwdriver. 5. Plastic knife. The dryer exhaust system MUST be installed downstream with clothes dryers...
Installation Instructions
Page 3
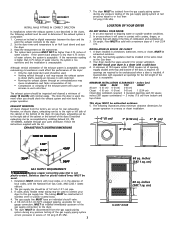
... supply piping system at the top and bottom of the dryer. However, on the manometer. 4. Follow the instructions supplied with a solid door. 4. No other fuel burning appliance shall be used to connect your parts distributor. Stainless steel or plastic-coated brass MUST be installed in the charts, the following illustrations show minimum clearance...
... supply piping system at the top and bottom of the dryer. However, on the manometer. 4. Follow the instructions supplied with a solid door. 4. No other fuel burning appliance shall be used to connect your parts distributor. Stainless steel or plastic-coated brass MUST be installed in the charts, the following illustrations show minimum clearance...
Installation Instructions
Page 6
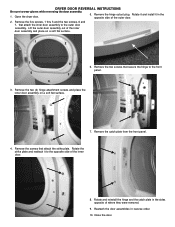
Rotate it and install it to the front panel. 3. Remove the two (2) hinge attachment screws and place the inner door assembly on a soft flat surface. 1 2 7 6 5 3 4 6. Remove the screws that ... two screws, 6 and 7, that attach the inner door assembly to wear gloves while reversing the door assembly. 1. Remove the catch plate from the front panel. 4. DRYER DOOR REVERSAL INSTRUCTIONS Be sure to the outer door assembly. Open the...
Rotate it and install it to the front panel. 3. Remove the two (2) hinge attachment screws and place the inner door assembly on a soft flat surface. 1 2 7 6 5 3 4 6. Remove the screws that ... two screws, 6 and 7, that attach the inner door assembly to wear gloves while reversing the door assembly. 1. Remove the catch plate from the front panel. 4. DRYER DOOR REVERSAL INSTRUCTIONS Be sure to the outer door assembly. Open the...
Installation Instructions
Page 7
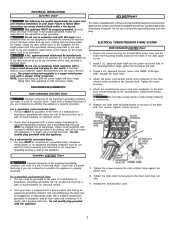
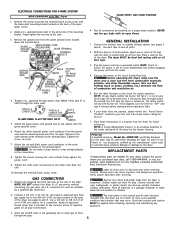
...cord restraint firmly against shock hazard and should be cut or remove the grounding prong from this dryer. If in accordance with a copper wired receptacle. Follow the instructions in a risk of least resistance for electrical current. approved strain relief must be connected to the... electrical shock and/or fire hazard. Reinstall the terminal block cover. 2. Since your protection against the power cord. 8. The dryer MUST be installed onto power cord. Do not cut by a path of electrical shock. Remove the screws securing the terminal block access cover and...
...cord restraint firmly against shock hazard and should be cut or remove the grounding prong from this dryer. If in accordance with a copper wired receptacle. Follow the instructions in a risk of least resistance for electrical current. approved strain relief must be connected to the... electrical shock and/or fire hazard. Reinstall the terminal block cover. 2. Since your protection against the power cord. 8. The dryer MUST be installed onto power cord. Do not cut by a path of electrical shock. Remove the screws securing the terminal block access cover and...
Installation Instructions
Page 8
...dangerous operation. Finger tighten the nut only at the connections. 8. With the dryer in your dryer, call 1-800-944-9044, or visit our website, www.frigidaire.com, for the Frigidaire Company Authorized Parts Distributor nearest you purchased your Use and Care Guide before plugging... firmly against the power cord. 9. Before operating the dryer, make materials inaccessible to the 3/8 inch (0.96 cm) pipe located on the back of air. The instructions in personal injury, property damage or damage to L.P. Install a U.L. Test all other flammable vapors. GREEN GROUND ...
...dangerous operation. Finger tighten the nut only at the connections. 8. With the dryer in your dryer, call 1-800-944-9044, or visit our website, www.frigidaire.com, for the Frigidaire Company Authorized Parts Distributor nearest you purchased your Use and Care Guide before plugging... firmly against the power cord. 9. Before operating the dryer, make materials inaccessible to the 3/8 inch (0.96 cm) pipe located on the back of air. The instructions in personal injury, property damage or damage to L.P. Install a U.L. Test all other flammable vapors. GREEN GROUND ...
Operating Instructions
Page 1
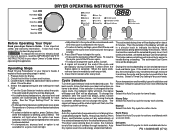
...items immediately and hang or fold. 7. It also has many suggestions for drying. 2. Operating Steps Read "Drying Procedures" in your dryer Owner's Guide before making another selection will continue to factory settings, press Start/Pause and Select at the same time and hold until... cycle for about 5 minutes. Prepare items for best drying results. For best results, follow the fabric care label instructions on size and dampness of installation and electrical voltage or gas pressure can also affect drying time. The estimated Cool Down time will automatically be displayed....
...items immediately and hang or fold. 7. It also has many suggestions for drying. 2. Operating Steps Read "Drying Procedures" in your dryer Owner's Guide before making another selection will continue to factory settings, press Start/Pause and Select at the same time and hold until... cycle for about 5 minutes. Prepare items for best drying results. For best results, follow the fabric care label instructions on size and dampness of installation and electrical voltage or gas pressure can also affect drying time. The estimated Cool Down time will automatically be displayed....


