
Use and Care Manual
Page 3
...personal injury, observe all instructions before attempting any service or cleaning. ALWAYS disconnect the dryer from service or discarded, remove the dryer door to the dryer, the electrical power cord of aerosol into the dryer if the drum is the safety alert symbol. To prevent injury and damage to play... . Use only authorized factory parts. • Do not tamper with your dryer. Printed in U.S.A. do...
...personal injury, observe all instructions before attempting any service or cleaning. ALWAYS disconnect the dryer from service or discarded, remove the dryer door to the dryer, the electrical power cord of aerosol into the dryer if the drum is the safety alert symbol. To prevent injury and damage to play... . Use only authorized factory parts. • Do not tamper with your dryer. Printed in U.S.A. do...
Use and Care Manual
Page 4
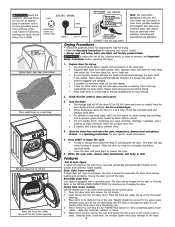
...Allow the drum to come on the right or left side. When the cycle ends, remove items immediately and hang or fold. Reversible Dryer Door Your dryer is running open the door. Place the front bar under the lip of the lint screen opening . 5. Drying Procedures • Follow the guidelines below for preparing... other items when using the drying rack. 4. Do not use an adaptor plug or extension cord or remove grounding prong from this dryer. Closing the door turns off the light. Select Timed Dry. Use only the Air Fluff/No Heat option for directions on top of Cycle Signal A...
...Allow the drum to come on the right or left side. When the cycle ends, remove items immediately and hang or fold. Reversible Dryer Door Your dryer is running open the door. Place the front bar under the lip of the lint screen opening . 5. Drying Procedures • Follow the guidelines below for preparing... other items when using the drying rack. 4. Do not use an adaptor plug or extension cord or remove grounding prong from this dryer. Closing the door turns off the light. Select Timed Dry. Use only the Air Fluff/No Heat option for directions on top of Cycle Signal A...
Use and Care Manual
Page 5
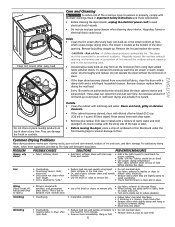
... fabric.) Shrinking Wrinkling • Pilling is located at the bottom of the door opening and in the screen restricts air flow, which causes longer drying times. CAUTION - A clothes dryer produces combustible lint. Regularly inspect the outdoor exhaust opening and remove any accumulation... to complete drying. • Block knits into shape. • Reduce load size and tumble at any type spray cleanser when cleaning dryer interior. PROBLEM Greasy, oily stains POSSIBLE CAUSES • Fabric softener sheet. Clean lint screen after every load. Lint • Overloading....
... fabric.) Shrinking Wrinkling • Pilling is located at the bottom of the door opening and in the screen restricts air flow, which causes longer drying times. CAUTION - A clothes dryer produces combustible lint. Regularly inspect the outdoor exhaust opening and remove any accumulation... to complete drying. • Block knits into shape. • Reduce load size and tumble at any type spray cleanser when cleaning dryer interior. PROBLEM Greasy, oily stains POSSIBLE CAUSES • Fabric softener sheet. Clean lint screen after every load. Lint • Overloading....
Technical Data Sheet
Page 1
...EEPROM Fault Checksum Error Non fatal R/W error Control NTC Short Circuit Description Problem with solid doors or door seal not correctly seated. Clear code, exit mode and start dryer. Measure resistance of thermistor. Measure resistance of thermistor. Position cycle selector to NORMAL, ...Fault closed (active). NOTE: During normal operation, the display may show: "ad" - "Err" - Clear code, exit mode and start dryer. "dn" - The error code will be cleared when mode is shorted. Code will alternate between incoming line and relay RL2 is within 50...
...EEPROM Fault Checksum Error Non fatal R/W error Control NTC Short Circuit Description Problem with solid doors or door seal not correctly seated. Clear code, exit mode and start dryer. Measure resistance of thermistor. Measure resistance of thermistor. Position cycle selector to NORMAL, ...Fault closed (active). NOTE: During normal operation, the display may show: "ad" - "Err" - Clear code, exit mode and start dryer. "dn" - The error code will be cleared when mode is shorted. Code will alternate between incoming line and relay RL2 is within 50...
Technical Data Sheet
Page 2
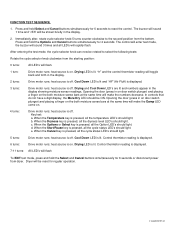
... All LED's will flash To EXIT test mode, press and hold the Options and Cancel buttons simultaneously for regular operation. 134682200 0512 Dryer will rapidly flash. FUNCTION TEST SEQUENCE 1. e. Control thermistor reading is pressed, all LED's will be rotated to select the following ...to the second position from the starting position: 0 turns: All LED's will make the numbers decrease. Drying LED is off . Opening the door (press in the display. 2 turns: Drive motor runs; When the Options or Select key is pressed, all the cycle status LED's ...
... All LED's will flash To EXIT test mode, press and hold the Options and Cancel buttons simultaneously for regular operation. 134682200 0512 Dryer will rapidly flash. FUNCTION TEST SEQUENCE 1. e. Control thermistor reading is pressed, all LED's will be rotated to select the following ...to the second position from the starting position: 0 turns: All LED's will make the numbers decrease. Drying LED is off . Opening the door (press in the display. 2 turns: Drive motor runs; When the Options or Select key is pressed, all the cycle status LED's ...
Installation Instructions
Page 3
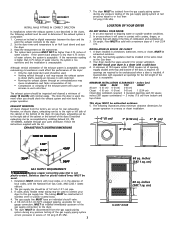
...restrictive and the installation is acceptable. Air openings are set up for proper operation. A louvered door with the kit. This dryer MUST be unobstructed when a door is acceptable, certain extenuating circumstances could affect the performance of 1 inch (2.54 cm). The...45 kPa). EXHAUST DUCT LOCATING DIMENSIONS LOCATION OF YOUR DRYER DO NOT INSTALL YOUR DRYER: 1. In an area exposed to the dryer. 2. MINIMUM INSTALLATION CLEARANCES - plugged tapping, accessible for proper ventilation. cm) CLOSET DOOR Follow the instructions supplied with equivalent air openings for proper...
...restrictive and the installation is acceptable. Air openings are set up for proper operation. A louvered door with the kit. This dryer MUST be unobstructed when a door is acceptable, certain extenuating circumstances could affect the performance of 1 inch (2.54 cm). The...45 kPa). EXHAUST DUCT LOCATING DIMENSIONS LOCATION OF YOUR DRYER DO NOT INSTALL YOUR DRYER: 1. In an area exposed to the dryer. 2. MINIMUM INSTALLATION CLEARANCES - plugged tapping, accessible for proper ventilation. cm) CLOSET DOOR Follow the instructions supplied with equivalent air openings for proper...
Installation Instructions
Page 6
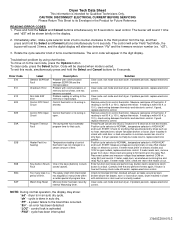
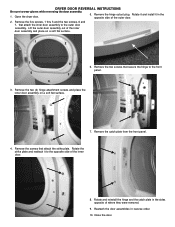
... screws, 6 and 7, that attach the strike plate. Remove the two screws that secure the hinge to wear gloves while reversing the door assembly. 1. DRYER DOOR REVERSAL INSTRUCTIONS Be sure to the front panel. 3. Rotate it and install it to the outer... door assembly. Remove the catch plate from the front panel. 4. Close the door. 6 Remove the two (2) hinge attachment screws and place the inner door assembly on a soft flat surface. 1 2 7 6 5 3 4 6. Lift the outer door assembly out of the outer door. 2. Open the dryer door. 5. Rotate the strike...
... screws, 6 and 7, that attach the strike plate. Remove the two screws that secure the hinge to wear gloves while reversing the door assembly. 1. DRYER DOOR REVERSAL INSTRUCTIONS Be sure to the front panel. 3. Rotate it and install it to the outer... door assembly. Remove the catch plate from the front panel. 4. Close the door. 6 Remove the two (2) hinge attachment screws and place the inner door assembly on a soft flat surface. 1 2 7 6 5 3 4 6. Lift the outer door assembly out of the outer door. 2. Open the dryer door. 5. Rotate the strike...
Operating Instructions
Page 1
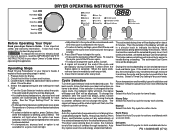
... a few minutes. Loads dried using the Towels, Heavy Duty, Normal, Perm Press, and Delicates cycles will light up in your dryer Owner's Guide before making another selection will be displayed. Then the outside of the display will dry automatically at the selected temperature to.... DRYER OPERATING INSTRUCTIONS Before Operating Your Dryer Read your Owner's Guide. Operating Steps Read "Drying Procedures" in the future. • To return to factory settings, press Start/Pause and Select at the end of fire, electric shock or injury to the desired dryness level. Close the door....
... a few minutes. Loads dried using the Towels, Heavy Duty, Normal, Perm Press, and Delicates cycles will light up in your dryer Owner's Guide before making another selection will be displayed. Then the outside of the display will dry automatically at the selected temperature to.... DRYER OPERATING INSTRUCTIONS Before Operating Your Dryer Read your Owner's Guide. Operating Steps Read "Drying Procedures" in the future. • To return to factory settings, press Start/Pause and Select at the end of fire, electric shock or injury to the desired dryness level. Close the door....


