
English manual
Page 1
... service or the shop where you how to avoid such problems. Warning: means that can help prevent negative consequences for GeForce series Graphics Card. CE: This product has passed CE certification. For more detailed information about recycling of this product may damage hardware , and tells you purchased the product. By ensuring this product is the intellectual property of Foxconn, Foxconn reserves the right to use...
... service or the shop where you how to avoid such problems. Warning: means that can help prevent negative consequences for GeForce series Graphics Card. CE: This product has passed CE certification. For more detailed information about recycling of this product may damage hardware , and tells you purchased the product. By ensuring this product is the intellectual property of Foxconn, Foxconn reserves the right to use...
English manual
Page 4
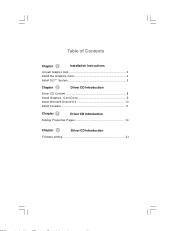
Table of Contents Chapter 1 Installation Instructions Connect Graphics Card 2 Install the Graphics Card 4 Install SLITM System 5 Chapter 2 Driver CD Introduction Driver CD Content 8 Install Graphics Card Driver 9 Install Microsoft DirectX 9.0 10 Install Foxware 11 Chapter 3 Driver CD Introduction Display Properties Pages 14 Chapter 43 Driver CD Introduction Foxware setting 21
Table of Contents Chapter 1 Installation Instructions Connect Graphics Card 2 Install the Graphics Card 4 Install SLITM System 5 Chapter 2 Driver CD Introduction Driver CD Content 8 Install Graphics Card Driver 9 Install Microsoft DirectX 9.0 10 Install Foxware 11 Chapter 3 Driver CD Introduction Display Properties Pages 14 Chapter 43 Driver CD Introduction Foxware setting 21
English manual
Page 7
Please makesure your Graphics Card. Chapter 2 Driver CD Introduction 1 Chapter Read through this User's manual carefully before installing your system goes smoothly. This chapter includes the following information: v Connect Graphics Card v Install the Graphics Card v Install SLITM System 1
Please makesure your Graphics Card. Chapter 2 Driver CD Introduction 1 Chapter Read through this User's manual carefully before installing your system goes smoothly. This chapter includes the following information: v Connect Graphics Card v Install the Graphics Card v Install SLITM System 1

English manual
Page 8
Chapter 1 Installation Instructions Connect Graphics Card Projector Pb/COMP OUT NTSC/PAL TV HDTV S-VID OUT Pb/COMP OUT Y OUT Pr OUT LCD Monitor Graphics Card DVI Output Projector NTSC/PAL TV HDTV LCD Monitor Pb/COMP OUT S-VID OUT Pr OUT Pb/COMP OUT Y OUT VGA Output DVI Output 2
Chapter 1 Installation Instructions Connect Graphics Card Projector Pb/COMP OUT NTSC/PAL TV HDTV S-VID OUT Pb/COMP OUT Y OUT Pr OUT LCD Monitor Graphics Card DVI Output Projector NTSC/PAL TV HDTV LCD Monitor Pb/COMP OUT S-VID OUT Pr OUT Pb/COMP OUT Y OUT VGA Output DVI Output 2

English manual
Page 9
Projector NTSC/PAL TV HDTV LCD Monitor Chapter 1 Installation Instructions Pb/COMP OUT S-VID OUT Pb/COMP OUT Y OUT Pr OUT VGA Output VGA Output Note: You can connect the RCA/AV/Pr interface to Pb/COMP OUT. 3
Projector NTSC/PAL TV HDTV LCD Monitor Chapter 1 Installation Instructions Pb/COMP OUT S-VID OUT Pb/COMP OUT Y OUT Pr OUT VGA Output VGA Output Note: You can connect the RCA/AV/Pr interface to Pb/COMP OUT. 3
English manual
Page 10
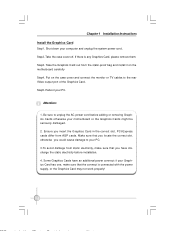
... cables to unplug the AC power cord before installation. 4. Step3. Step5. Some Graphics Cards have discharge the static electricity before adding or removing Graphics Cards otherwise your PC. Step2. Reboot your motherboard or the Graphics Cards might be seriously damaged. 2. Ensure you have an additional power connect; If there is connected with the power supply, or the Graphics Card may not work properly! 4 Be sure to the rear Video output port...
... cables to unplug the AC power cord before installation. 4. Step3. Step5. Some Graphics Cards have discharge the static electricity before adding or removing Graphics Cards otherwise your PC. Step2. Reboot your motherboard or the Graphics Cards might be seriously damaged. 2. Ensure you have an additional power connect; If there is connected with the power supply, or the Graphics Card may not work properly! 4 Be sure to the rear Video output port...

English manual
Page 11
Install two Graphics Cards on a SLI ready motherboard, please makesure that the Graphics Cards are the same type. Graphics Card Power Cable 5 Connect Graphics Card power connector and system power supply connector. Chapter 1 Installation Instructions Install SLITM System Step1. Step2.
Install two Graphics Cards on a SLI ready motherboard, please makesure that the Graphics Cards are the same type. Graphics Card Power Cable 5 Connect Graphics Card power connector and system power supply connector. Chapter 1 Installation Instructions Install SLITM System Step1. Step2.

English manual
Page 12
Install the SLI Bridge Board to the goldfingers on each Graphics Card. Make sure that the connector is firm in place. 6 Chapter 1 Installation Instructions Step 3.
Install the SLI Bridge Board to the goldfingers on each Graphics Card. Make sure that the connector is firm in place. 6 Chapter 1 Installation Instructions Step 3.
English manual
Page 13
This chapter includes the following information: v Driver CD content v Install Graphics Card Driver v Install Microsoft DirectX 9.0 v Install Foxware 7 Chapter 1 Installation Instructions 2 Chapter The Driver CD that cames with the Graphics Card contains several drivers and useful software that enhance the Graphics Card features.
This chapter includes the following information: v Driver CD content v Install Graphics Card Driver v Install Microsoft DirectX 9.0 v Install Foxware 7 Chapter 1 Installation Instructions 2 Chapter The Driver CD that cames with the Graphics Card contains several drivers and useful software that enhance the Graphics Card features.
English manual
Page 14
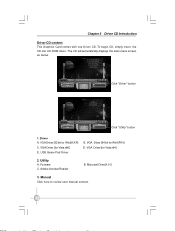
Click "Driver" button Click "Utility" button 1. Foxware C. To begin CD, simply insert the CD into CD-ROM driver. VGA Driver [32 bit for Vista x64] 2. USB Game Pad Driver B. Utility A. Manual Click here to review user manual content. 8 Driver A. Microsoft DirectX 9.0 3. Chapter 2 Driver CD Introduction Driver CD content This Graphics Card comes with one Driver CD. VGA Driver [for Win2K/XP] C. The CD will automatically displays the main menu screen as below. VGA Driver [for WinXP64] D. VGA Driver [64 bit for Vista x86] E. Adobe Acrobat Reader B.
Click "Driver" button Click "Utility" button 1. Foxware C. To begin CD, simply insert the CD into CD-ROM driver. VGA Driver [32 bit for Vista x64] 2. USB Game Pad Driver B. Utility A. Manual Click here to review user manual content. 8 Driver A. Microsoft DirectX 9.0 3. Chapter 2 Driver CD Introduction Driver CD content This Graphics Card comes with one Driver CD. VGA Driver [for Win2K/XP] C. The CD will automatically displays the main menu screen as below. VGA Driver [for WinXP64] D. VGA Driver [64 bit for Vista x86] E. Adobe Acrobat Reader B.
English manual
Page 17
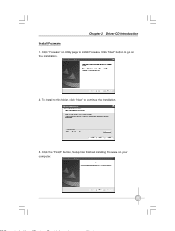
Chapter 2 Driver CD Introduction Install Foxware 1. Click the "Finish" button, Setup has finished installing Foxware on the installation. 2. To install to this folder, click "Next" to install Foxware. Click "Foxware" on Utility page to continue the installation. 3. Click "Next" button to go on your computer. 11
Chapter 2 Driver CD Introduction Install Foxware 1. Click the "Finish" button, Setup has finished installing Foxware on the installation. 2. To install to this folder, click "Next" to install Foxware. Click "Foxware" on Utility page to continue the installation. 3. Click "Next" button to go on your computer. 11
English manual
Page 18
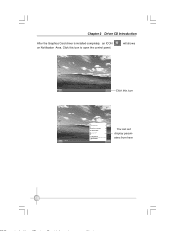
will shows Click this icon to open the control panel. Click this icon You can set display parameters from here 12 Chapter 2 Driver CD Introduction After the Graphics Card driver is installed completely, an ICON on Notification Area.
will shows Click this icon to open the control panel. Click this icon You can set display parameters from here 12 Chapter 2 Driver CD Introduction After the Graphics Card driver is installed completely, an ICON on Notification Area.
English manual
Page 20
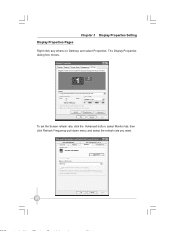
The Display Properties dialog box shows. To set the Screen refresh rate, click the Advanced button, select Monitor tab, then click Refresh Frequency pull-down menu and select the refresh rate you want. 14 Display Properties Pages Chapter 3 Display Properties Setting Right-click any where on Desktop and select Properties.
The Display Properties dialog box shows. To set the Screen refresh rate, click the Advanced button, select Monitor tab, then click Refresh Frequency pull-down menu and select the refresh rate you want. 14 Display Properties Pages Chapter 3 Display Properties Setting Right-click any where on Desktop and select Properties.
English manual
Page 21
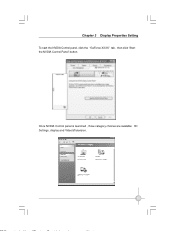
Once NVDIA Control panel is launched , three category choices are available; 3D Settings, display and Video&Television. 15 Chapter 3 Display Properties Setting To start the NVDIA Control panel, click the "GeForce XXXX" tab, then click "Start the NVDIA Control Panel" button.
Once NVDIA Control panel is launched , three category choices are available; 3D Settings, display and Video&Television. 15 Chapter 3 Display Properties Setting To start the NVDIA Control panel, click the "GeForce XXXX" tab, then click "Start the NVDIA Control Panel" button.
English manual
Page 22
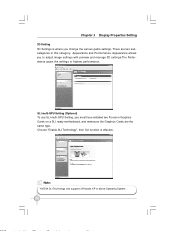
... have installed two Foxconn Graphics Cards on a SLI ready motherboard, and makesure the Graphics Cards are two subcategories in this category, Appearance and Performance. Note: NVIDIA SLI Technology only supports W indows XP or above Operating System. 16 There are the same type. Choose "Enable SLI Technology", then SLI function is where you change the various game settings. Chapter 3 Display Properties Setting 3D Setting 3D Settings is effective. SLI multi-GPU Setting (Optional) To use SLI multi-GPU Setting, you to adjust image settings with...
... have installed two Foxconn Graphics Cards on a SLI ready motherboard, and makesure the Graphics Cards are two subcategories in this category, Appearance and Performance. Note: NVIDIA SLI Technology only supports W indows XP or above Operating System. 16 There are the same type. Choose "Enable SLI Technology", then SLI function is where you change the various game settings. Chapter 3 Display Properties Setting 3D Setting 3D Settings is effective. SLI multi-GPU Setting (Optional) To use SLI multi-GPU Setting, you to adjust image settings with...
English manual
Page 23
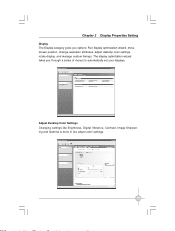
Chapter 3 Display Properties Setting Display The Display category gives you through a series of menus to automatically set your displays. The display optimization wizard takes you options: Run display optimization wizard, move screen position, change resolution attributes, adjust desktop color settings, rotate display, and manage custom timings. Adjust Desktop Color Settings Changing settings like Brightness, Digital Vibrance, Contrast, Image Sharpening and Gamma is done in the adjust color settings. 17
Chapter 3 Display Properties Setting Display The Display category gives you through a series of menus to automatically set your displays. The display optimization wizard takes you options: Run display optimization wizard, move screen position, change resolution attributes, adjust desktop color settings, rotate display, and manage custom timings. Adjust Desktop Color Settings Changing settings like Brightness, Digital Vibrance, Contrast, Image Sharpening and Gamma is done in the adjust color settings. 17
English manual
Page 24
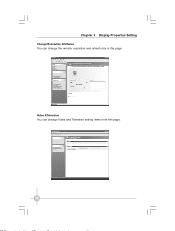
Video &Television You can change Video and Television setting items from this page. Chapter 3 Display Properties Setting Change Resolution Attributes You can change the monitor resolution and refresh rate in this page. 18
Video &Television You can change Video and Television setting items from this page. Chapter 3 Display Properties Setting Change Resolution Attributes You can change the monitor resolution and refresh rate in this page. 18
English manual
Page 25
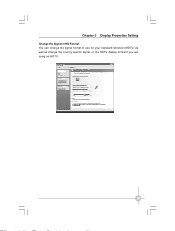
Chapter 3 Display Properties Setting Change the Signal or HD Format You can change the signal format to use for your standard television(HDTV) as well as change the country specfic signal, or the HDTV display format if you are using an HDTV. 19
Chapter 3 Display Properties Setting Change the Signal or HD Format You can change the signal format to use for your standard television(HDTV) as well as change the country specfic signal, or the HDTV display format if you are using an HDTV. 19
English manual
Page 27
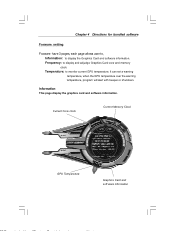
... Graphics Card and software information. It can set a warning temperature, when the GPU temperature over the warning temperature, program will alert with beeper or shutdown. Information This page display the graphics card and software informaiton. Chapter 4 Directions for bundled software Foxware setting Foxware have 3 pages, each page allows user to, Information: to display and adjudge Graphics Card core and memory clock. Current Core clock Current Memory Clock GPU Temperature Graphics Card and soft ware information Temperature: to monitor current GPU temperature...
... Graphics Card and software information. It can set a warning temperature, when the GPU temperature over the warning temperature, program will alert with beeper or shutdown. Information This page display the graphics card and software informaiton. Chapter 4 Directions for bundled software Foxware setting Foxware have 3 pages, each page allows user to, Information: to display and adjudge Graphics Card core and memory clock. Current Core clock Current Memory Clock GPU Temperature Graphics Card and soft ware information Temperature: to monitor current GPU temperature...
English manual
Page 28
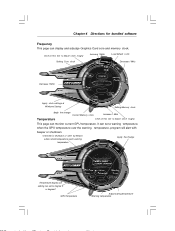
It can set to adjust clock roughy This page can monitor current GPU temperature. Click on this bar to adjust clock roughy Increase 1 MHz Load default colck Setting Core clock Decrease 1 MHz Decrease 1 MHz Apply clock settings at Windows Startup Setting Memory clock Apply the change Temperature display unit setting can set a warning temperature, when the GPU temperature over the warning beeper or shutdown. Checked for bundled software Frequency This page can display and adjudge Graphics Card core and memory clock. Chapter...
It can set to adjust clock roughy This page can monitor current GPU temperature. Click on this bar to adjust clock roughy Increase 1 MHz Load default colck Setting Core clock Decrease 1 MHz Decrease 1 MHz Apply clock settings at Windows Startup Setting Memory clock Apply the change Temperature display unit setting can set a warning temperature, when the GPU temperature over the warning beeper or shutdown. Checked for bundled software Frequency This page can display and adjudge Graphics Card core and memory clock. Chapter...