User Manual
Page 1
All product names are subject to change without notice. TiS10, TiS20, TiS40, TiS45 TiS50, TiS55, TiS60, TiS65 Performance Series Thermal Imagers July 2015 © 2015 Fluke Corporation. Users Manual Specifications are trademarks of their respective companies. All rights reserved.
All product names are subject to change without notice. TiS10, TiS20, TiS40, TiS45 TiS50, TiS55, TiS60, TiS65 Performance Series Thermal Imagers July 2015 © 2015 Fluke Corporation. Users Manual Specifications are trademarks of their respective companies. All rights reserved.
User Manual
Page 11
... • Standard Palettes and Ultra Contrast™ Palettes (availability varies by model) 1 Introduction The Fluke TiS10, TiS20, TiS40, TiS45, TiS50, TiS55, TiS60, and TiS65 Thermal Imagers (the Product or Imager) are handheld, infrared imaging cameras for user-selectable high temperature and low temperature (availability varies by model) IR-Fusion® Technology • Automatically aligned (parallax corrected...
... • Standard Palettes and Ultra Contrast™ Palettes (availability varies by model) 1 Introduction The Fluke TiS10, TiS20, TiS40, TiS45, TiS50, TiS55, TiS60, and TiS65 Thermal Imagers (the Product or Imager) are handheld, infrared imaging cameras for user-selectable high temperature and low temperature (availability varies by model) IR-Fusion® Technology • Automatically aligned (parallax corrected...
User Manual
Page 13
For more information, go to www.fluke.com and search for Radio Frequency Data for actual temperatures. See Imager Information for instructions on the Imager. If this occurs, let the Imager stabilize (cool down or warm up) before you use the Product. • Carefully read... measurements. • Do not use the Product if it is damaged. • See emissivity information for Class A. 3 Performance Series Thermal Imagers Safety Information Operation in Extreme Conditions Storage and/or continual operation of operation. Warning To prevent personal injury: • Read all...
For more information, go to www.fluke.com and search for Radio Frequency Data for actual temperatures. See Imager Information for instructions on the Imager. If this occurs, let the Imager stabilize (cool down or warm up) before you use the Product. • Carefully read... measurements. • Do not use the Product if it is damaged. • See emissivity information for Class A. 3 Performance Series Thermal Imagers Safety Information Operation in Extreme Conditions Storage and/or continual operation of operation. Warning To prevent personal injury: • Read all...

User Manual
Page 15
...-Bluetooth Bluetooth Headset BOOK-ITP Introduction to Thermography Principles Performance Series Thermal Imagers Accessories Part Number 3440365 4354922 3039779 4335389 4603258 3413459 SmartView Software SmartView® software is supplied with the Imager and is available for Fluke Imagers and contains features to analyze images, organize data and information, and make professional reports. SmartView is used...
...-Bluetooth Bluetooth Headset BOOK-ITP Introduction to Thermography Principles Performance Series Thermal Imagers Accessories Part Number 3440365 4354922 3039779 4335389 4603258 3413459 SmartView Software SmartView® software is supplied with the Imager and is available for Fluke Imagers and contains features to analyze images, organize data and information, and make professional reports. SmartView is used...

User Manual
Page 17
...charge in video mode, the Sleep Mode/Auto Off feature is disabled automatically. Performance Series Thermal Imagers Before You Start Keep the Imager attached to the external power socket of the display when the Imager is in hot or cold areas. Connect the output to the charger until the , icon... on the display does not flash. 3. Connect the ac power adapter into the 12 V accessory socket of the display to the Imager, remove the Imager from the charger before you charge the battery in extreme temperatures, battery capacity may have a reduced run-time. Note When the battery...
...charge in video mode, the Sleep Mode/Auto Off feature is disabled automatically. Performance Series Thermal Imagers Before You Start Keep the Imager attached to the external power socket of the display when the Imager is in hot or cold areas. Connect the output to the charger until the , icon... on the display does not flash. 3. Connect the ac power adapter into the 12 V accessory socket of the display to the Imager, remove the Imager from the charger before you charge the battery in extreme temperatures, battery capacity may have a reduced run-time. Note When the battery...
User Manual
Page 19
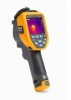
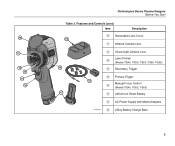
Features and Controls (cont.) Item Description Retractable Lens Cover 19 Infrared Camera Lens Visual Light Camera Lens Laser Pointer (Models TiS45, TiS50, TiS55, TiS60, TiS65) 16 Secondary Trigger Primary Trigger 18 Manual Focus Control (Models TiS45, TiS55, TiS65) 17 Lithium-ion Smart Battery AC Power Supply with Mains Adapters hxk002.eps 2-Bay Battery Charge Base 9 10 11 12 13 14 15 Performance Series Thermal Imagers Before You Start Table 3.
Features and Controls (cont.) Item Description Retractable Lens Cover 19 Infrared Camera Lens Visual Light Camera Lens Laser Pointer (Models TiS45, TiS50, TiS55, TiS60, TiS65) 16 Secondary Trigger Primary Trigger 18 Manual Focus Control (Models TiS45, TiS55, TiS65) 17 Lithium-ion Smart Battery AC Power Supply with Mains Adapters hxk002.eps 2-Bay Battery Charge Base 9 10 11 12 13 14 15 Performance Series Thermal Imagers Before You Start Table 3.
User Manual
Page 20
...video is off), the function of the infrared or visible image. Note All thermal imagers need sufficient warm-up in the standard trigger position for >3 seconds. Although most imagers are fully warmed up time for possible storage to capture a thermal image for the most accurate temperature measurement is located in 3-5 ..., it is always best to set these features, see Settings Menu. The smaller, black trigger is offset from the infrared camera. TiS10, TiS20, TiS40, TiS45, TiS50, TiS55, TiS60, TiS65 Users Manual Power On and Off To turn on or turn off the laser pointer. 10...
...video is off), the function of the infrared or visible image. Note All thermal imagers need sufficient warm-up in the standard trigger position for >3 seconds. Although most imagers are fully warmed up time for possible storage to capture a thermal image for the most accurate temperature measurement is located in 3-5 ..., it is always best to set these features, see Settings Menu. The smaller, black trigger is offset from the infrared camera. TiS10, TiS20, TiS40, TiS45, TiS50, TiS55, TiS60, TiS65 Users Manual Power On and Off To turn on or turn off the laser pointer. 10...
User Manual
Page 21
...; Expand/contract measurement box with MIN-AVG-MAX • Color alarms • User-selectable backlight setting • Graphic information display (selectable) Performance Series Thermal Imagers Before You Start In general, push: 1 to set the change and go back to the live Manual Mode, the arrow buttons are the primary controls. ...
...; Expand/contract measurement box with MIN-AVG-MAX • Color alarms • User-selectable backlight setting • Graphic information display (selectable) Performance Series Thermal Imagers Before You Start In general, push: 1 to set the change and go back to the live Manual Mode, the arrow buttons are the primary controls. ...
User Manual
Page 22
... format and are the access point for: • Thermal image display • Camera features • Measurement • Advanced functions • Memory review • Settings for these secondary menus: Measurement, Image, Camera, Memory, and Settings. These visible images are only available in focus. The primary menu shows .... The menu bar lets you make the selection, go up to three visible (digital) images of various objects: Model: TiS60, TiS65 TiS50, TiS55 TiS40, TiS45, TiS10, TiS20 # of the screen correspond to the buttons. To change the file format, see File Format ...
... format and are the access point for: • Thermal image display • Camera features • Measurement • Advanced functions • Memory review • Settings for these secondary menus: Measurement, Image, Camera, Memory, and Settings. These visible images are only available in focus. The primary menu shows .... The menu bar lets you make the selection, go up to three visible (digital) images of various objects: Model: TiS60, TiS65 TiS50, TiS55 TiS40, TiS45, TiS10, TiS20 # of the screen correspond to the buttons. To change the file format, see File Format ...

User Manual
Page 23
Push to save the pictures with the image. Push save the audio with the image. Push to review the audio file or to enter the Picture mode. 4. Performance Series Thermal Imagers Image Capture i Voice Annotation (Recording) A Bluetooth headset (sold separately) is stored in the file so you do not... file format and is required and the radio must be available in all regions. (Not available on the object and push the Image Capture button. 5. Push W/X to show the recorded time. 4. Focus the Imager on the TiS10 and TiS20 models.) To record: 1.
Push to save the pictures with the image. Push save the audio with the image. Push to review the audio file or to enter the Picture mode. 4. Performance Series Thermal Imagers Image Capture i Voice Annotation (Recording) A Bluetooth headset (sold separately) is stored in the file so you do not... file format and is required and the radio must be available in all regions. (Not available on the object and push the Image Capture button. 5. Push W/X to show the recorded time. 4. Focus the Imager on the TiS10 and TiS20 models.) To record: 1.

User Manual
Page 25
For information about how to view or erase a stored image, see page 14. The Imager senses the infrared energy from the surface of the object. The Micro SD memory card includes an SD adapter for insertion into a PC or multi-... common objects and materials such as they have an emissivity of the slot. For information about how to save data, see page 29. Performance Series Thermal Imagers Micro SD Memory Card Temperature Measurement All objects radiate infrared energy. The quantity of energy radiated is ≥90 % (or 0.90). This simplification does not...
For information about how to view or erase a stored image, see page 14. The Imager senses the infrared energy from the surface of the object. The Micro SD memory card includes an SD adapter for insertion into a PC or multi-... common objects and materials such as they have an emissivity of the slot. For information about how to save data, see page 29. Performance Series Thermal Imagers Micro SD Memory Card Temperature Measurement All objects radiate infrared energy. The quantity of energy radiated is ≥90 % (or 0.90). This simplification does not...
User Manual
Page 26
To choose between the Auto and Manual ranging. 7. Push 2. 2. Push W/X to the thermal images. Fast Auto/Manual Range Toggle When NOT in a menu mode, push 3 for date, time, language, units, file format, and Imager information. Measurement Menu The Measurement Menu has settings for 3 seconds to set . 8. Push ...view. • 2 or Y to toggle between Auto Range and Manual Range. TiS10, TiS20, TiS40, TiS45, TiS50, TiS55, TiS60, TiS65 Users Manual Menus The menus are the access points for thermal image display, camera features, memory setup, and settings for Push 1 or Z to highlight Set...
To choose between the Auto and Manual ranging. 7. Push 2. 2. Push W/X to the thermal images. Fast Auto/Manual Range Toggle When NOT in a menu mode, push 3 for date, time, language, units, file format, and Imager information. Measurement Menu The Measurement Menu has settings for 3 seconds to set . 8. Push ...view. • 2 or Y to toggle between Auto Range and Manual Range. TiS10, TiS20, TiS40, TiS45, TiS50, TiS55, TiS60, TiS65 Users Manual Menus The menus are the access points for thermal image display, camera features, memory setup, and settings for Push 1 or Z to highlight Set...
User Manual
Page 27
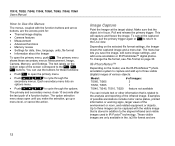
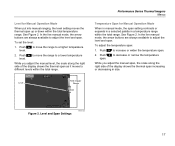
... buttons are always available to different levels within the total range. Level Total Imager Range Span Figure 2. Push W to move the range to adjust the level and span. Performance Series Thermal Imagers Menus Temperature Span for Manual Operation Mode When put into manual ranging, the level... setting moves the thermal span up or down within the total temperature range. While you adjust the manual ...
... buttons are always available to different levels within the total range. Level Total Imager Range Span Figure 2. Push W to move the range to adjust the level and span. Performance Series Thermal Imagers Menus Temperature Span for Manual Operation Mode When put into manual ranging, the level... setting moves the thermal span up or down within the total temperature range. While you adjust the manual ...

User Manual
Page 29
Note If the Display is set to Display All, you set in the window. Performance Series Thermal Imagers Menus Transmission/Transmittance Adjustment (TiS45, TiS55, TiS65 only) When you can affect the apparent temperature and measurement accuracy of the target or ... of interest is transmitted through the optical material in the Background tab. Very hot objects or very cold objects can adjust this percentage in the Imager or in the SmartView® software. Go to Measurement > Background. 2. If you see page 18. Go to Measurement > Transmission. 2. If the transmission...
Note If the Display is set to Display All, you set in the window. Performance Series Thermal Imagers Menus Transmission/Transmittance Adjustment (TiS45, TiS55, TiS65 only) When you can affect the apparent temperature and measurement accuracy of the target or ... of interest is transmitted through the optical material in the Background tab. Very hot objects or very cold objects can adjust this percentage in the Imager or in the SmartView® software. Go to Measurement > Background. 2. If you see page 18. Go to Measurement > Transmission. 2. If the transmission...

User Manual
Page 31
...to highlight Center Box. 5. Push W/X to view the menu. 4. Push 1 or Z to increase the size of the Center Box. 4. Performance Series Thermal Imagers Menus To set the change and go back to the previous menu. • 3 to cancel the change and go back to set the size of ...approximate maximum (MAX), average (AVG), and minimum (MIN) temperature measurement in AUTO Level and Span mode, the Imager automatically sets the level and span according to the infrared scene within the infrared image. Push W/X to reduce the size of the Center Box when enabled: 1. Push Y to toggle the function...
...to highlight Center Box. 5. Push W/X to view the menu. 4. Push 1 or Z to increase the size of the Center Box. 4. Performance Series Thermal Imagers Menus To set the change and go back to the previous menu. • 3 to cancel the change and go back to set the size of ...approximate maximum (MAX), average (AVG), and minimum (MIN) temperature measurement in AUTO Level and Span mode, the Imager automatically sets the level and span according to the infrared scene within the infrared image. Push W/X to reduce the size of the Center Box when enabled: 1. Push Y to toggle the function...

User Manual
Page 33
...easier to understand, analyze, and communicate infrared images through the use of an aligned visible image and infrared image. Push: • 1 to set the change and go back to the live view. The Imager automatically captures a visible image with the TiS10 model.) Table 5. To set...or Ultra Contrast. 7. Push W/X to view the menu. 4. Performance Series Thermal Imagers Menus IR-Fusion® Technology IR-Fusion® technology makes it to others. IR-Fusion has different modes that vary by Model TiS10 TiS20 TiS40, TiS45 TiS50, TiS55 TiS60, TiS65 Auto Blending Level 0, 100 3 ...
...easier to understand, analyze, and communicate infrared images through the use of an aligned visible image and infrared image. Push: • 1 to set the change and go back to the live view. The Imager automatically captures a visible image with the TiS10 model.) Table 5. To set...or Ultra Contrast. 7. Push W/X to view the menu. 4. Performance Series Thermal Imagers Menus IR-Fusion® Technology IR-Fusion® technology makes it to others. IR-Fusion has different modes that vary by Model TiS10 TiS20 TiS40, TiS45 TiS50, TiS55 TiS60, TiS65 Auto Blending Level 0, 100 3 ...

User Manual
Page 35
... temperature setting. 4. Push W/X to highlight the option: Set High Alarm. 2. Push Z to adjust the temperature setting. Push W/X to open the Color Alarm menu. 3. Performance Series Thermal Imagers Menus 4. Push: • 1 to set the change and go back to the live view. • 2 or Y to set the change and go back to the... go back to the live view. Outside/Inside Alarm If you set values for the high-temperature color alarm and a low-temperature color alarm, the Imager will have the options for inside or outside isotherm color alarms. To set a high-temperature color alarm: 1.
... temperature setting. 4. Push W/X to highlight the option: Set High Alarm. 2. Push Z to adjust the temperature setting. Push W/X to open the Color Alarm menu. 3. Performance Series Thermal Imagers Menus 4. Push: • 1 to set the change and go back to the live view. • 2 or Y to set the change and go back to the... go back to the live view. Outside/Inside Alarm If you set values for the high-temperature color alarm and a low-temperature color alarm, the Imager will have the options for inside or outside isotherm color alarms. To set a high-temperature color alarm: 1.

User Manual
Page 37
... button to highlight Backlight. 5. Push W/X to stop recording. 27 Push W/X to enable the recording mode. Performance Series Thermal Imagers Menus Video The TiS60 and TiS65 Imagers can record infrared and IR-Fusion™ to low, medium, and high. The icon shows on the display to start recording mode. 4. A Bluetooth headset ...
... button to highlight Backlight. 5. Push W/X to stop recording. 27 Push W/X to enable the recording mode. Performance Series Thermal Imagers Menus Video The TiS60 and TiS65 Imagers can record infrared and IR-Fusion™ to low, medium, and high. The icon shows on the display to start recording mode. 4. A Bluetooth headset ...

User Manual
Page 39
...allows you to edit .is2 image files that are shown in a large preview format. Files in memory are stored in memory. Go to delete all images in memory. 29 Performance Series Thermal Imagers Menus Edit Image Files SmartView® software and the Fluke Connect™ app allow ...you to highlight the preview image of the file for visible and thermal image and then view all files in the same...
...allows you to edit .is2 image files that are shown in a large preview format. Files in memory are stored in memory. Go to delete all images in memory. 29 Performance Series Thermal Imagers Menus Edit Image Files SmartView® software and the Fluke Connect™ app allow ...you to highlight the preview image of the file for visible and thermal image and then view all files in the same...

User Manual
Page 41
Localization The Imager has several settings for the LCD and power. Push to highlight time format. 3. Push W/X to open the Set Time menu. 31 Highlight Set Time. 5. ..., month, or year. 7. Push Y/Z to Settings > Auto Off. 2. Note Auto Off is automatically disabled when the Imager is user-defined separately for localization: • Date • Time • Language • Decimal Separator Performance Series Thermal Imagers Menus Date The date can be displayed in two different formats: 24 hour or 12 hour. Push...
Localization The Imager has several settings for the LCD and power. Push to highlight time format. 3. Push W/X to open the Set Time menu. 31 Highlight Set Time. 5. ..., month, or year. 7. Push Y/Z to Settings > Auto Off. 2. Note Auto Off is automatically disabled when the Imager is user-defined separately for localization: • Date • Time • Language • Decimal Separator Performance Series Thermal Imagers Menus Date The date can be displayed in two different formats: 24 hour or 12 hour. Push...


