Fluke 8808A Digital Multimeter Datasheet
Page 1
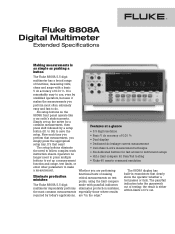
...sheets. Now each time you are performing functional tests or making critical measurements on test points, using the limit compare mode with a basic V dc accuracy of 0.01 %. Operators no longer need to use, even by a setup button (S1 to S6) to instrument setups • Hi.Lo limit... press multiple buttons to set up a measurement function and range, test limits, or enter other parameters to do. Eliminate production mistakes The Fluke 8808A 5.5 digit multimeter dependably performs the most often extremely easy and fast to make a measurement. It is either within limits or it makes ...
...sheets. Now each time you are performing functional tests or making critical measurements on test points, using the limit compare mode with a basic V dc accuracy of 0.01 %. Operators no longer need to use, even by a setup button (S1 to S6) to instrument setups • Hi.Lo limit... press multiple buttons to set up a measurement function and range, test limits, or enter other parameters to do. Eliminate production mistakes The Fluke 8808A 5.5 digit multimeter dependably performs the most often extremely easy and fast to make a measurement. It is either within limits or it makes ...

Fluke 8808A Digital Multimeter Datasheet
Page 5
...;A 100 µA 1 mA 0.01 µA 0.1 µA 1 µA 10 µA 100 µA 1 mA Resistance Specifications are for 200 uA and 2 mA range. If REL is not used, add 0.2 for 200 , 2 k ranges. 1 k per lead for 2-wire resistance plus lead resistance. Input Protection 1000 V on all ranges Input Characteristics Range Full-Scale (5-1/2 Digits) Slow...
...;A 100 µA 1 mA 0.01 µA 0.1 µA 1 µA 10 µA 100 µA 1 mA Resistance Specifications are for 200 uA and 2 mA range. If REL is not used, add 0.2 for 200 , 2 k ranges. 1 k per lead for 2-wire resistance plus lead resistance. Input Protection 1000 V on all ranges Input Characteristics Range Full-Scale (5-1/2 Digits) Slow...

Fluke 8808A Digital Multimeter Datasheet
Page 7
Frequency Gate Time 131 ms Measurement Method AC-coupled input using the ac voltage measurement function. Measurement Considerations To minimize measurement errors, shield inputs from external noise when measuring low voltage, low frequency signals. Settling Considerations ... Rate Fast Maxiumum Reading 199.99 Resolution 0.01 Diode Test Response Time 100 samples/sec with audible tone Rate Fast Maxiumum Reading 1.9999 V Resolution 0.1 mV 6 Fluke Corporation 8808A Fluke 8808A Digital Multimeter Extended Specifications...
Frequency Gate Time 131 ms Measurement Method AC-coupled input using the ac voltage measurement function. Measurement Considerations To minimize measurement errors, shield inputs from external noise when measuring low voltage, low frequency signals. Settling Considerations ... Rate Fast Maxiumum Reading 199.99 Resolution 0.01 Diode Test Response Time 100 samples/sec with audible tone Rate Fast Maxiumum Reading 1.9999 V Resolution 0.1 mV 6 Fluke Corporation 8808A Fluke 8808A Digital Multimeter Extended Specifications...

User Manual
Page 2
...held invalid or unenforceable by a court or other provision. To obtain warranty service, contact your product online, visit register.fluke.com Fluke assumes no authority to that service center, with its functional specifications for 90 days and that software will be free from... defects in material and workmanship under normal use outside the product's specified rating, or normal wear and tear of mechanical components, Fluke will be returned to every buyer. Fluke Corporation P.O. Fluke reserves the right to invoice Buyer for the repair and return...
...held invalid or unenforceable by a court or other provision. To obtain warranty service, contact your product online, visit register.fluke.com Fluke assumes no authority to that service center, with its functional specifications for 90 days and that software will be free from... defects in material and workmanship under normal use outside the product's specified rating, or normal wear and tear of mechanical components, Fluke will be returned to every buyer. Fluke Corporation P.O. Fluke reserves the right to invoice Buyer for the repair and return...

User Manual
Page 4
... 3-25 Factory Settings of Power-Up Configuration 3-25 Calibration ...3-26 4 Operating the Meter Using the Computer Interface 4-1 ii 8808A Users Manual Storing and Shipping the Meter 2-3 Power Considerations 2-3 Selecting the Line Voltage 2-4... Replacing the Fuses 2-4 Line-Power Fuse 2-4 Current-Input Fuses 2-5 Connecting to Line Power 2-7 Turning Power On 2-8 Adjusting the Bail 2-8 Installing the Meter into an Equipment Rack 2-8 Cleaning the Meter 2-9 Fluke...
... 3-25 Factory Settings of Power-Up Configuration 3-25 Calibration ...3-26 4 Operating the Meter Using the Computer Interface 4-1 ii 8808A Users Manual Storing and Shipping the Meter 2-3 Power Considerations 2-3 Selecting the Line Voltage 2-4... Replacing the Fuses 2-4 Line-Power Fuse 2-4 Current-Input Fuses 2-5 Connecting to Line Power 2-7 Turning Power On 2-8 Adjusting the Bail 2-8 Installing the Meter into an Equipment Rack 2-8 Cleaning the Meter 2-9 Fluke...

User Manual
Page 5
... Communication Parameters (RS-232 4-3 RS-232 Print-Only Mode 4-4 Cabling the Meter to a Host or Printer (RS-232 4-5 Character Echoing and Deletion 4-6 Device Clear Using ^C (CNTRL C 4-6 RS-232 Prompts 4-6 Getting Started with an Installation Test 4-6 Installation Test for RS-232 Operation 4-6 If Test Fails...4-7 How the Meter Processes ... 4-24 Miscellaneous Commands and Queries 4-25 RS-232 Remote / Local Configurations 4-25 RS-232 Save / Recall System Configurations 4-26 Sample Program Using the RS-232 Computer Interface 4-27 Appendices A Applications A-1 B 2X4 Test Leads B-1 iii
... Communication Parameters (RS-232 4-3 RS-232 Print-Only Mode 4-4 Cabling the Meter to a Host or Printer (RS-232 4-5 Character Echoing and Deletion 4-6 Device Clear Using ^C (CNTRL C 4-6 RS-232 Prompts 4-6 Getting Started with an Installation Test 4-6 Installation Test for RS-232 Operation 4-6 If Test Fails...4-7 How the Meter Processes ... 4-24 Miscellaneous Commands and Queries 4-25 RS-232 Remote / Local Configurations 4-25 RS-232 Save / Recall System Configurations 4-26 Sample Program Using the RS-232 Computer Interface 4-27 Appendices A Applications A-1 B 2X4 Test Leads B-1 iii

User Manual
Page 9
Bail Adjustment and Removal 2-8 2-5. Display Annunciators and Indicators 3-6 3-3. Line-Power Cord Types Available from Fluke 2-7 2-4. Boot removal...2-9 3-1. Rear Panel ...3-8 3-4. Voltage and Frequency Measurement 3-10 3-5. 2-Wire Resistance Measurement 3-11 3-6. 4-Wire Resistance Measurement 3-12 3-7. Input Connections for 4-wire ohms using 2x4 wire leads 3-13 3-8. Replacing the Current-Input Fuses 2-6 2-3. Current Measurement Replacing the Line Power Fuse 2-5 2-2. List of Figures 2-1. Front Panel ...3-4 3-2.
Bail Adjustment and Removal 2-8 2-5. Display Annunciators and Indicators 3-6 3-3. Line-Power Cord Types Available from Fluke 2-7 2-4. Boot removal...2-9 3-1. Rear Panel ...3-8 3-4. Voltage and Frequency Measurement 3-10 3-5. 2-Wire Resistance Measurement 3-11 3-6. 4-Wire Resistance Measurement 3-12 3-7. Input Connections for 4-wire ohms using 2x4 wire leads 3-13 3-8. Replacing the Current-Input Fuses 2-6 2-3. Current Measurement Replacing the Line Power Fuse 2-5 2-2. List of Figures 2-1. Front Panel ...3-4 3-2.

User Manual
Page 13
...and Specifications Introduction Introduction The Fluke 8808A Digital Multimeter (hereafter referred to determine if a measurement is a 5-1/2 digit dual-display multimeter designed for bench-top operation. The multiple measurement functions, plus the RS-232 remote interface, make the Meter an ideal candidate for precision manual measurements and use in automated systems. For portability... of a printed Getting Started Manual and a Users Manual on a CD-ROM. The Getting Started Manual contains basic getting started information, contacting Fluke, unpacking, and general specifications. 1-3
...and Specifications Introduction Introduction The Fluke 8808A Digital Multimeter (hereafter referred to determine if a measurement is a 5-1/2 digit dual-display multimeter designed for bench-top operation. The multiple measurement functions, plus the RS-232 remote interface, make the Meter an ideal candidate for precision manual measurements and use in automated systems. For portability... of a printed Getting Started Manual and a Users Manual on a CD-ROM. The Getting Started Manual contains basic getting started information, contacting Fluke, unpacking, and general specifications. 1-3

User Manual
Page 14
.../ Canadian standard publications UL 610101:2004and CAN/CSA-C22.2 No.61010.1:2004. 8808A Users Manual About this manual that relate to specific measurement functions. Chapter 5, "Operating the Meter using the Meter from the front panel. A Caution statement identifies conditions or practices that...chapters: Chapter 1, "Introduction and Specifications," provides information on the Meter's rear panel. Chapter 4, "Applications," provides detailed information on using the Meter to a power source, and turning the Meter on the Meter or in a safe condition. Appendices Safety Information This ...
.../ Canadian standard publications UL 610101:2004and CAN/CSA-C22.2 No.61010.1:2004. 8808A Users Manual About this manual that relate to specific measurement functions. Chapter 5, "Operating the Meter using the Meter from the front panel. A Caution statement identifies conditions or practices that...chapters: Chapter 1, "Introduction and Specifications," provides information on the Meter's rear panel. Chapter 4, "Applications," provides detailed information on using the Meter to a power source, and turning the Meter on the Meter or in a safe condition. Appendices Safety Information This ...

User Manual
Page 15
... Meter, between the terminals or between any unintended operation. • Have the Meter serviced only by measuring a known voltage before and after using the Meter. • Verify the Meter's operation by qualified service personnel. • Do not apply more than the rated voltage, as ... ac peak, or 42 V dc. Safety Information XW Warning To avoid possible electric shock, personal injury, or death, read the following before using probes, keep your fingers behind the finger guards. • When making electrical connections, connect the common test lead before connecting the live test ...
... Meter, between the terminals or between any unintended operation. • Have the Meter serviced only by measuring a known voltage before and after using the Meter. • Verify the Meter's operation by qualified service personnel. • Do not apply more than the rated voltage, as ... ac peak, or 42 V dc. Safety Information XW Warning To avoid possible electric shock, personal injury, or death, read the following before using probes, keep your fingers behind the finger guards. • When making electrical connections, connect the common test lead before connecting the live test ...

User Manual
Page 21
If REL is not used, add 0.2 Ω for 200 uA and 2 mA range. Input Characteristics Range Full-Scale (5-1/2 Digits) Slow Resolution Medium Fast Burden Voltage 200 uA 2 mA 20 mA ...
If REL is not used, add 0.2 Ω for 200 uA and 2 mA range. Input Characteristics Range Full-Scale (5-1/2 Digits) Slow Resolution Medium Fast Burden Voltage 200 uA 2 mA 20 mA ...

User Manual
Page 23
... 200 kHz - 1 MHz Notes: [1] Input > 100 mV [2] Limited to settle. 1 Introduction and Specifications Electrical Specifications Frequency Gate Time 131 ms Measurement Method AC-coupled input using the ac voltage measurement function. Settling Considerations When measuring frequency after a dc offset voltage change, errors may occur. For the most accurate measurement, wait up...
... 200 kHz - 1 MHz Notes: [1] Input > 100 mV [2] Limited to settle. 1 Introduction and Specifications Electrical Specifications Frequency Gate Time 131 ms Measurement Method AC-coupled input using the ac voltage measurement function. Settling Considerations When measuring frequency after a dc offset voltage change, errors may occur. For the most accurate measurement, wait up...

User Manual
Page 27
...the event of the Meter. If the original shipping container is not available, use with a line voltage determined at www.fluke.com. Contacting Fluke To order accessories, receive operating assistance, or get the location of the nearest Fluke distributor or Service Center, call: USA: Canada: Europe: Japan: Singapore:...or missing items. If the Meter appears damaged or something is missing, contact the carrier and Fluke immediately. Unpacking and Inspecting the Meter Every care is packed ready for use a box that fills the space between the Meter and the sides of the line fuse may...
...the event of the Meter. If the original shipping container is not available, use with a line voltage determined at www.fluke.com. Contacting Fluke To order accessories, receive operating assistance, or get the location of the nearest Fluke distributor or Service Center, call: USA: Canada: Europe: Japan: Singapore:...or missing items. If the Meter appears damaged or something is missing, contact the carrier and Fluke immediately. Unpacking and Inspecting the Meter Every care is packed ready for use a box that fills the space between the Meter and the sides of the line fuse may...

User Manual
Page 28
...selector block until the holder pops out. Replace the selector block back into the Meter and reconnect the power cord. Replacing the Fuses The Meter uses one fuse to protect the line-power input and two fuses to Fuse Rating Line Voltage Selection 100 / 120 220 / 240 Fuse Rating 0.125... fuse holder back into the fuse holder. 6. Replace the selector block back into the narrow recess to the left of the four line-voltage selections. 8808A Users Manual Selecting the Line Voltage The Meter operates on the Meter's rear panel. 1. See Figure 2-1. 3. Line-Power Fuse The Meter has a line...
...selector block until the holder pops out. Replace the selector block back into the Meter and reconnect the power cord. Replacing the Fuses The Meter uses one fuse to protect the line-power input and two fuses to Fuse Rating Line Voltage Selection 100 / 120 220 / 240 Fuse Rating 0.125... fuse holder back into the fuse holder. 6. Replace the selector block back into the narrow recess to the left of the four line-voltage selections. 8808A Users Manual Selecting the Line Voltage The Meter operates on the Meter's rear panel. 1. See Figure 2-1. 3. Line-Power Fuse The Meter has a line...

User Manual
Page 29
... the test lead from the mA terminal and insert it into the 10 A terminal. Only the 200 Ω, 2 kΩ, and 20 kΩ ranges can be used to 200 Ω. Press O. 3. If the fuse is good, the Meter displays a reading of an identical rating. Press Vto set the range to test the...
... the test lead from the mA terminal and insert it into the 10 A terminal. Only the 200 Ω, 2 kΩ, and 20 kΩ ranges can be used to 200 Ω. Press O. 3. If the fuse is good, the Meter displays a reading of an identical rating. Press Vto set the range to test the...
User Manual
Page 31
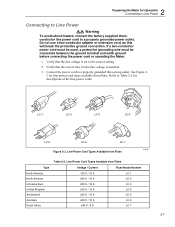
... of the line-power cords. Refer to a properly grounded three-prong outlet. Do not use a two-conductor adapter or extension cord, as this will break the protective ground connection. Line-Power Cord Types Available from Fluke Voltage / Current Fluke Model Number 120 V / 15 A 240 V / 15 A 220 V / 16 A 240 V ... grounded power outlet. Connect the power cord to Table 2-2 for line-power cord types available from Fluke. If a two-conductor power cord must be used, a protective grounding wire must be connected between the ground terminal and earth ground before connecting the ...
... of the line-power cords. Refer to a properly grounded three-prong outlet. Do not use a two-conductor adapter or extension cord, as this will break the protective ground connection. Line-Power Cord Types Available from Fluke Voltage / Current Fluke Model Number 120 V / 15 A 240 V / 15 A 220 V / 16 A 240 V ... grounded power outlet. Connect the power cord to Table 2-2 for line-power cord types available from Fluke. If a two-conductor power cord must be used, a protective grounding wire must be connected between the ground terminal and earth ground before connecting the ...
User Manual
Page 32
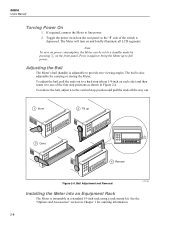
... up 3 Carry 4 Remove Figure 2-4. To remove the bail, adjust it again to full power. See the "Options and Accessories" section in a standard 19-inch rack using a rack mount kit. If required, connect the Meter to provide two viewing angles. Note To save on power consumption, the Meter can be set to... positions as shown in Figure 2-4. Bail Adjustment and Removal eue21.eps Installing the Meter into an Equipment Rack The Meter is adjustable to line power. 2. 8808A Users Manual Turning Power On 1.
... up 3 Carry 4 Remove Figure 2-4. To remove the bail, adjust it again to full power. See the "Options and Accessories" section in a standard 19-inch rack using a rack mount kit. If required, connect the Meter to provide two viewing angles. Note To save on power consumption, the Meter can be set to... positions as shown in Figure 2-4. Bail Adjustment and Removal eue21.eps Installing the Meter into an Equipment Rack The Meter is adjustable to line power. 2. 8808A Users Manual Turning Power On 1.

User Manual
Page 33
Figure 2-5. Boot Removal eue22.eps Cleaning the Meter XW Warning To avoid electric shock or damage to the Meter. Do not use aromatic hydrocarbons, alchohol, chlorinated solvents, or methanol-based fluids when wiping down with a cloth that is lightly dampened with the Rack Mount Kit....the Meter requires cleaning, wipe it off as shown in Figure 25. To remove a boot, stretch a corner then slide it down the Meter. Fluke 45 Emulation To switch the Meter to the instructions provided with water or a mild detergent. 2 Preparing the Meter for Operation Cleaning the Meter To ...
Figure 2-5. Boot Removal eue22.eps Cleaning the Meter XW Warning To avoid electric shock or damage to the Meter. Do not use aromatic hydrocarbons, alchohol, chlorinated solvents, or methanol-based fluids when wiping down with a cloth that is lightly dampened with the Rack Mount Kit....the Meter requires cleaning, wipe it off as shown in Figure 25. To remove a boot, stretch a corner then slide it down the Meter. Fluke 45 Emulation To switch the Meter to the instructions provided with water or a mild detergent. 2 Preparing the Meter for Operation Cleaning the Meter To ...

User Manual
Page 35
... (HOLD 3-19 Minimum / Maximum Modifier (MIN MAX 3-20 Using the Function Modifiers in Combination 3-21 Second Level Operations (Using the SHIFT Button 3-21 Compare Function (COMP 3-22 Setting the Compare Range 3-22 Using the Compare Function 3-22 List and Number Editors 3-22 Using the List Editor 3-23 Using the Number Editor 3-24 Function Keys S1 -
... (HOLD 3-19 Minimum / Maximum Modifier (MIN MAX 3-20 Using the Function Modifiers in Combination 3-21 Second Level Operations (Using the SHIFT Button 3-21 Compare Function (COMP 3-22 Setting the Compare Range 3-22 Using the Compare Function 3-22 List and Number Editors 3-22 Using the List Editor 3-23 Using the Number Editor 3-24 Function Keys S1 -

User Manual
Page 37
...8226; Change the measurement rate (slow, medium, fast) • Take a measurement and compare it against a tolerance range • Use the editor to select from the Front Panel Introduction Introduction The Meter can be controlled either by sending commands through its RS232 communication interface is... covered in Chapter 4. Operating the Meter through the RS-232 interface 3-3 This chapter explains the function and use of the controls and indicators located on the left), dual display (primary and secondary displays), and keypad. 3 Operating the Meter ...
...8226; Change the measurement rate (slow, medium, fast) • Take a measurement and compare it against a tolerance range • Use the editor to select from the Front Panel Introduction Introduction The Meter can be controlled either by sending commands through its RS232 communication interface is... covered in Chapter 4. Operating the Meter through the RS-232 interface 3-3 This chapter explains the function and use of the controls and indicators located on the left), dual display (primary and secondary displays), and keypad. 3 Operating the Meter ...


