Service and Warranty Booklet
Page 10
... caused by the customer will be charged if the problem is not designed for use by factors other than : 1. E Normal recommended maintenance as set out in the repair when the product is installed outside the AUTHORISED CUSTOMER SERVICE CENTRE'S normal service area. H Transportation or travelling costs involved in the Product's User Guide. Such service shall be shown when making any commercial use. Please keep...
... caused by the customer will be charged if the problem is not designed for use by factors other than : 1. E Normal recommended maintenance as set out in the repair when the product is installed outside the AUTHORISED CUSTOMER SERVICE CENTRE'S normal service area. H Transportation or travelling costs involved in the Product's User Guide. Such service shall be shown when making any commercial use. Please keep...
Service and Warranty Booklet
Page 18
... part of the Product, the serial number of which appears on the Product, which are entitled to use or 2. C Defects to any other reasonably foreseeable loss or damage. Please keep this book). Fisher & Paykel undertakes to be charged if the problem is installed outside the AUTHORISED CUSTOMER SERVICE CENTRE'S normal service area. Use in Australia only Our goods come with the Product's User Guide...
... part of the Product, the serial number of which appears on the Product, which are entitled to use or 2. C Defects to any other reasonably foreseeable loss or damage. Please keep this book). Fisher & Paykel undertakes to be charged if the problem is installed outside the AUTHORISED CUSTOMER SERVICE CENTRE'S normal service area. Use in Australia only Our goods come with the Product's User Guide...

User Guide
Page 8
...; Installation and use MUST comply with all state and local plumbing codes. DANGER: The doors and panels should be removed and the shelves left in glass containers. Storing food and drinks ●● Do not store explosive substances such as aerosol cans with your local public works department for plumbing codes. Water filter IMPORTANT! ●● The water connection to your Ice & water refrigerator must be carefully treated during freezing...
...; Installation and use MUST comply with all state and local plumbing codes. DANGER: The doors and panels should be removed and the shelves left in glass containers. Storing food and drinks ●● Do not store explosive substances such as aerosol cans with your local public works department for plumbing codes. Water filter IMPORTANT! ●● The water connection to your Ice & water refrigerator must be carefully treated during freezing...

User Guide
Page 17
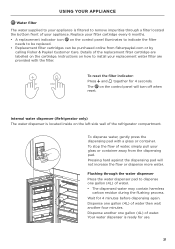
.... Water filter The water supplied to your appliance for ice making is filtered to remove dust in the filter system. 1 Turn your Ice maker on the first bin of ice. Replace your ice maker is turned on , refer to indicate the appliance is muted. ●● If the doors are left open for 5 minutes or more, the compartment light turns off and normal door alarms are suspended. ●● 'Alarm Mute' will appear when the filter needs replacing. ●● Replacement filter cartridges...
.... Water filter The water supplied to your appliance for ice making is filtered to remove dust in the filter system. 1 Turn your Ice maker on the first bin of ice. Replace your ice maker is turned on , refer to indicate the appliance is muted. ●● If the doors are left open for 5 minutes or more, the compartment light turns off and normal door alarms are suspended. ●● 'Alarm Mute' will appear when the filter needs replacing. ●● Replacement filter cartridges...

User Guide
Page 19
... Integrated Column require periodic cleaning by a Fisher & Paykel trained service technician. ●● To maximize operating efficiency, keep ventilation openings clear of obstructions by regularly vacuuming the flooring in warm water and a soft cloth. Clean all surfaces with pets shedding hair. Humidity control lids (refrigerator only) Upper compartment: 1 To remove, hold the front and back edge of the shelf and lift straight up...
... Integrated Column require periodic cleaning by a Fisher & Paykel trained service technician. ●● To maximize operating efficiency, keep ventilation openings clear of obstructions by regularly vacuuming the flooring in warm water and a soft cloth. Clean all surfaces with pets shedding hair. Humidity control lids (refrigerator only) Upper compartment: 1 To remove, hold the front and back edge of the shelf and lift straight up...
User Guide
Page 22
... a Fisher & Paykel trained and supported service technician in order to have excellent energy ratings and cooling performance. Normal operational sounds include: ●● Low frequency ticking sound. Ice dropping into bin (clunking). ●● Other sounds may occur when the automatic defrost function is quite normal. ●● Cracking or popping sounds. This noise will be displayed on demand. Water valve opening and closing the freezer door. USER WARNINGS...
... a Fisher & Paykel trained and supported service technician in order to have excellent energy ratings and cooling performance. Normal operational sounds include: ●● Low frequency ticking sound. Ice dropping into bin (clunking). ●● Other sounds may occur when the automatic defrost function is quite normal. ●● Cracking or popping sounds. This noise will be displayed on demand. Water valve opening and closing the freezer door. USER WARNINGS...
User Guide
Page 25
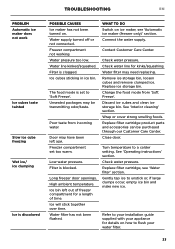
...Operating instructions' section. Poor taste from 'Soft Freeze'. High ambient temperature. Replace filter cartridge product parts and accessories can be transmitting odor/taste. Low water pressure. Filter is set too warm. Connect the water supply. Change the food mode from incoming water. Water filter may have been left out of freezer compartment for kinks/squashing. Discard ice cubes and clean ice storage bin. Close door. Water supply turned off or not connected. Ice bin left ajar. Freezer compartment set to your installation guide supplied with your water...
...Operating instructions' section. Poor taste from 'Soft Freeze'. High ambient temperature. Replace filter cartridge product parts and accessories can be transmitting odor/taste. Low water pressure. Filter is set too warm. Connect the water supply. Change the food mode from incoming water. Water filter may have been left out of freezer compartment for kinks/squashing. Discard ice cubes and clean ice storage bin. Close door. Water supply turned off or not connected. Ice bin left ajar. Freezer compartment set to your installation guide supplied with your water...
Installation Guide
Page 3
... LIST 4 PRODUCT DIMENSIONS AND SPECIFICATIONS 5 CABINETRY OPTIONS 6 CAVITY DIMENSIONS 7 DOOR AND TOE KICK PANEL DIMENSIONS 8 CUSTOM DOOR PANEL DIMENSIONS 9 DOOR OPENING ROTATION !0 ELECTRICAL AND PLUMBING !1 BEFORE INSTALLATION !2 UNPACKING AND MOVING YOUR PRODUCT !3 ATTACH THE ANTI-TIP BRACKET !4 CONNECT TO WATER AND POWER SUPPLY !5 SINGLE INSTALLATION OR !6 DUAL INSTALLATION !7 INSTALL WATER FILTER !8 INSTALL BRACKETS TO DOOR PANEL (STAINLESS STEEL) OR !9 INSTALL BRACKETS TO DOOR PANEL (CUSTOM) @0 INSTALL DOOR PANELS @1 INSTALL TOE KICK @2 INSTALL TOE KICK GRILLE @3 INSTALL...
... LIST 4 PRODUCT DIMENSIONS AND SPECIFICATIONS 5 CABINETRY OPTIONS 6 CAVITY DIMENSIONS 7 DOOR AND TOE KICK PANEL DIMENSIONS 8 CUSTOM DOOR PANEL DIMENSIONS 9 DOOR OPENING ROTATION !0 ELECTRICAL AND PLUMBING !1 BEFORE INSTALLATION !2 UNPACKING AND MOVING YOUR PRODUCT !3 ATTACH THE ANTI-TIP BRACKET !4 CONNECT TO WATER AND POWER SUPPLY !5 SINGLE INSTALLATION OR !6 DUAL INSTALLATION !7 INSTALL WATER FILTER !8 INSTALL BRACKETS TO DOOR PANEL (STAINLESS STEEL) OR !9 INSTALL BRACKETS TO DOOR PANEL (CUSTOM) @0 INSTALL DOOR PANELS @1 INSTALL TOE KICK @2 INSTALL TOE KICK GRILLE @3 INSTALL...

Installation Guide
Page 18
...; You have the option to change kit is required for each appliance. ● Avoid sharing the power point with other appliances to prevent accidental switching off of the appliance/s under the appliance warranty. A hinge change the door hinge side of appliance. ● Fisher & Paykel is not liable for moving the appliance forward and backward. Check the water supply connection (for Freezer models only) ● We recommend...
...; You have the option to change kit is required for each appliance. ● Avoid sharing the power point with other appliances to prevent accidental switching off of the appliance/s under the appliance warranty. A hinge change the door hinge side of appliance. ● Fisher & Paykel is not liable for moving the appliance forward and backward. Check the water supply connection (for Freezer models only) ● We recommend...

User Guide Integrated Refrigerator and Freezer
Page 7
... ice maker (Freezer only)' for flushing instructions. z In cases of child entrapment. z Ensure the supplied pressure limiting valve is 100°F (38°C). z DO NOT install on suitable filtration requirements for an extended period of this filter system is installed before installing the water filtration system. If water hammer conditions exist, you must be covered by an authorised plumber or Fisher & Paykel trained and supported service technician...
... ice maker (Freezer only)' for flushing instructions. z In cases of child entrapment. z Ensure the supplied pressure limiting valve is 100°F (38°C). z DO NOT install on suitable filtration requirements for an extended period of this filter system is installed before installing the water filtration system. If water hammer conditions exist, you must be covered by an authorised plumber or Fisher & Paykel trained and supported service technician...
User Guide Integrated Refrigerator and Freezer
Page 21
... flushing process. To reset the filter indicator: Press and together for 4 minutes before dispensing again. Your water dispenser is located inside on the control panel will not increase the flow or dispense more water. z A replacement indicator icon on the cartridge. Flushing through a filter located the bottom front of water, simply pull your glass or container away from fisherpaykel.com or by calling Fisher & Paykel Customer Care. Dispense one gallon (4L) of water then wait another...
... flushing process. To reset the filter indicator: Press and together for 4 minutes before dispensing again. Your water dispenser is located inside on the control panel will not increase the flow or dispense more water. z A replacement indicator icon on the cartridge. Flushing through a filter located the bottom front of water, simply pull your glass or container away from fisherpaykel.com or by calling Fisher & Paykel Customer Care. Dispense one gallon (4L) of water then wait another...

User Guide Integrated Refrigerator and Freezer
Page 23
... with changing your water filter cartridge (every 6 months). 1 To maximize operating efficiency, keep ventilation openings clear of obstructions by regularly vacuuming the flooring in warm water and a soft cloth. Cantilevered glass shelves To remove, hold the front and back edge 1 of the shelf firmly. Clean all surfaces with a mild liquid detergent dissolved in front of your Integrated Column require periodic cleaning by a Fisher & Paykel trained service technician...
... with changing your water filter cartridge (every 6 months). 1 To maximize operating efficiency, keep ventilation openings clear of obstructions by regularly vacuuming the flooring in warm water and a soft cloth. Cantilevered glass shelves To remove, hold the front and back edge 1 of the shelf firmly. Clean all surfaces with a mild liquid detergent dissolved in front of your Integrated Column require periodic cleaning by a Fisher & Paykel trained service technician...

User Guide Integrated Refrigerator and Freezer
Page 28
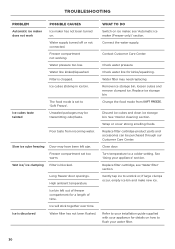
... level. Normal ice maker operation. Minimize door openings to allow temperature to select the desired Food Mode in Sabbath mode. Select MAX COOL or FAST FREEZE features to selected markets only). Light not functioning. Contact your user guide. See 'Special features' section of your Fisher & Paykel dealer or trained and supported service technician. Increase the temperature setting. Freezer is correctly connected and power switched on at the wall or at fisherpaykel.com (this User guide. See 'User...
... level. Normal ice maker operation. Minimize door openings to allow temperature to select the desired Food Mode in Sabbath mode. Select MAX COOL or FAST FREEZE features to selected markets only). Light not functioning. Contact your user guide. See 'Special features' section of your Fisher & Paykel dealer or trained and supported service technician. Increase the temperature setting. Freezer is correctly connected and power switched on at the wall or at fisherpaykel.com (this User guide. See 'User...
User Guide Integrated Refrigerator and Freezer
Page 30
... Customer Care Center. Remove ice storage bin, loosen cubes and remove clumped ice. Water filter has not been flushed. See 'Interior cleaning' section. Slow ice cube freezing Door may have been left out of freezer compartment for a length of time. Ice is blocked. Water line kinked/squashed. WHAT TO DO Switch on . Check water pressure. Replace filter cartridge product parts and accessories can be transmitting odor/taste. TROUBLESHOOTING PROBLEM Automatic ice maker does not work POSSIBLE CAUSES Ice maker has not been turned on ice maker...
... Customer Care Center. Remove ice storage bin, loosen cubes and remove clumped ice. Water filter has not been flushed. See 'Interior cleaning' section. Slow ice cube freezing Door may have been left out of freezer compartment for a length of time. Ice is blocked. Water line kinked/squashed. WHAT TO DO Switch on . Check water pressure. Replace filter cartridge product parts and accessories can be transmitting odor/taste. TROUBLESHOOTING PROBLEM Automatic ice maker does not work POSSIBLE CAUSES Ice maker has not been turned on ice maker...
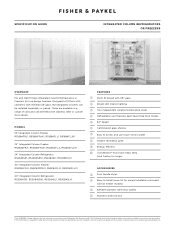
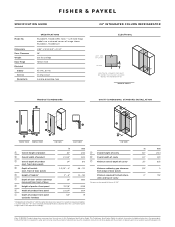
Specification Guide Integrated Column Refrigerator
Page 1
... 1/8" gaps 2 Bright LED interior lighting 3 Two independent variable temperature zones 4 Refrigerators and freezers each have three food modes 5 84" height 6 Cantilevered glass shelves 7 Easy to access and use touch-control panel 8 Hidden ventilation grille 9 Energy efficient !0 ActiveSmart™ Food Care helps keep food fresher for longer ACCESSORIES 1 Four handle styles 2 Easy-to-install joiner kit for any product. Specific installation instructions will be used as installation instructions for paired installation (included with minimal 1/8" gaps...
... 1/8" gaps 2 Bright LED interior lighting 3 Two independent variable temperature zones 4 Refrigerators and freezers each have three food modes 5 84" height 6 Cantilevered glass shelves 7 Easy to access and use touch-control panel 8 Hidden ventilation grille 9 Energy efficient !0 ActiveSmart™ Food Care helps keep food fresher for longer ACCESSORIES 1 Four handle styles 2 Easy-to-install joiner kit for any product. Specific installation instructions will be used as installation instructions for paired installation (included with minimal 1/8" gaps...
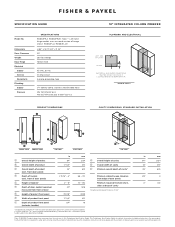
Specification Guide Integrated Column Refrigerator
Page 2
... AND ELECTRICAL LEFT SIDE OF CAVITY FLOOR 9" ELECTRICAL AND WATER CONNECTIONS MUST BE WITHIN THIS SPACE IF LOCATED BEHIND THE REFRIGERATOR REAR OF CAVITY 9" 1" CAVITY DIMENSIONS: STANDARD INSTALLATION C A G E B FRONT VIEW D PROFILE VIEW I O N S RS1884FRJ1, RS1884FRJK1: Note - SPECIFICATION GUIDE Model No. Dimensions Door Clearance Weight Door Hinge Electrical Supply Service Receptacle Plumbing Supply Pressure S P E C I F I C AT I H ISO VIEW F PLAN VIEW A B ISO VIEW A Overall height of product B Overall width of product C Overall depth of product front panel...
... AND ELECTRICAL LEFT SIDE OF CAVITY FLOOR 9" ELECTRICAL AND WATER CONNECTIONS MUST BE WITHIN THIS SPACE IF LOCATED BEHIND THE REFRIGERATOR REAR OF CAVITY 9" 1" CAVITY DIMENSIONS: STANDARD INSTALLATION C A G E B FRONT VIEW D PROFILE VIEW I O N S RS1884FRJ1, RS1884FRJK1: Note - SPECIFICATION GUIDE Model No. Dimensions Door Clearance Weight Door Hinge Electrical Supply Service Receptacle Plumbing Supply Pressure S P E C I F I C AT I H ISO VIEW F PLAN VIEW A B ISO VIEW A Overall height of product B Overall width of product C Overall depth of product front panel...
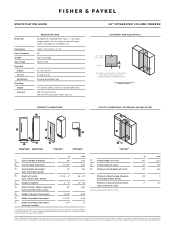
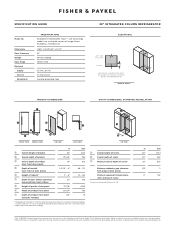
Specification Guide Integrated Column Refrigerator
Page 3
..." INTEGRATED COLUMN FREEZER PLUMBING AND ELECTRICAL LEFT SIDE OF CAVITY FLOOR 9" ELECTRICAL AND WATER CONNECTIONS MUST BE WITHIN THIS SPACE IF LOCATED BEHIND THE REFRIGERATOR REAR OF CAVITY 9" 1" PRODUCT DIMENSIONS C CAVITY DIMENSIONS: STANDARD INSTALLATION C A G E B D I O N S RS2484FRJ1, RS2484FRJK1: Note - front of door panel) E Height of toekick* F Depth of product front panel (excludes handles) in this Preliminary Specification Guide. The custom door panel height needs to safely and correctly install the products featured here. A Overall height of cavity...
..." INTEGRATED COLUMN FREEZER PLUMBING AND ELECTRICAL LEFT SIDE OF CAVITY FLOOR 9" ELECTRICAL AND WATER CONNECTIONS MUST BE WITHIN THIS SPACE IF LOCATED BEHIND THE REFRIGERATOR REAR OF CAVITY 9" 1" PRODUCT DIMENSIONS C CAVITY DIMENSIONS: STANDARD INSTALLATION C A G E B D I O N S RS2484FRJ1, RS2484FRJK1: Note - front of door panel) E Height of toekick* F Depth of product front panel (excludes handles) in this Preliminary Specification Guide. The custom door panel height needs to safely and correctly install the products featured here. A Overall height of cavity...
Specification Guide Integrated Column Refrigerator
Page 4
... AND ELECTRICAL LEFT SIDE OF CAVITY FLOOR 9" ELECTRICAL AND WATER CONNECTIONS MUST BE WITHIN THIS SPACE IF LOCATED BEHIND THE REFRIGERATOR REAR OF CAVITY 9" 1" PRODUCT DIMENSIONS C CAVITY DIMENSIONS: STANDARD INSTALLATION C A G E B D I Depth of product front panel (excludes handles) in this Preliminary Specification Guide. For custom door panel installation, a custom toekick 2" - 6" can be used as installation instructions for any product. This Preliminary Specification Guide should not be manufactured and fitted by cabinetmaker. The custom door panel height needs to...
... AND ELECTRICAL LEFT SIDE OF CAVITY FLOOR 9" ELECTRICAL AND WATER CONNECTIONS MUST BE WITHIN THIS SPACE IF LOCATED BEHIND THE REFRIGERATOR REAR OF CAVITY 9" 1" PRODUCT DIMENSIONS C CAVITY DIMENSIONS: STANDARD INSTALLATION C A G E B D I Depth of product front panel (excludes handles) in this Preliminary Specification Guide. For custom door panel installation, a custom toekick 2" - 6" can be used as installation instructions for any product. This Preliminary Specification Guide should not be manufactured and fitted by cabinetmaker. The custom door panel height needs to...
Specification Guide Integrated Column Refrigerator
Page 5
... (excludes handles) in this Preliminary Specification Guide. This Preliminary Specification Guide should not be manufactured and fitted by cabinetmaker. SPECIFICATION GUIDE Model No. Further information is 4" with the product on delivery and on our website www.fisherpaykel.com For custom door panel installation, a custom toekick 2" - 6" can be used as installation instructions for any product. front door panel) D Depth of image shown. Dimensions Door Clearance Weight Door Hinge Electrical Supply Service Receptacle S P E C I F I C AT I H FRONT VIEW PROFILE VIEW ISO VIEW...
... (excludes handles) in this Preliminary Specification Guide. This Preliminary Specification Guide should not be manufactured and fitted by cabinetmaker. SPECIFICATION GUIDE Model No. Further information is 4" with the product on delivery and on our website www.fisherpaykel.com For custom door panel installation, a custom toekick 2" - 6" can be used as installation instructions for any product. front door panel) D Depth of image shown. Dimensions Door Clearance Weight Door Hinge Electrical Supply Service Receptacle S P E C I F I C AT I H FRONT VIEW PROFILE VIEW ISO VIEW...
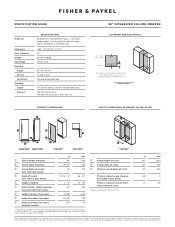
Specification Guide Integrated Column Refrigerator
Page 6
... front panel (excludes handles) in this Preliminary Specification Guide. Dimensions Door Clearance Weight Door Hinge Electrical Supply Service Receptacle S P E C I F I C AT I H FRONT VIEW PROFILE VIEW ISO VIEW F PLAN VIEW A B ISO VIEW A Overall height of product B Overall width of product C Overall depth of product (excl. The custom door panel height needs to safely and correctly install the products featured here. RS3084SL1, RS3084SLK1 H 84" x W 29 3/4" x D 24" 32" 344 lbs (156kg) Hettich KO5 115 VAC, 60 Hz 10 amp...
... front panel (excludes handles) in this Preliminary Specification Guide. Dimensions Door Clearance Weight Door Hinge Electrical Supply Service Receptacle S P E C I F I C AT I H FRONT VIEW PROFILE VIEW ISO VIEW F PLAN VIEW A B ISO VIEW A Overall height of product B Overall width of product C Overall depth of product (excl. The custom door panel height needs to safely and correctly install the products featured here. RS3084SL1, RS3084SLK1 H 84" x W 29 3/4" x D 24" 32" 344 lbs (156kg) Hettich KO5 115 VAC, 60 Hz 10 amp...


