
User Guide
Page 8
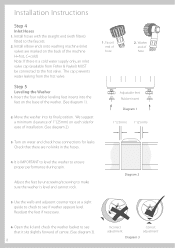
... H=hot, C=cold) Note: If there is IMPORTANT to level the washer to see that there are marked on each side for leaks. Diagram 2 5. Open the lid and check the washer basket to the faucets. 2. Install elbow ends onto washing machine (inlet valves are no .... 4. We suggest a minimum clearance of 1" (25mm) on the back of centre. (See diagram 3). 8 Incorrect adjustment Correct adjustment Diagram 3 Readjust the feet if necessary. 6. The cap prevents water leaking from Fisher & Paykel) MUST be connected to make sure the washer is level and cannot rock. Install hoses with the...
... H=hot, C=cold) Note: If there is IMPORTANT to level the washer to see that there are marked on each side for leaks. Diagram 2 5. Open the lid and check the washer basket to the faucets. 2. Install elbow ends onto washing machine (inlet valves are no .... 4. We suggest a minimum clearance of 1" (25mm) on the back of centre. (See diagram 3). 8 Incorrect adjustment Correct adjustment Diagram 3 Readjust the feet if necessary. 6. The cap prevents water leaking from Fisher & Paykel) MUST be connected to make sure the washer is level and cannot rock. Install hoses with the...

User Guide
Page 18
... fabrics with normal soil and clothes which wrinkle easily. A more traditional wash for normally soiled knits and machine washable woollens. Select wash cycle. 2. The following diagrams: ( ) = light is on your wash needs. Wash Options When you want to use . 3. Wash Cycles and Options Heavy Duty Eco Active Wash* Agitate Time* Wash...
... fabrics with normal soil and clothes which wrinkle easily. A more traditional wash for normally soiled knits and machine washable woollens. Select wash cycle. 2. The following diagrams: ( ) = light is on your wash needs. Wash Options When you want to use . 3. Wash Cycles and Options Heavy Duty Eco Active Wash* Agitate Time* Wash...
User Guide
Page 26
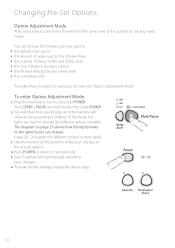
... some of water used to normal mode. 5. To make further changes, repeat the above steps. 26 You can change the following pre-set options. 4. The diagram on the panel to make your changes to the pre-set options: the default rinse option the amount of the options to suit your wash...
... some of water used to normal mode. 5. To make further changes, repeat the above steps. 26 You can change the following pre-set options. 4. The diagram on the panel to make your changes to the pre-set options: the default rinse option the amount of the options to suit your wash...
User Guide
Page 27
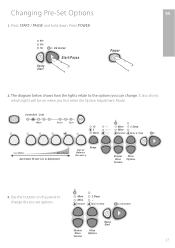
The diagram below shows how the lights relate to change . Controlled Cold 15 5 None More More Standard 2 Deep Spra y & Deep Less Water More Water Aut omatic W ater ...
The diagram below shows how the lights relate to change . Controlled Cold 15 5 None More More Standard 2 Deep Spra y & Deep Less Water More Water Aut omatic W ater ...