
User Guide
Page 3
... Fisher & Paykel dealer. SAVE THESE INSTRUCTIONS The models shown in this user guide may not be available in your country, please go to change at any time. Contents Introduction 2 Safety and warnings 3 Installation instructions 5 Before you start using your Ice & Water refrigerator 15 All about model and specification availability in all markets and are subject to our website www.fisherpaykel.com or contact your freezer 38 Troubleshooting...
... Fisher & Paykel dealer. SAVE THESE INSTRUCTIONS The models shown in this user guide may not be available in your country, please go to change at any time. Contents Introduction 2 Safety and warnings 3 Installation instructions 5 Before you start using your Ice & Water refrigerator 15 All about model and specification availability in all markets and are subject to our website www.fisherpaykel.com or contact your freezer 38 Troubleshooting...
User Guide
Page 4
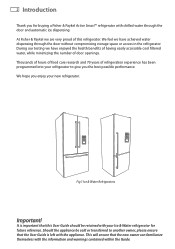
... accessible cool filtered water, while minimizing the number of door openings. We hope you the best possible performance. Fig.1 Ice & Water Refrigerators Important! This will ensure that this refrigerator. We feel we have achieved water dispensing through the door and automatic ice dispensing. Thousands of hours of food care research and 70 years of this User Guide should be sold or transferred to give you enjoy your Ice & Water refrigerator for buying a Fisher & Paykel...
... accessible cool filtered water, while minimizing the number of door openings. We hope you the best possible performance. Fig.1 Ice & Water Refrigerators Important! This will ensure that this refrigerator. We feel we have achieved water dispensing through the door and automatic ice dispensing. Thousands of hours of food care research and 70 years of this User Guide should be sold or transferred to give you enjoy your Ice & Water refrigerator for buying a Fisher & Paykel...

User Guide
Page 5
... your old refrigerator or freezer. Leave the shelves in death, electric shock, fire or injury to give advice on the power cord. Young children should be replaced by pulling on environmentally friendly methods of disposing of young children, remove doors. The refrigerant gas must be properly installed in this User Guide before it must be able to persons. Repair or replace immediately all electric service cords...
... your old refrigerator or freezer. Leave the shelves in death, electric shock, fire or injury to give advice on the power cord. Young children should be replaced by pulling on environmentally friendly methods of disposing of young children, remove doors. The refrigerant gas must be properly installed in this User Guide before it must be able to persons. Repair or replace immediately all electric service cords...

User Guide
Page 7
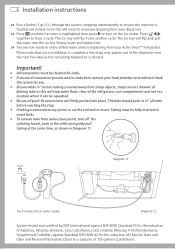
... keys 6 1 x water filter cartridge and head 7 1 x faucet connection Installation instructions 5 EN 1 2 3 4 5 6 7 Fig.2 Water connection kit Important! The new tubings supplied with water that is used to the connection line your state or town is susceptible to freezing temperatures as damage to the refrigerator. connect to the filter. It is imperative the pressure reducing valve (PRV) is microbiologically unsafe or of filter system. This valve ensures the water will be used . DO NOT use copper tubing. DO NOT install in...
... keys 6 1 x water filter cartridge and head 7 1 x faucet connection Installation instructions 5 EN 1 2 3 4 5 6 7 Fig.2 Water connection kit Important! The new tubings supplied with water that is used to the connection line your state or town is susceptible to freezing temperatures as damage to the refrigerator. connect to the filter. It is imperative the pressure reducing valve (PRV) is microbiologically unsafe or of filter system. This valve ensures the water will be used . DO NOT use copper tubing. DO NOT install in...
User Guide
Page 8
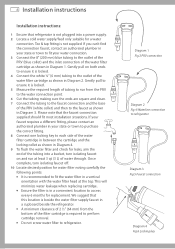
... Diagram 1. 6 Installation instructions Installation instructions: 1 Ensure that refrigerator is not plugged into a bucket, turn isolating faucet off. 10 Locate desired position for a water connection. Once complete, turn isolating faucet on both ends to ensure it is locked. 5 Measure the required length of tubing to run at least 3 qt (3 L) of the tubing into a power supply. 2 Locate a cold water supply/feed only suitable for water filter noting carefully the following points: It is recommended to perform cartridge removal...
... Diagram 1. 6 Installation instructions Installation instructions: 1 Ensure that refrigerator is not plugged into a bucket, turn isolating faucet off. 10 Locate desired position for a water connection. Once complete, turn isolating faucet on both ends to ensure it is locked. 5 Measure the required length of tubing to run at least 3 qt (3 L) of the tubing into a power supply. 2 Locate a cold water supply/feed only suitable for water filter noting carefully the following points: It is recommended to perform cartridge removal...

User Guide
Page 9
... remove as shown in Diagram 7. 14 Connect tubing into the water (solenoid) valve located on the right hand side of the unit (compressor) compartment as shown in Diagram 9. 16 Place compressor compartment cover back into position, run the ¼" (6 mm) tubing through the space provided at the top of each side of drips. Push your refrigerator into place being careful not to the back of the water filter...
... remove as shown in Diagram 7. 14 Connect tubing into the water (solenoid) valve located on the right hand side of the unit (compressor) compartment as shown in Diagram 9. 16 Place compressor compartment cover back into position, run the ¼" (6 mm) tubing through the space provided at the top of each side of drips. Push your refrigerator into place being careful not to the back of the water filter...
User Guide
Page 10
... isolating faucet, push in Diagram 11. 8 Installation instructions 22 Run a further 3 qt (3 L) through the system, stopping intermittently to enjoy chilled water and ice dispensing from your Active Smart™ refrigerator. Press together to water supply Diagram 12 System tested and certified by NSF International against Standard NSF/ANSI 42 for you. Force another cycle. The ice tray will flip. Diagram 11 Fig.9 Connection to force a cycle. Ensure...
... isolating faucet, push in Diagram 11. 8 Installation instructions 22 Run a further 3 qt (3 L) through the system, stopping intermittently to enjoy chilled water and ice dispensing from your Active Smart™ refrigerator. Press together to water supply Diagram 12 System tested and certified by NSF International against Standard NSF/ANSI 42 for you. Force another cycle. The ice tray will flip. Diagram 11 Fig.9 Connection to force a cycle. Ensure...
User Guide
Page 14
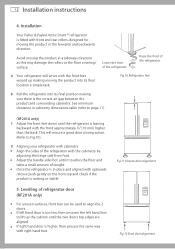
... Levelling of the refrigerator Fig.10 Refrigerator feet B Roll the refrigerator into its final position making moving the product into its final location a simple task. A Your refrigerator will ensure a good door closing action. (Refer to align the 2 doors. Adjust the handle side foot until the two doors top edges are aligned. 12 Installation instructions 4. D Aligning your refrigerator with the cabinetry by adjusting the hinge side front foot. Installation Your Fisher & Paykel...
... Levelling of the refrigerator Fig.10 Refrigerator feet B Roll the refrigerator into its final position making moving the product into its final location a simple task. A Your refrigerator will ensure a good door closing action. (Refer to align the 2 doors. Adjust the handle side foot until the two doors top edges are aligned. 12 Installation instructions 4. D Aligning your refrigerator with the cabinetry by adjusting the hinge side front foot. Installation Your Fisher & Paykel...
User Guide
Page 16
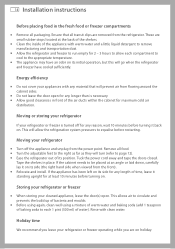
... freezer is necessary. 14 Installation instructions Before placing food in the fresh food or freezer compartments Remove all transit clips are removed from the refrigerator. Clean the inside of the air ducts within the cabinet for maximum cold air distribution. Remove all food. Tape the shelves in front of the appliance with clean water. These are small rubber stops located at least 10 minutes before restarting. Rinse with warm water...
... freezer is necessary. 14 Installation instructions Before placing food in the fresh food or freezer compartments Remove all transit clips are removed from the refrigerator. Clean the inside of the air ducts within the cabinet for maximum cold air distribution. Remove all food. Tape the shelves in front of the appliance with clean water. These are small rubber stops located at least 10 minutes before restarting. Rinse with warm water...

User Guide
Page 17
... 3 qt (3 L) of your refrigerator and freezer) before use allow the tank to fill. Failure to page 23 - First use ). Turn on ice maker (refer to page 18 - This will result in excessive dripping from your dispenser. The temperature of water from the dispenser, stopping intermittently (refer to page 19). Before you start using your Ice & Water refrigerator 15 Check refrigerator is switched on and has cooled for at least 2 hours...
... 3 qt (3 L) of your refrigerator and freezer) before use allow the tank to fill. Failure to page 23 - First use ). Turn on ice maker (refer to page 18 - This will result in excessive dripping from your dispenser. The temperature of water from the dispenser, stopping intermittently (refer to page 19). Before you start using your Ice & Water refrigerator 15 Check refrigerator is switched on and has cooled for at least 2 hours...

User Guide
Page 22
... for the ice. For maximum ice storage, level the stored cubes with a smaller ice bin inside the larger freezer bin. Attached to the ice maker must be ejected from the mould into the larger bin. Installation of ice is noted, discard the ice cubes and contact your Fisher & Paykel Appliances Authorised Service Center. Ice making will be completed by a qualified service technician or a qualified plumber (see installation instructions). Your Ice & Water product comes with...
... for the ice. For maximum ice storage, level the stored cubes with a smaller ice bin inside the larger freezer bin. Attached to the ice maker must be ejected from the mould into the larger bin. Installation of ice is noted, discard the ice cubes and contact your Fisher & Paykel Appliances Authorised Service Center. Ice making will be completed by a qualified service technician or a qualified plumber (see installation instructions). Your Ice & Water product comes with...
User Guide
Page 26
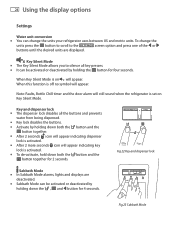
... de-activate, hold down both the button and the button together for 4 seconds. Fig.22 Key and dispenser lock Sabbath Mode In Sabbath Mode alarms, lights and displays are displayed. Key and dispenser lock The dispenser lock disables all key presses. Fig.23 Sabbath Mode Activate by holding down the , and button for 2 seconds. To change the units your refrigerator uses between US and metric units.
... de-activate, hold down both the button and the button together for 4 seconds. Fig.22 Key and dispenser lock Sabbath Mode In Sabbath Mode alarms, lights and displays are displayed. Key and dispenser lock The dispenser lock disables all key presses. Fig.23 Sabbath Mode Activate by holding down the , and button for 2 seconds. To change the units your refrigerator uses between US and metric units.

User Guide
Page 27
Sabbath Mode will flash when dispensing water. This will automatically de-activate after 80 hours. When the door is a fault. Details of this press any button on the display. Fig.24 Fault code display Electronic control panel will not operate. Using the display options 25 Settings EN Once in Sabbath Mode once power is restored. The display will not be displayed on the left in the back of Customer Care phone numbers can be...
Sabbath Mode will flash when dispensing water. This will automatically de-activate after 80 hours. When the door is a fault. Details of this press any button on the display. Fig.24 Fault code display Electronic control panel will not operate. Using the display options 25 Settings EN Once in Sabbath Mode once power is restored. The display will not be displayed on the left in the back of Customer Care phone numbers can be...

User Guide
Page 30
... trapped air is a replacement indicator icon on the quality of the dispenser over the next few days as shown in Diagram 1. 2 Pull the cartridge away from your authorised Fisher & Paykel Dealer. There is cleared. Changing the water filter cartridge It is due to be present when the filter is filtered to 740 gallons (2800 L) depending on the control panel which will flash, when dispensing water, as shown in Diagram 2. - Remove protective...
... trapped air is a replacement indicator icon on the quality of the dispenser over the next few days as shown in Diagram 1. 2 Pull the cartridge away from your authorised Fisher & Paykel Dealer. There is cleared. Changing the water filter cartridge It is due to be present when the filter is filtered to 740 gallons (2800 L) depending on the control panel which will flash, when dispensing water, as shown in Diagram 2. - Remove protective...

User Guide
Page 31
... be displayed in the water supplied to change your filter. If unpleasant taste or odour persists, you may wish to be present in the screen. Water filter 29 To reset the filter indicator EN Important! When no filter is to fit a new filter cartridge. Important! In cases of water flow through the water dispenser can disable the filter indicator. Filter replacement is changed when the filter indicator icon flashes on the interface panel. If the water filtration...
... be displayed in the water supplied to change your filter. If unpleasant taste or odour persists, you may wish to be present in the screen. Water filter 29 To reset the filter indicator EN Important! When no filter is to fit a new filter cartridge. Important! In cases of water flow through the water dispenser can disable the filter indicator. Filter replacement is changed when the filter indicator icon flashes on the interface panel. If the water filtration...
User Guide
Page 42
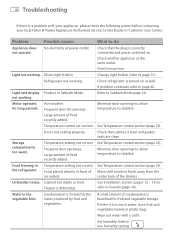
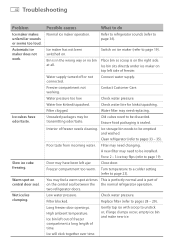
... compartments too warm. Temperature setting not correct. Food freezing in Sabbath Mode. See Temperature control section (page 23). Cabinet not stable or level. See Installation section (pages 12 - 13) or refer to page 31). If there is level and gasket seals are clean. Problem Possible causes What to stabilise. Blown light bulb(s). Minimize door openings to allow temperature to Sabbath Mode page 24. Condensation is turned on . Set humidity slide to...
... compartments too warm. Temperature setting not correct. Food freezing in Sabbath Mode. See Temperature control section (page 23). Cabinet not stable or level. See Installation section (pages 12 - 13) or refer to page 31). If there is level and gasket seals are clean. Problem Possible causes What to stabilise. Blown light bulb(s). Minimize door openings to allow temperature to Sabbath Mode page 24. Condensation is turned on . Set humidity slide to...

User Guide
Page 43
... inside fresh food compartment. Door handles out of cabinet are warm. Tray/bin does not slide in ice cubes. Check and clean door gasket seal. this will reset the runner. Warm area on outside of refrigerator/ freezer. Possible causes This is normal. Frequent or long door openings. Not unusual during periods of high humidity. Freezer door not closing tightly. With time and usage, movement may occur. Minimize door openings. See Installation instructions...
... inside fresh food compartment. Door handles out of cabinet are warm. Tray/bin does not slide in ice cubes. Check and clean door gasket seal. this will reset the runner. Warm area on outside of refrigerator/ freezer. Possible causes This is normal. Frequent or long door openings. Not unusual during periods of high humidity. Freezer door not closing tightly. With time and usage, movement may occur. Minimize door openings. See Installation instructions...
User Guide
Page 44
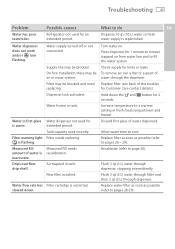
... supply turned off or not connected. Water filter may need replacing. Filter may need changing. Turn temperature to a colder setting (refer to page 19). Check water pressure. Warm spot on the right side. Water line kinked/squashed. Filter clogged. Ensure food packaging is part of time. two refrigerator doors. High ambient temperature. Ice bin sits directly under ice maker on ice maker (refer to page 23). Contact Customer Care. Check water line for kinks/squashing. Poor taste from incoming water. You may be installed. Replace...
... supply turned off or not connected. Water filter may need replacing. Filter may need changing. Turn temperature to a colder setting (refer to page 19). Check water pressure. Warm spot on the right side. Water line kinked/squashed. Filter clogged. Ensure food packaging is part of time. two refrigerator doors. High ambient temperature. Ice bin sits directly under ice maker on ice maker (refer to page 23). Contact Customer Care. Check water line for kinks/squashing. Poor taste from incoming water. You may be installed. Replace...
User Guide
Page 45
... remove trapped air from water line and to pages 28 - 29). Supply line may be air in water system. Increase temperature to page 30). Recalibrate (refer to a warmer setting in first glass is warm. Water flow rate has slowed down the and button for an extended period. Filter needs replacing. Flush 3 qt (3 L) water through filter and then 3 qt (3 L) through dispenser. Dispense 10 qt (10 L) water so fresh water supply is flashing. Hold down . Drips overflow drip-shelf. Refrigerator not used recently. Filter warning light...
... remove trapped air from water line and to pages 28 - 29). Supply line may be air in water system. Increase temperature to page 30). Recalibrate (refer to a warmer setting in first glass is warm. Water flow rate has slowed down the and button for an extended period. Filter needs replacing. Flush 3 qt (3 L) water through filter and then 3 qt (3 L) through dispenser. Dispense 10 qt (10 L) water so fresh water supply is flashing. Hold down . Drips overflow drip-shelf. Refrigerator not used recently. Filter warning light...
User Guide
Page 47
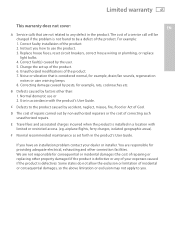
... product. Use in the product's User Guide. D The cost of repairs carried out by the user. 5. F Normal recommended maintenance as set -up of correcting such unauthorized repairs. You are not responsible for providing adequate electrical, exhausting and other connection facilities. Change the set forth in accordance with limited or restricted access. (eg. Replace house fuses, reset circuit breakers, correct house wiring or plumbing, or replace light bulbs. 4.
... product. Use in the product's User Guide. D The cost of repairs carried out by the user. 5. F Normal recommended maintenance as set -up of correcting such unauthorized repairs. You are not responsible for providing adequate electrical, exhausting and other connection facilities. Change the set forth in accordance with limited or restricted access. (eg. Replace house fuses, reset circuit breakers, correct house wiring or plumbing, or replace light bulbs. 4.


