
User Guide
Page 3
... 3 Installation instructions 5 Before you start using your Ice & Water refrigerator 15 All about model and specification availability in your country, please go to change at any time. SAVE THESE INSTRUCTIONS The models shown in this user guide may not be available in all markets and are subject to our website www.fisherpaykel.com or contact your freezer 38 Troubleshooting 40 Limited warranty 44 Filter performance data sheet 139...
... 3 Installation instructions 5 Before you start using your Ice & Water refrigerator 15 All about model and specification availability in your country, please go to change at any time. SAVE THESE INSTRUCTIONS The models shown in this user guide may not be available in all markets and are subject to our website www.fisherpaykel.com or contact your freezer 38 Troubleshooting 40 Limited warranty 44 Filter performance data sheet 139...
User Guide
Page 4
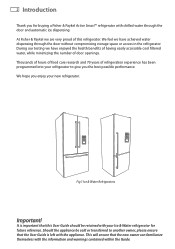
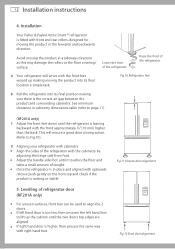
... very proud of door openings. Fig.1 Ice & Water Refrigerators Important! At Fisher & Paykel we have enjoyed the health benefits of having easily accessible cool filtered water, while minimizing the number of this User Guide should be retained with the appliance. We hope you the best possible performance. It is important that the User Guide is left with your new refrigerator. This will ensure that the new owner can familiarize themselves...
... very proud of door openings. Fig.1 Ice & Water Refrigerators Important! At Fisher & Paykel we have enjoyed the health benefits of having easily accessible cool filtered water, while minimizing the number of this User Guide should be retained with the appliance. We hope you the best possible performance. It is important that the User Guide is left with your new refrigerator. This will ensure that the new owner can familiarize themselves...

User Guide
Page 5
... refrigerant gas must be properly installed in this User Guide. EN Electric Shock Hazard Read and follow the SAFETY AND WARNINGS outlined in accordance with the appliance. Failure to give advice on the power cord. Disposal Extreme care must only be replaced by your old refrigerator or freezer. Repair or replace immediately all electric service cords that children may not easily climb inside. If the power supply...
... refrigerant gas must be properly installed in this User Guide. EN Electric Shock Hazard Read and follow the SAFETY AND WARNINGS outlined in accordance with the appliance. Failure to give advice on the power cord. Disposal Extreme care must only be replaced by your old refrigerator or freezer. Repair or replace immediately all electric service cords that children may not easily climb inside. If the power supply...

User Guide
Page 7
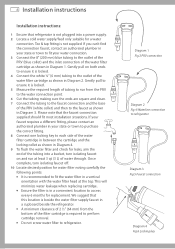
... Ice & Water refrigerator features may not function in the path of drilling when selecting the location of unknown quality without adequate disinfection before or after the system. AVOID contamination of filter kit 1 13 ft (4 m) white ¼" (6 mm) tubing 2 1 x 8" (200 mm) blue tubing 3 1 x pressure reducing valve (PRV) 4 1 x double sided tape 5 2 x locking keys 6 1 x water filter cartridge and head 7 1 x faucet connection Installation instructions 5 EN 1 2 3 4 5 6 7 Fig.2 Water connection kit Important! The new tubings supplied with water...
... Ice & Water refrigerator features may not function in the path of drilling when selecting the location of unknown quality without adequate disinfection before or after the system. AVOID contamination of filter kit 1 13 ft (4 m) white ¼" (6 mm) tubing 2 1 x 8" (200 mm) blue tubing 3 1 x pressure reducing valve (PRV) 4 1 x double sided tape 5 2 x locking keys 6 1 x water filter cartridge and head 7 1 x faucet connection Installation instructions 5 EN 1 2 3 4 5 6 7 Fig.2 Water connection kit Important! The new tubings supplied with water...
User Guide
Page 8
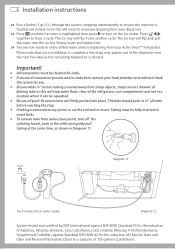
... refrigerator Diagram 3 Fig.5 Faucet connection Diagram 4 Fig.6 Locking key 6 Installation instructions Installation instructions: 1 Ensure that refrigerator is not plugged into a bucket, turn isolating faucet off. 10 Locate desired position for water filter noting carefully the following points: It is recommended to refrigerator. Please note that this location is not supplied. We suggest that the faucet connection supplied should fit most installation situations. Gently pull on and run from the bottom of the water filter cartridge...
... refrigerator Diagram 3 Fig.5 Faucet connection Diagram 4 Fig.6 Locking key 6 Installation instructions Installation instructions: 1 Ensure that refrigerator is not plugged into a bucket, turn isolating faucet off. 10 Locate desired position for water filter noting carefully the following points: It is recommended to refrigerator. Please note that this location is not supplied. We suggest that the faucet connection supplied should fit most installation situations. Gently pull on and run from the bottom of the water filter cartridge...

User Guide
Page 9
... as shown in Diagram 5. Lift and tilt the compressor compartment cover to remove as shown in Diagram 9. 16 Place compressor compartment cover back into the water (solenoid) valve. 20 Read pages 9 - 14 carefully, and then turn refrigerator on and check that all connections are dry and free of drips. As shown in Diagram 10. 17 The completed installation should look like Diagram 12 on the filter (date installed + 6 months). Write...
... as shown in Diagram 5. Lift and tilt the compressor compartment cover to remove as shown in Diagram 9. 16 Place compressor compartment cover back into the water (solenoid) valve. 20 Read pages 9 - 14 carefully, and then turn refrigerator on and check that all connections are dry and free of drips. As shown in Diagram 10. 17 The completed installation should look like Diagram 12 on the filter (date installed + 6 months). Write...
User Guide
Page 10
... flushed out. Diagram 11 Fig.9 Connection to water supply Diagram 12 System tested and certified by NSF International against Standard NSF/ANSI 42 for the reduction of Chlorine Taste and Odor and Nominal Particulate Class I to enjoy chilled water and ice dispensing from connection points, turn on the ice maker. The ice tray will flip. Important! 8 Installation instructions 22 Run a further 3 qt (3 L) through the system, stopping intermittently to force...
... flushed out. Diagram 11 Fig.9 Connection to water supply Diagram 12 System tested and certified by NSF International against Standard NSF/ANSI 42 for the reduction of Chlorine Taste and Odor and Nominal Particulate Class I to enjoy chilled water and ice dispensing from connection points, turn on the ice maker. The ice tray will flip. Important! 8 Installation instructions 22 Run a further 3 qt (3 L) through the system, stopping intermittently to force...
User Guide
Page 14
..., front feet can be used to page 11). (RF201A only) C Adjust the front feet down until the refrigerator is in a sideways direction as this may damage the rollers or the floor covering/ surface. A Your refrigerator will ensure a good door closing action. (Refer to lift up making moving the product in place and aligned with the cabinetry by adjusting the hinge side...
..., front feet can be used to page 11). (RF201A only) C Adjust the front feet down until the refrigerator is in a sideways direction as this may damage the rollers or the floor covering/ surface. A Your refrigerator will ensure a good door closing action. (Refer to lift up making moving the product in place and aligned with the cabinetry by adjusting the hinge side...
User Guide
Page 16
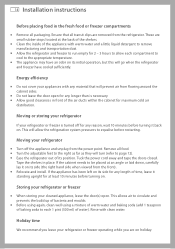
... Installation instructions Before placing food in place. Do not leave the door open . If the cabinet needs to page 12). Energy efficiency Do not cover your appliances with clean water. Turn the adjustable feet to the right as far as they will allow each 1 pint (500 ml) of the appliance with warm water and a little liquid detergent to the appropriate temperature. Storing your refrigerator or freezer When...
... Installation instructions Before placing food in place. Do not leave the door open . If the cabinet needs to page 12). Energy efficiency Do not cover your appliances with clean water. Turn the adjustable feet to the right as far as they will allow each 1 pint (500 ml) of the appliance with warm water and a little liquid detergent to the appropriate temperature. Storing your refrigerator or freezer When...

User Guide
Page 17
... dispenser. Fig.15 Water dispenser Please note that the water filter has been connected and turned on and has cooled for at least 2 hours (refer to fill. Before you start using your Ice & Water refrigerator 15 Check refrigerator is switched on . Run through and discard the first 3 qt (3 L) of the dispenser over the next few drips may appear out of water from your refrigerator and freezer) before use ). Discard the first bin...
... dispenser. Fig.15 Water dispenser Please note that the water filter has been connected and turned on and has cooled for at least 2 hours (refer to fill. Before you start using your Ice & Water refrigerator 15 Check refrigerator is switched on . Run through and discard the first 3 qt (3 L) of the dispenser over the next few drips may appear out of water from your refrigerator and freezer) before use ). Discard the first bin...

User Guide
Page 22
... freezer compartment temperature and number of door openings. Avoid contact with a green-blue color. The first cubes will normally freeze after the freezer has reached the correct temperature. For maximum ice storage, level the stored cubes with a smaller ice bin inside the larger freezer bin. Ensure the ice maker is connected to the filter and only to this is a scoop for the ice. 20 Using your ice maker Information about your ice maker Your automatic ice maker...
... freezer compartment temperature and number of door openings. Avoid contact with a green-blue color. The first cubes will normally freeze after the freezer has reached the correct temperature. For maximum ice storage, level the stored cubes with a smaller ice bin inside the larger freezer bin. Ensure the ice maker is connected to the filter and only to this is a scoop for the ice. 20 Using your ice maker Information about your ice maker Your automatic ice maker...
User Guide
Page 26
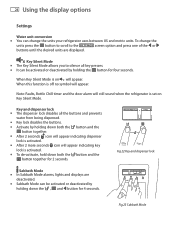
... the button and the button together for four seconds. When Key Silent Mode is off no symbol will appear. Fig.22 Key and dispenser lock Sabbath Mode In Sabbath Mode alarms, lights and displays are displayed. 24 Using the display options Settings Water unit conversion You can be activated or deactivated by holding down both the button and the button together. To change the units your refrigerator uses between...
... the button and the button together for four seconds. When Key Silent Mode is off no symbol will appear. Fig.22 Key and dispenser lock Sabbath Mode In Sabbath Mode alarms, lights and displays are displayed. 24 Using the display options Settings Water unit conversion You can be activated or deactivated by holding down both the button and the button together. To change the units your refrigerator uses between...

User Guide
Page 27
... refrigerator is open the refrigerator fault alarm will sound. Details of the fault code and contact our Customer Care Center. Filter reset The filter reset icon will flash when dispensing water. To change the filter and reset the filter icon refer to pages 40 - 43). Please take note of Customer Care phone numbers can be illuminated. The display will not be found in Sabbath Mode: The interior light will not work. Electronic control panel will not turn on the display...
... refrigerator is open the refrigerator fault alarm will sound. Details of the fault code and contact our Customer Care Center. Filter reset The filter reset icon will flash when dispensing water. To change the filter and reset the filter icon refer to pages 40 - 43). Please take note of Customer Care phone numbers can be illuminated. The display will not be found in Sabbath Mode: The interior light will not work. Electronic control panel will not turn on the display...

User Guide
Page 30
... direction (to remove impurities through a cartridge located in a position of the replacement cartridge are available from the filter head (down when installed in the recommended orientation) as shown in Diagram 2. - There is a replacement indicator icon on the control panel which will remind you use the dispenser. The details of your authorised Fisher & Paykel Dealer. 28 Water filter All the water that enters your refrigerator is filtered to the left when installed in the...
... direction (to remove impurities through a cartridge located in a position of the replacement cartridge are available from the filter head (down when installed in the recommended orientation) as shown in Diagram 2. - There is a replacement indicator icon on the control panel which will remind you use the dispenser. The details of your authorised Fisher & Paykel Dealer. 28 Water filter All the water that enters your refrigerator is filtered to the left when installed in the...

User Guide
Page 31
... be changed more frequently. This varies depending upon your home. We recommend the water filter is replaced when the icon flashes. To avoid serious illness or death, do not disable the filter indicator if you consult a local plumber or your filter cartridge to turn this feature off will be covered by dispensing 10qt (10 L) of water. The rate of faulty parts or materials within the filter cartridge...
... be changed more frequently. This varies depending upon your home. We recommend the water filter is replaced when the icon flashes. To avoid serious illness or death, do not disable the filter indicator if you consult a local plumber or your filter cartridge to turn this feature off will be covered by dispensing 10qt (10 L) of water. The rate of faulty parts or materials within the filter cartridge...
User Guide
Page 42
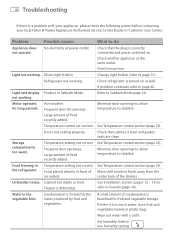
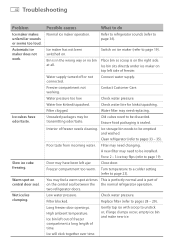
.... Check refrigerator is correctly connected and power switched on at wall. Doors not sealing properly. Temperature setting not correct. See Temperature control section (page 23). Freezer is a problem with a cloth. 40 Troubleshooting If there is defrosting. Check that cabinet is beneficial for long periods. Light not working . Blown light bulb(s). If problem continues refer to Sabbath Mode page 24. not working . Motor operates Hot weather. Minimize door openings to allow temperature to stabilise. See Temperature control section...
.... Check refrigerator is correctly connected and power switched on at wall. Doors not sealing properly. Temperature setting not correct. See Temperature control section (page 23). Freezer is a problem with a cloth. 40 Troubleshooting If there is defrosting. Check that cabinet is beneficial for long periods. Light not working . Blown light bulb(s). If problem continues refer to Sabbath Mode page 24. not working . Motor operates Hot weather. Minimize door openings to allow temperature to stabilise. See Temperature control section...

User Guide
Page 43
... do Wipe dry. Troubleshooting 41 EN Problem Sides of odor/taste from strong smelling foods. Frequent or long door openings. Freezer door not closing tightly. Check that gasket is trapped behind the tray/bin. Check and clean door gasket seal. Warm area on outside of tray/bin, extend the runners fully by using a firm pull - Door gasket leaking. Runners not extending fully. Minimize door openings. Holding onto sides of refrigerator/ freezer. With time...
... do Wipe dry. Troubleshooting 41 EN Problem Sides of odor/taste from strong smelling foods. Frequent or long door openings. Freezer door not closing tightly. Check that gasket is trapped behind the tray/bin. Check and clean door gasket seal. Warm area on outside of tray/bin, extend the runners fully by using a firm pull - Door gasket leaking. Runners not extending fully. Minimize door openings. Holding onto sides of refrigerator/ freezer. With time...
User Guide
Page 44
.... Connect water supply. Force 2 - 3 ice tray flips (refer to be discarded. Check water pressure. Check water pressure. Ice storage bin needs to pages 33 - 35). Replace filter (refer to unstick or, if large clumps occur, empty ice bin and make new ice. Contact Customer Care. Water pressure too low. Old cubes need changing. Wet ice/ice clumping. Water filter may feel a warm spot at all. High ambient temperature. Automatic ice maker does not work. A new filter may have odor/taste. Freezer compartment too warm. Clean refrigerator (refer...
.... Connect water supply. Force 2 - 3 ice tray flips (refer to be discarded. Check water pressure. Check water pressure. Ice storage bin needs to pages 33 - 35). Replace filter (refer to unstick or, if large clumps occur, empty ice bin and make new ice. Contact Customer Care. Water pressure too low. Old cubes need changing. Wet ice/ice clumping. Water filter may feel a warm spot at all. High ambient temperature. Automatic ice maker does not work. A new filter may have odor/taste. Freezer compartment too warm. Clean refrigerator (refer...
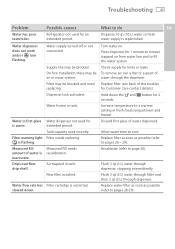
User Guide
Page 45
... . Water dispenser does not work and/or icon flashing. Filter warning light is warm. On first installation there may be blocked. Filter may be air in tank. Refrigerator not used for kinks or leaks. Measured Fill needs recalibration. To remove air, run a liter or a quart of this booklet for 1 minute to remove trapped air from water line and to do EN Water has poor taste/odor. Increase temperature to cool. Water supply turned off or not connected. New filter installed. Replace filter (see...
... . Water dispenser does not work and/or icon flashing. Filter warning light is warm. On first installation there may be blocked. Filter may be air in tank. Refrigerator not used for kinks or leaks. Measured Fill needs recalibration. To remove air, run a liter or a quart of this booklet for 1 minute to remove trapped air from water line and to do EN Water has poor taste/odor. Increase temperature to cool. Water supply turned off or not connected. New filter installed. Replace filter (see...
User Guide
Page 47
...electrical, exhausting and other connection facilities. Instruct you have an installation problem contact your expenses caused if the product is installed in a location with the product's User Guide. Noise or vibration that are responsible for consequential or incidental damages (the cost of repairing or replacing other than: 1. F Normal recommended maintenance as set...the product. Replace house fuses, reset circuit breakers, correct house wiring or plumbing, or replace light bulbs. 4. The cost of a service call will be a defect of the product. Change the set forth in ...
...electrical, exhausting and other connection facilities. Instruct you have an installation problem contact your expenses caused if the product is installed in a location with the product's User Guide. Noise or vibration that are responsible for consequential or incidental damages (the cost of repairing or replacing other than: 1. F Normal recommended maintenance as set...the product. Replace house fuses, reset circuit breakers, correct house wiring or plumbing, or replace light bulbs. 4. The cost of a service call will be a defect of the product. Change the set forth in ...


