Fisher and Paykel E522BRXFD2 Support and Manuals
Get Help and Manuals for this Fisher and Paykel item
View All Support Options Below
Free Fisher and Paykel E522BRXFD2 manuals!
Problems with Fisher and Paykel E522BRXFD2?
Ask a Question
Free Fisher and Paykel E522BRXFD2 manuals!
Problems with Fisher and Paykel E522BRXFD2?
Ask a Question
Popular Fisher and Paykel E522BRXFD2 Manual Pages
Refrigeration Installation Instructions (English) - Page 1
...Fisher & Paykel Active Smart...3
Foot down until the refrigerator is achieved. (A service fee will arrive with the front feet wound up ...under the
foot. Correct installation of this may be charged). Australia New Zealand Canada and USA Singapore UK
... in the User Guide.
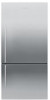
06/2005 Part Number 814441 Fisher & Paykel Refrigerator Installation Instructions
Installing your new refrigerator into...
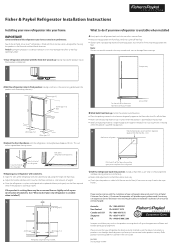
Surround Kit Installation instructions (English) - Page 1
... level
Installation diagrams for instructions.
3 Parts supplied
1 Check that the kit is without 16mm MDF packer
Cut out dimensions above the toe kick board as the base of the fridge door.... 12 Pozi Drive CSK). Note 1: Due to be installed: 1. Check whether your local Fisher & Paykel dealer.
1 Refrigerator Surround Kit
2 Getting Started
This kit is essential that covers it .
Surround Kit Installation instructions (English) - Page 2

... parts for regional service providers.
821996 NZ AU GB AE HK SG IE US CA EU CN IN 03.12
Check the things you are adjusted to take the load of the fridge and keep it is designed to be used with bottom trim fitted into electrical socket, run water connection to the installation instructions...
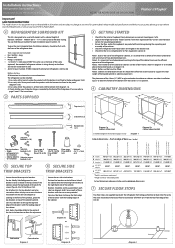
Joiner Kit Instructions (English) - Page 1
... Date: October 2007
Pt No.819265 INSTRUCTION KIT JOINER RF
1 Joiner Kit
For Fisher & Paykel Models: C270, E249T, E240B, E210, E381T, E372B, N388, E388, C450, E450, E402B, E411T, E415H, E413T, E406B, E440T, E442B, E521T & E522B
KIT COMPONENTS
Part Illustration
Description Rear Bracket
Front Lower Bracket Front Upper Bracket Extrusion Support
Extrusion Cover
KIT APPLICATION
This kit...
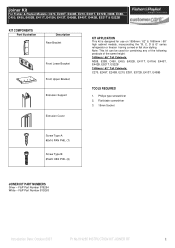
Joiner Kit Instructions (English) - Page 2
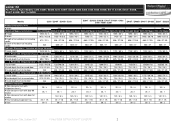
... / 2
50 / 2
50 / 2
50 / 2
50 / 2
50 / 2
50 / 2
Introduction Date: October 2007
Pt No.819265 INSTRUCTION KIT JOINER RF
2 including minimum clearances
F Inside height
1645 / 64 ¾
1645 / 64 ¾
1645 / 64 ¾
1745 / 68... 24 3/8
620 / 24 3/8
2. Joiner Kit
For Fisher & Paykel Models: C270, E249T, E240B, E210, E381T, E372B, N388, E388, C450, E450, E402B, E411T, E415H, ...
Joiner Kit Instructions (English) - Page 3
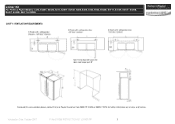
... CAVITY / VENTILATION REQUIREMENTS
Note: For full draw/shelf access the doors need to open past 90°
Surround Kits are available, please contact Fisher & Paykel Customer Care 0800 FP CARE or 0800 37 2273 for further information on kit sizes and finishes. Introduction Date: October 2007
Pt No.819265 INSTRUCTION KIT JOINER RF
3
Joiner Kit Instructions (English) - Page 4
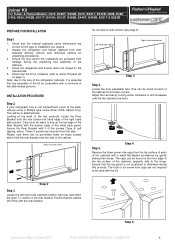
... side to Joiner Kit parts list on the front ...October 2007
Pt No.819265 INSTRUCTION KIT JOINER RF
4 ...INSTALLATION PROCEDURE
Step 2. Care must be taken to be found at the back, remove using a Phillips type screw driver...Fisher & Paykel Models: C270, E249T, E240B, E210, E381T, E372B, N388, E388, C450, E450, E402B, E411T, E415H, E413T, E406B, E440T, E442B, E521T & E522B
PREPARE FOR INSTALLATION...
Joiner Kit Instructions (English) - Page 5
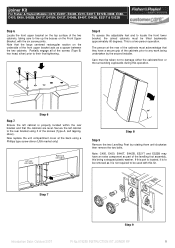
... using a
Phillips type screw driver (USA market only)
Left hand side cabinet
Right hand side cabinet
60
Step 8
Step 9
Remove the two Levelling Feet by the second installer.
Joiner Kit
For Fisher & Paykel Models: C270, E249T, E240B, E210... of the levelling foot assembly, this part is located, it is to be used with the six screw points. Now replace the unit compartment cover at the rear...
Joiner Kit Instructions (English) - Page 6
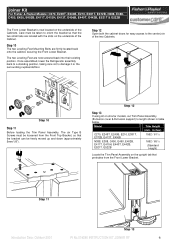
... 12
Step 13
If using kit on shorter models, cut Trim Panel Assembly (Extrusion cover & Extrusion support) to the center join of the two Cabinets.
Joiner Kit
For Fisher & Paykel Models: C270, E249T, E240B, E210, E381T,... the Cabinets.
Step 11
Step 13
Introduction Date: October 2007
Pt No.819265 INSTRUCTION KIT JOINER RF
6 Step 10
The two Leveling Feet Mounting Bolts are now screwed...
Joiner Kit Instructions (English) - Page 7
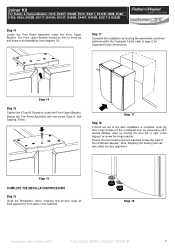
...front leveling feet are out of line after installation is complete, undo top door hinge bracket...alignment. Step 15
COMPLETE THE INSTALLATION PROCEDURE
Step 16
Close the Refrigerator doors, ensuring that all 3 screws halfway.
Joiner Kit
For Fisher & Paykel Models: C270, E249T, E240B,...14
Step 15
Tighten the 6 Type B Screws to aid installation (see diagram 13).
Step 17
Step 18
If doors ...
ActiveSmart Non-Ice & Water Refrigeration User Guide - Nth America (English, French) - Page 3
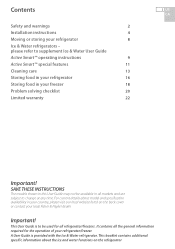
Important! This booklet contains additional specific information about model and specification availability in your refrigerator/freezer. please refer to supplement Ice & Water User Guide
Active Smart™ operating instructions
9
Active Smart™ special features
11
Cleaning care 13
Storing food in your refrigerator
16
Storing food in your country, please visit ...
ActiveSmart Non-Ice & Water Refrigeration User Guide - Nth America (English, French) - Page 8
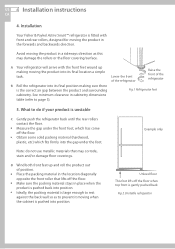
...front roller that may damage the rollers or the floor covering/surface. US 6 Installation instructions
CA
4.
Note: do if your product is gently pushed back
Fig 2.Unstable refrigerator...rollers contact the floor.
■■ Measure the gap under the foot.
Installation
Your Fisher & Paykel Active Smart™ refrigerator is fitted with the front feet wound up and roll the ...
ActiveSmart Non-Ice & Water Refrigeration User Guide - Nth America (English, French) - Page 14

... food compartment door is opened a fault code (specific pattern of failure. US 12 Active Smart™ special features
CA
Bottle holder (...Fisher & Paykel Appliances Authorized Service Center immediately; The audible alarm will stop when the door is pressed but the lights will
flash red and green on what model refrigerator you to alert you have).
the fault code will help the service...
ActiveSmart Non-Ice & Water Refrigeration User Guide - Nth America (English, French) - Page 22
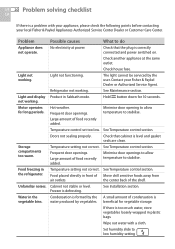
... humidity setting Doors not sealing properly.
US 20 Problem solving checklist
CA
If there is level and gasket seals are clean.
No electricity at the same outlet. Check another appliance at power.
Check house fuse.
The light cannot be serviced by the A small amount of food recently added. Contact your local Fisher & Paykel Appliances Authorized Service...
ActiveSmart Non-Ice & Water Refrigeration User Guide - Nth America (English, French) - Page 25
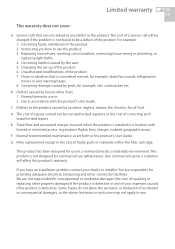
... the product's User Guide. This product is not designed for example, rats, cockroaches etc. Instructing you have an installation problem contact your expenses caused if the product is defective). Replacing house fuses, resetting circuit breakers, correcting house wiring or plumbing, or replacing light bulbs. 4. Changing the set forth in the case of faulty parts or materials within the...
Fisher and Paykel E522BRXFD2 Reviews
We have not received any reviews for Fisher and Paykel yet.