

User Guide
Page 1
Use and Care With Installation Instructions RECYCLED PAPER RECYCLABLE We care about our environment 500A277P046
Use and Care With Installation Instructions RECYCLED PAPER RECYCLABLE We care about our environment 500A277P046

User Guide
Page 2
... Electric Dryer 8 Gas Dryer 8, 9 Reversible Door Instructions 5 Care and Cleaning Dryer Exhaust 14 Exterior 11 Light Bulb Replacement 13 Lint Filter 11 Problem Solver 15 Operating Instructions, Tips Automatic Drying 13 Drying Selection Guide 12, 13 Electronic Sensor Control 13 Extra Care Program 10, 12 Knits Drying Tips 11, 12 Lint Filter 11 Loading 11, 15 Operating the Dryer 10, 11, 12, 13 Permanent Press Drying Tips 11, 15 Sorting Clothes 11, 12 Special Instructions 12 Timed Drying 12, 13 End Cycle Signal 10 Consumer Services Model and Serial Numbers 2 Repair Service...
... Electric Dryer 8 Gas Dryer 8, 9 Reversible Door Instructions 5 Care and Cleaning Dryer Exhaust 14 Exterior 11 Light Bulb Replacement 13 Lint Filter 11 Problem Solver 15 Operating Instructions, Tips Automatic Drying 13 Drying Selection Guide 12, 13 Electronic Sensor Control 13 Extra Care Program 10, 12 Knits Drying Tips 11, 12 Lint Filter 11 Loading 11, 15 Operating the Dryer 10, 11, 12, 13 Permanent Press Drying Tips 11, 15 Sorting Clothes 11, 12 Special Instructions 12 Timed Drying 12, 13 End Cycle Signal 10 Consumer Services Model and Serial Numbers 2 Repair Service...
User Guide
Page 3
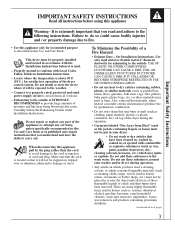
... in the Installation Instructions. Connect to a properly rated, protected and sized power supply circuit to conform with Local Codes. Do not repair or replace any servicing unless specifically recommended in this Use and Care Book or in or near the dryer until all instructions before it will not be placed in published user-repair instructions that you read and adhere to the cord or junction of moisture and lint from Heat" (such...
... in the Installation Instructions. Connect to a properly rated, protected and sized power supply circuit to conform with Local Codes. Do not repair or replace any servicing unless specifically recommended in this Use and Care Book or in or near the dryer until all instructions before it will not be placed in published user-repair instructions that you read and adhere to the cord or junction of moisture and lint from Heat" (such...

User Guide
Page 4
... exhaust duct to be followed very carefully. • Close supervision is necessary if this appliance if it is damaged, malfunctioning, partially disassembled, or has missing or broken parts, including a damaged cord or plug. • Never climb on or stand on . Service or performance problems caused by a qualified service person. (see Care & Cleaning section) To Minimize the Possibility of the lint filter). • NOTE: Turning the Cycle...
... exhaust duct to be followed very carefully. • Close supervision is necessary if this appliance if it is damaged, malfunctioning, partially disassembled, or has missing or broken parts, including a damaged cord or plug. • Never climb on or stand on . Service or performance problems caused by a qualified service person. (see Care & Cleaning section) To Minimize the Possibility of the lint filter). • NOTE: Turning the Cycle...
User Guide
Page 5
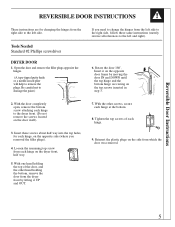
... instructions (merely reverse all references to remove the plugs. With the door completely open, remove the bottom screw attaching each hinge to the left side to the right side, follow these screws about half way into the top holes, for changing the hinges from each hinge, on the opposite side (where you need to change the hinges from which the door was removed. 5 Reversible Door Instructions REVERSIBLE DOOR INSTRUCTIONS...
... instructions (merely reverse all references to remove the plugs. With the door completely open, remove the bottom screw attaching each hinge to the left side to the right side, follow these screws about half way into the top holes, for changing the hinges from each hinge, on the opposite side (where you need to change the hinges from which the door was removed. 5 Reversible Door Instructions REVERSIBLE DOOR INSTRUCTIONS...
User Guide
Page 6
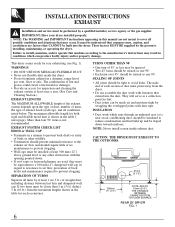
... at least once a year. (See Care and Cleaning Section.) EXHAUST LENGTH The MAXIMUM ALLOWABLE length of the exhaust system depends upon the type of duct, number of turns, the type of exhaust hood (wall cap), and all conditions noted below. The male end of duct must point away from the dryer. • Do not assemble the duct work which can be installed at least 300 mm (12") above...
... at least once a year. (See Care and Cleaning Section.) EXHAUST LENGTH The MAXIMUM ALLOWABLE length of the exhaust system depends upon the type of duct, number of turns, the type of exhaust hood (wall cap), and all conditions noted below. The male end of duct must point away from the dryer. • Do not assemble the duct work which can be installed at least 300 mm (12") above...
User Guide
Page 7
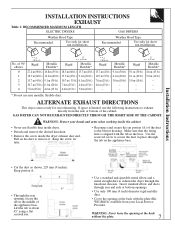
... the plate (Kit WE1M454) available from the side or bottom of the duct to remove it. Metallic Flexible* 4.6 m (15 ft.) 3.0 m (10 ft.) - - - * Do not use the following instructions to secure the duct in the base. WARNING: Protect your Local Service Provider. INSTALLATION INSTRUCTIONS EXHAUST Table 1: RECOMMENDED MAXIMUM LENGTH ELECTRIC DRYERS GAS DRYERS Weather Hood Type Recommended Use only for short run installations Weather Hood Type Recommended Use only for rear exhausting. Rigid 9.1 m (30...
... the plate (Kit WE1M454) available from the side or bottom of the duct to remove it. Metallic Flexible* 4.6 m (15 ft.) 3.0 m (10 ft.) - - - * Do not use the following instructions to secure the duct in the base. WARNING: Protect your Local Service Provider. INSTALLATION INSTRUCTIONS EXHAUST Table 1: RECOMMENDED MAXIMUM LENGTH ELECTRIC DRYERS GAS DRYERS Weather Hood Type Recommended Use only for short run installations Weather Hood Type Recommended Use only for rear exhausting. Rigid 9.1 m (30...
User Guide
Page 8
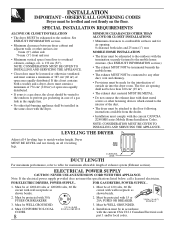
... GIVEN TO INSTALLING AND SERVICING THE APPLIANCE. Must be WELL GROUNDED. 3. The free air opening : 0 clearance both a washer and a dryer, doors must contain a minimum of 387 cm2 (60 in2) of 120/240 volts or 120/208 volts, 60 Hz circuit with the current CSA C22.1 Canadian Electrical code part 1 and/or local codes. Note: If the electrical power supply provided does not meet the specifications listed below...
... GIVEN TO INSTALLING AND SERVICING THE APPLIANCE. Must be WELL GROUNDED. 3. The free air opening : 0 clearance both a washer and a dryer, doors must contain a minimum of 387 cm2 (60 in2) of 120/240 volts or 120/208 volts, 60 Hz circuit with the current CSA C22.1 Canadian Electrical code part 1 and/or local codes. Note: If the electrical power supply provided does not meet the specifications listed below...
User Guide
Page 9
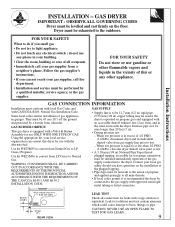
..., accessible for leaks with CAN/CGA-B149, Natural Gas Installation Code. When test pressure is operated on the installation of the plugged tapping. • Pipe dope must conform with local Gas Codes and with soapy solution or equivalent. Contact your gas supplier from Natural Gas to Natural Gas. Use kit WE25M35 to convert from a neighbor's phone. Some local codes restrict installation of propane and applied sparingly to all connections for test gauge connection, must be exhausted...
..., accessible for leaks with CAN/CGA-B149, Natural Gas Installation Code. When test pressure is operated on the installation of the plugged tapping. • Pipe dope must conform with local Gas Codes and with soapy solution or equivalent. Contact your gas supplier from Natural Gas to Natural Gas. Use kit WE25M35 to convert from a neighbor's phone. Some local codes restrict installation of propane and applied sparingly to all connections for test gauge connection, must be exhausted...
User Guide
Page 10
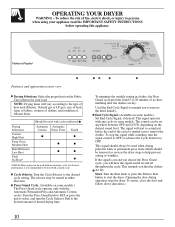
... removed as soon as the dryer stops to the type of no-heat tumbling after the clothes are dry. Turn the Start knob or press the Push to Start button to start to 20 minutes of heat used with the Automatic Permanent Press and Automatic Cottons cycles. The selector may vary 1 Drying Selections. OPERATING YOUR DRYER WARNING - Start. NOTE: Drying times will start the dryer. (Opening the door during operation stops the dryer. Press Timed *Fluff-No Heat...
... removed as soon as the dryer stops to the type of no-heat tumbling after the clothes are dry. Turn the Start knob or press the Push to Start button to start to 20 minutes of heat used with the Automatic Permanent Press and Automatic Cottons cycles. The selector may vary 1 Drying Selections. OPERATING YOUR DRYER WARNING - Start. NOTE: Drying times will start the dryer. (Opening the door during operation stops the dryer. Press Timed *Fluff-No Heat...
User Guide
Page 11
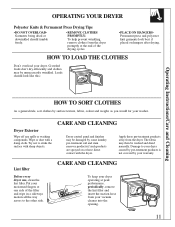
... Cleaning HOW TO SORT CLOTHES As a general rule, sort clothes by your dryer operating at peak performance. CARE AND CLEANING Dryer control panel and finishes may be damaged by some laundry pre-treatment soil and stain remover products if such products are sprayed on hangers after drying. Put your dryer. CARE AND CLEANING To keep your warranty. Dryer Exterior Wipe off any spills or washing compounds. periodically, remove the lint filter...
... Cleaning HOW TO SORT CLOTHES As a general rule, sort clothes by your dryer operating at peak performance. CARE AND CLEANING Dryer control panel and finishes may be damaged by some laundry pre-treatment soil and stain remover products if such products are sprayed on hangers after drying. Put your dryer. CARE AND CLEANING To keep your warranty. Dryer Exterior Wipe off any spills or washing compounds. periodically, remove the lint filter...
User Guide
Page 12
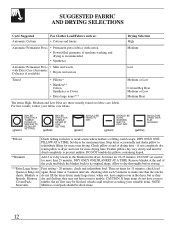
... dryer and reset for more even drying. Then set control for more drying time. Blankets or do not have room to redistribute filling for holes or weak seams where feathers or filling could result in scorching your fabric care labels. Mattress dry and fluff up, they Spreads; Set dryer for 20-25 minutes. DRY ONLY ONE BLANKET AT A TIME. check and redistribute load. tumble, the air flow...
... dryer and reset for more even drying. Then set control for more drying time. Blankets or do not have room to redistribute filling for holes or weak seams where feathers or filling could result in scorching your fabric care labels. Mattress dry and fluff up, they Spreads; Set dryer for 20-25 minutes. DRY ONLY ONE BLANKET AT A TIME. check and redistribute load. tumble, the air flow...
User Guide
Page 13
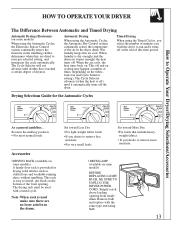
... the number of minutes you desire to remove more moisture. • DRUM LAMP (available on some models) BEFORE REPLACING LIGHT BULB, BE SURE TO UNPLUG THE DRYER POWER CORD. This rack is dry enough (and the drum air warms enough) the heat turns off at the end of this air cool. Automatic Drying When using the Automatic Cycles, the Automatic Dry Control system continually senses the temperature of times (depending on the fabric, load size and Cycle Selector setting). Set...
... the number of minutes you desire to remove more moisture. • DRUM LAMP (available on some models) BEFORE REPLACING LIGHT BULB, BE SURE TO UNPLUG THE DRYER POWER CORD. This rack is dry enough (and the drum air warms enough) the heat turns off at the end of this air cool. Automatic Drying When using the Automatic Cycles, the Automatic Dry Control system continually senses the temperature of times (depending on the fabric, load size and Cycle Selector setting). Set...
User Guide
Page 14
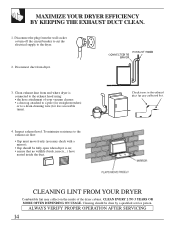
... plug from the wall socket or turn off the circuit breaker to cut the electrical supply to a drain cleaning wire (for straight stretches) or to the dryer. 2. CLEANING LINT FROM YOUR DRYER Combustible lint may check with a mirror); • flap should be fully open when dryer is connected to the exhaust hood using: • the hose attachment of the dryer cabinet. CLEAN EVERY 2 TO 3 YEARS OR MORE OFTEN DEPENDING ON USAGE. Clean exhaust duct...
... plug from the wall socket or turn off the circuit breaker to cut the electrical supply to a drain cleaning wire (for straight stretches) or to the dryer. 2. CLEANING LINT FROM YOUR DRYER Combustible lint may check with a mirror); • flap should be fully open when dryer is connected to the exhaust hood using: • the hose attachment of the dryer cabinet. CLEAN EVERY 2 TO 3 YEARS OR MORE OFTEN DEPENDING ON USAGE. Clean exhaust duct...
User Guide
Page 15
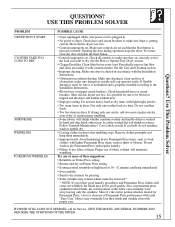
... PROBLEM DRYER WON'T START CLOTHES TAKE TOO LONG TO DRY SHRINKAGE WRINKLING TO REMOVE WRINKLES POSSIBLE CAUSE • Dryer unplugged. Make sure controls are correctly set and that the Start button is treated for Service, GIVE THE MODEL AND SERIAL NUMBERS AND DESCRIBE THE SYMPTOMS OF THE DRYER. 15 Opening the door during operation stops the dryer. Dry only one or more similar articles, even if dry, to Operate Your Dryer section. • Clogged lint filter. Try one washer load at a time...
... PROBLEM DRYER WON'T START CLOTHES TAKE TOO LONG TO DRY SHRINKAGE WRINKLING TO REMOVE WRINKLES POSSIBLE CAUSE • Dryer unplugged. Make sure controls are correctly set and that the Start button is treated for Service, GIVE THE MODEL AND SERIAL NUMBERS AND DESCRIBE THE SYMPTOMS OF THE DRYER. 15 Opening the door during operation stops the dryer. Dry only one or more similar articles, even if dry, to Operate Your Dryer section. • Clogged lint filter. Try one washer load at a time...
User Guide
Page 16
... a Fisher & Paykel Authorized Service Agent during the warranty period or beyond: in Canada call DIRECT 1 877 744 7400 - Warrantor: Fisher & Paykel Appliances Inc. All warranty will provide, free of charge, parts and service labor in your dealer or installer. Damage to repair or replace any succeeding owner for products purchased for providing adequate electrical, exhausting and other than the intended purpose or used for other connection facilities. - YOUR AUTOMATIC CLOTHES DRYER WARRANTY...
... a Fisher & Paykel Authorized Service Agent during the warranty period or beyond: in Canada call DIRECT 1 877 744 7400 - Warrantor: Fisher & Paykel Appliances Inc. All warranty will provide, free of charge, parts and service labor in your dealer or installer. Damage to repair or replace any succeeding owner for products purchased for providing adequate electrical, exhausting and other than the intended purpose or used for other connection facilities. - YOUR AUTOMATIC CLOTHES DRYER WARRANTY...


