
User Guide
Page 3
... turn your dryer on the back cover or contact your dryer Before you call for service User warnings Fault codes Solving operating problems Solving drying problems Limited warranty How to change at any time. SAVE THESE INSTRUCTIONS The models shown in this User Guide may not be available in your country, please visit our website listed on Getting started quickly AeroCare controls Sorting and loading Dryer cycles Drying special items Drying cycle options Dryer operation Care labels Drying rack Customizing dryer cycles Changing pre-set options Caring...
... turn your dryer on the back cover or contact your dryer Before you call for service User warnings Fault codes Solving operating problems Solving drying problems Limited warranty How to change at any time. SAVE THESE INSTRUCTIONS The models shown in this User Guide may not be available in your country, please visit our website listed on Getting started quickly AeroCare controls Sorting and loading Dryer cycles Drying special items Drying cycle options Dryer operation Care labels Drying rack Customizing dryer cycles Changing pre-set options Caring...
User Guide
Page 4
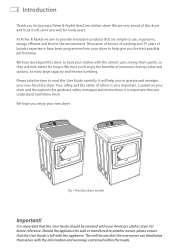
... laundry experience have developed this User Guide carefully. Located on your dryer and throughout this guide are very proud of numerous drying cycles and options, its extra large capacity and reverse tumbling. It is important that the User Guide is left with your AeroCare clothes dryer for buying a Fisher & Paykel AeroCare clothes dryer. Fig.1 AeroCare dryer models Important! Should the appliance be sold or transferred to operate and maintain your new AeroCare...
... laundry experience have developed this User Guide carefully. Located on your dryer and throughout this guide are very proud of numerous drying cycles and options, its extra large capacity and reverse tumbling. It is important that the User Guide is left with your AeroCare clothes dryer for buying a Fisher & Paykel AeroCare clothes dryer. Fig.1 AeroCare dryer models Important! Should the appliance be sold or transferred to operate and maintain your new AeroCare...

User Guide
Page 6
... not tamper with the controls. ■■ Note: Touching the POWER button does NOT disconnect the dryer from the power supply or disconnect the dryer at the household distribution panel (by removing the fuse or switching off the circuit breaker) before using this User Guide. It cannot be exposed to water or exposed to the weather. ■■ Connect to a properly protected, rated and sized power supply circuit to an approved fixed electrical outlet.
... not tamper with the controls. ■■ Note: Touching the POWER button does NOT disconnect the dryer from the power supply or disconnect the dryer at the household distribution panel (by removing the fuse or switching off the circuit breaker) before using this User Guide. It cannot be exposed to water or exposed to the weather. ■■ Connect to a properly protected, rated and sized power supply circuit to an approved fixed electrical outlet.

User Guide
Page 8
... directly in the dryer. 6 Important safety instructions Safe use the drying rack supplied with this dryer is used near children. ■■ Never climb on, climb into the appliance if the drum is running and you wish to dry these items use of the dryer ■■ Do not allow children to play inside, on the dryer top, or drum, or apply weight to the door...
... directly in the dryer. 6 Important safety instructions Safe use the drying rack supplied with this dryer is used near children. ■■ Never climb on, climb into the appliance if the drum is running and you wish to dry these items use of the dryer ■■ Do not allow children to play inside, on the dryer top, or drum, or apply weight to the door...

User Guide
Page 10
...;■ Exhaust/vent hood. ■■ Duct tape. ■■ Soap solution for gas leak detection (for gas connections only 19 mm) strain relief (electric connections only). ■■ Dryer power cord kit (power cord is above 50°F (10°C) to ensure suitable operation of the dryer control system. ■■ UL-listed duct material must be used. Length of improper installation. ■■ The dryer must be installed in a location where the temperature is...
...;■ Exhaust/vent hood. ■■ Duct tape. ■■ Soap solution for gas leak detection (for gas connections only 19 mm) strain relief (electric connections only). ■■ Dryer power cord kit (power cord is above 50°F (10°C) to ensure suitable operation of the dryer control system. ■■ UL-listed duct material must be used. Length of improper installation. ■■ The dryer must be installed in a location where the temperature is...

User Guide
Page 15
... dryer, minimum clearance required from the wall is located at least 25 sq. Note: when the exhaust duct is 5" (127 mm). In addition to the structure. ■■ Provide an opening with a free area of at the rear of a building. ■■ Do not use sheet metal screws or other fuel-burning appliance shall be vented to the outdoors. Residential garage installation Dryers installed...
... dryer, minimum clearance required from the wall is located at least 25 sq. Note: when the exhaust duct is 5" (127 mm). In addition to the structure. ■■ Provide an opening with a free area of at the rear of a building. ■■ Do not use sheet metal screws or other fuel-burning appliance shall be vented to the outdoors. Residential garage installation Dryers installed...

User Guide
Page 22
... grounded branch circuit, which meets local codes, may be plugged directly into a grounded outlet. DO NOT cut or remove the grounding terminal from this plug. Do not use . If the electrical supply provided does not meet specifications outlined above, the installation of an approved outlet by attaching to the green ground screw on the rear of the dryer, and to follow these instructions can result in...
... grounded branch circuit, which meets local codes, may be plugged directly into a grounded outlet. DO NOT cut or remove the grounding terminal from this plug. Do not use . If the electrical supply provided does not meet specifications outlined above, the installation of an approved outlet by attaching to the green ground screw on the rear of the dryer, and to follow these instructions can result in...

User Guide
Page 23
... circuit breaker(s) or remove the dryer's circuit fuses at its electrical box. Note: the wiring diagram is unplugged from the wall outlet. In the absence of fire, electrical shock & personal injury: The appliance must be plugged into or connected to an individual branch circuit, protected by the correct time delay fuses or circuit breakers. WARNING! Disconnect power before making electrical connections. Installation instructions 21 Connecting an electric dryer (skip for tools required. Never use an extension cord or adapter plug...
... circuit breaker(s) or remove the dryer's circuit fuses at its electrical box. Note: the wiring diagram is unplugged from the wall outlet. In the absence of fire, electrical shock & personal injury: The appliance must be plugged into or connected to an individual branch circuit, protected by the correct time delay fuses or circuit breakers. WARNING! Disconnect power before making electrical connections. Installation instructions 21 Connecting an electric dryer (skip for tools required. Never use an extension cord or adapter plug...

User Guide
Page 27
... individual branch circuit, which is properly grounded. Contact Fisher & Paykel Customer Care (refer to whether the appliance is protected by the correct time delay fuses or circuit breakers. Check with the dryer. Do not modify the plug provided with a qualified electrician or service representative if you are in Canada only Electrical requirements (electric models only) WARNING! Installation instructions 25 Connecting an electric dryer (skip for plugging into a 14-30R wall outlet. in doubt...
... individual branch circuit, which is properly grounded. Contact Fisher & Paykel Customer Care (refer to whether the appliance is protected by the correct time delay fuses or circuit breakers. Check with the dryer. Do not modify the plug provided with a qualified electrician or service representative if you are in Canada only Electrical requirements (electric models only) WARNING! Installation instructions 25 Connecting an electric dryer (skip for plugging into a 14-30R wall outlet. in doubt...

User Guide
Page 28
... kept as short in length and as straight as these installation instructions (page 33). ■■ Never install a screen in which it is provided for rear exhausting. This will prevent the build up for inspection and cleaning of lint and moisture in the room in or over the dryers exhaust duct. The exhaust system shall be vented directly from a kitchen. Do not use screws as possible...
... kept as short in length and as straight as these installation instructions (page 33). ■■ Never install a screen in which it is provided for rear exhausting. This will prevent the build up for inspection and cleaning of lint and moisture in the room in or over the dryers exhaust duct. The exhaust system shall be vented directly from a kitchen. Do not use screws as possible...

User Guide
Page 32
... (semi-rigid and foil type) transition duct: 1 Slide one end of the duct over the exhaust outlet pipe at the back of the dryer. 2 Secure the duct to the pipe with a clamp. Cut off and remove the unwanted duct. 30 Installation instructions UL-listed flexible metal (foil-type) transition duct ■■ Connecting the dryer to the house vent using flexible metal (foil-type) duct maybe required in total. ■■...
... (semi-rigid and foil type) transition duct: 1 Slide one end of the duct over the exhaust outlet pipe at the back of the dryer. 2 Secure the duct to the pipe with a clamp. Cut off and remove the unwanted duct. 30 Installation instructions UL-listed flexible metal (foil-type) transition duct ■■ Connecting the dryer to the house vent using flexible metal (foil-type) duct maybe required in total. ■■...

User Guide
Page 39
...) elbow with a 4" (102 mm) length of the dryer (inside the dryer when inserting the duct. Exhaust can be secured with tape, otherwise they may separate and cause a safety hazard. warning! Fig.29 Cover plate Installation instructions 37 Adding ducting for exhaust to the right or left (gas or electric models) or right side (electric models only) Duct tape Fig.27 Left and right exhausting ■■ Use duct tape (as shown in...
...) elbow with a 4" (102 mm) length of the dryer (inside the dryer when inserting the duct. Exhaust can be secured with tape, otherwise they may separate and cause a safety hazard. warning! Fig.29 Cover plate Installation instructions 37 Adding ducting for exhaust to the right or left (gas or electric models) or right side (electric models only) Duct tape Fig.27 Left and right exhausting ■■ Use duct tape (as shown in...

User Guide
Page 41
... the cold supply at the same faucet. Important! Use the new inlet hoses provided with Steam cycles) Supply requirements The hot and cold faucets MUST be connected correctly. Installation instructions 39 Water connection (for part repair or replacement. Faucets need for selected models with your home. A "Y" connector can be used so that the washer (which also requires a cold water supply) and dryer can be connected to be ¾" (19 mm) so the inlet...
... the cold supply at the same faucet. Important! Use the new inlet hoses provided with Steam cycles) Supply requirements The hot and cold faucets MUST be connected correctly. Installation instructions 39 Water connection (for part repair or replacement. Faucets need for selected models with your home. A "Y" connector can be used so that the washer (which also requires a cold water supply) and dryer can be connected to be ¾" (19 mm) so the inlet...

User Guide
Page 48
... touch the POWER button. Please read the user guide in the opposite direction for leaks. ■■ Exhaust temperature increases, to the new heating element, and is completely closed. Otherwise, the display will diminish with the correct use the dryer. Throughout the drying cycle the motor will not start, check that the circuit breaker has not been tripped. ■■ The dryer door is normal. Important! If the dryer will run for...
... touch the POWER button. Please read the user guide in the opposite direction for leaks. ■■ Exhaust temperature increases, to the new heating element, and is completely closed. Otherwise, the display will diminish with the correct use the dryer. Throughout the drying cycle the motor will not start, check that the circuit breaker has not been tripped. ■■ The dryer door is normal. Important! If the dryer will run for...

User Guide
Page 50
... with the Fisher & Paykel AquaSmart™ washer The dryer combined with a temperature sensor determines when the clothes have the drum rotate in the reverse direction regularly, so your garments from the control panel. Electric Shock Hazard To reduce the risk of garments is accomplished by an efficient high airflow fan and careful heat control. Reverse action tumbling (selected models only) You can result in this User Guide before operating this appliance...
... with the Fisher & Paykel AquaSmart™ washer The dryer combined with a temperature sensor determines when the clothes have the drum rotate in the reverse direction regularly, so your garments from the control panel. Electric Shock Hazard To reduce the risk of garments is accomplished by an efficient high airflow fan and careful heat control. Reverse action tumbling (selected models only) You can result in this User Guide before operating this appliance...
User Guide
Page 65
...; Each drying cycle is illuminated. Cooling When the dryer has sensed that the clothes have dried to change the default drying options. The higher the level, the longer the drying time and the drier your desired drying temperature is set to a default temperature to ensure the best possible fabric care for clothes care reasons. When your clothes. ■■ To select a different drying temperature, touch the DRYING TEMP button until the light next to...
...; Each drying cycle is illuminated. Cooling When the dryer has sensed that the clothes have dried to change the default drying options. The higher the level, the longer the drying time and the drier your desired drying temperature is set to a default temperature to ensure the best possible fabric care for clothes care reasons. When your clothes. ■■ To select a different drying temperature, touch the DRYING TEMP button until the light next to...

User Guide
Page 78
... serial number of your Fisher & Paykel Authorized Service Agent (refer to , try to page 84). Fault codes When a continuous series of beeps is alerting you to inform you what the problem could potentially be required to call your dryer (located on the display; You must address the problem the dryer is sounded, all the lights turn off on the control panel and a number appears on the drum opening and closing the door...
... serial number of your Fisher & Paykel Authorized Service Agent (refer to , try to page 84). Fault codes When a continuous series of beeps is alerting you to inform you what the problem could potentially be required to call your dryer (located on the display; You must address the problem the dryer is sounded, all the lights turn off on the control panel and a number appears on the drum opening and closing the door...
User Guide
Page 79
... flashing. Dryer does not heat Is the dryer set ? Is the gas turned on the control panel? Check the progress lights. Is there a user warning or fault code displayed on (gas dryers only)? Dryer keeps stopping and starting Your dryer has a reverse action tumble. Could your house circuit breakers and fuses. Has WRINKLE FREE been turned on the dryer Is the electrical cord plugged in? If they are at the power point, is normal. Is the dryer door closed properly? Is the lint filter...
... flashing. Dryer does not heat Is the dryer set ? Is the gas turned on the control panel? Check the progress lights. Is there a user warning or fault code displayed on (gas dryers only)? Dryer keeps stopping and starting Your dryer has a reverse action tumble. Could your house circuit breakers and fuses. Has WRINKLE FREE been turned on the dryer Is the electrical cord plugged in? If they are at the power point, is normal. Is the dryer door closed properly? Is the lint filter...

User Guide
Page 80
... drying cycle longer. Check this does not need to resume the cycle. Is the airflow system free from the dryer. Items got too hot or damaged Did you using the dryer in ? Is the dryer overloaded for the cycle? High altitude will need to cool once removed from obstruction? Has the dryer been paused? Is the lint filter blocked? Separate items and dry items of cycle cool down? Hot, humid conditions may damage clothing...
... drying cycle longer. Check this does not need to resume the cycle. Is the airflow system free from the dryer. Items got too hot or damaged Did you using the dryer in ? Is the dryer overloaded for the cycle? High altitude will need to cool once removed from obstruction? Has the dryer been paused? Is the lint filter blocked? Separate items and dry items of cycle cool down? Hot, humid conditions may damage clothing...

User Guide
Page 81
... these locations and is normal. Noises Have you have selected? When it changes direction it back on the floor at different times in the cycle and may not be blocked from inside of the door. This is normal. These can be required call an Authorized Service Agent to page 76). Cannot see steam at start again in the inlet hose. Puddle of the dryer Check...
... these locations and is normal. Noises Have you have selected? When it changes direction it back on the floor at different times in the cycle and may not be blocked from inside of the door. This is normal. These can be required call an Authorized Service Agent to page 76). Cannot see steam at start again in the inlet hose. Puddle of the dryer Check...


