

User Guide
Page 1
Use and Care With Installation Instructions RECYCLED PAPER RECYCLABLE We care about our environment 500A277P046
Use and Care With Installation Instructions RECYCLED PAPER RECYCLABLE We care about our environment 500A277P046

User Guide
Page 2
... Electric Dryer 8 Gas Dryer 8, 9 Reversible Door Instructions 5 Care and Cleaning Dryer Exhaust 14 Exterior 11 Light Bulb Replacement 13 Lint Filter 11 Problem Solver 15 Operating Instructions, Tips Automatic Drying 13 Drying Selection Guide 12, 13 Electronic Sensor Control 13 Extra Care Program 10, 12 Knits Drying Tips 11, 12 Lint Filter 11 Loading 11, 15 Operating the Dryer 10, 11, 12, 13 Permanent Press Drying Tips 11, 15 Sorting Clothes 11, 12 Special Instructions 12 Timed Drying 12, 13 End Cycle Signal 10 Consumer Services Model and Serial Numbers 2 Repair Service...
... Electric Dryer 8 Gas Dryer 8, 9 Reversible Door Instructions 5 Care and Cleaning Dryer Exhaust 14 Exterior 11 Light Bulb Replacement 13 Lint Filter 11 Problem Solver 15 Operating Instructions, Tips Automatic Drying 13 Drying Selection Guide 12, 13 Electronic Sensor Control 13 Extra Care Program 10, 12 Knits Drying Tips 11, 12 Lint Filter 11 Loading 11, 15 Operating the Dryer 10, 11, 12, 13 Permanent Press Drying Tips 11, 15 Sorting Clothes 11, 12 Special Instructions 12 Timed Drying 12, 13 End Cycle Signal 10 Consumer Services Model and Serial Numbers 2 Repair Service...
User Guide
Page 3
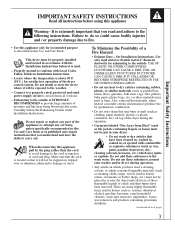
... out. Locate where the temperature is used in beauty salons, restaurants or barber shops, etc.) must not be put in this appliance only for its intended purpose as cleaning cloths, mops, towels used . - Carefully follow the Exhausting Details in Installation Instructions. - Do not repair or replace any part of the appliance or attempt any servicing unless specifically recommended in your washer and/or dryer during the operation. •...
... out. Locate where the temperature is used in beauty salons, restaurants or barber shops, etc.) must not be put in this appliance only for its intended purpose as cleaning cloths, mops, towels used . - Carefully follow the Exhausting Details in Installation Instructions. - Do not repair or replace any part of the appliance or attempt any servicing unless specifically recommended in your washer and/or dryer during the operation. •...

User Guide
Page 4
... the dryer should be followed very carefully. • Close supervision is necessary if this appliance is used in your appliances clean and dry to reduce the possibility of slipping. • To minimize the possibility of electric shock, unplug this appliance from the power supply before attempting any maintenance or cleaning (except the removal and cleaning of the lint filter). • NOTE: Turning the Cycle Selector...
... the dryer should be followed very carefully. • Close supervision is necessary if this appliance is used in your appliances clean and dry to reduce the possibility of slipping. • To minimize the possibility of electric shock, unplug this appliance from the power supply before attempting any maintenance or cleaning (except the removal and cleaning of the lint filter). • NOTE: Turning the Cycle Selector...
User Guide
Page 5
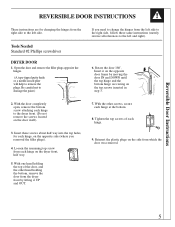
... Needed Standard #2 Phillips screwdriver DRYER DOOR 1. Loosen the remaining top screw from which the door was removed. 5 Reinsert the plastic plugs on the side from each hinge on the dryer front, half way. 5. Insert these same instructions (merely reverse all references to the dryer front. (Do not remove the screws located on the door itself). 3. Reversible Door Instructions REVERSIBLE DOOR INSTRUCTIONS These instructions are for each hinge at the bottom. 8. Open...
... Needed Standard #2 Phillips screwdriver DRYER DOOR 1. Loosen the remaining top screw from which the door was removed. 5 Reinsert the plastic plugs on the side from each hinge on the dryer front, half way. 5. Insert these same instructions (merely reverse all references to the dryer front. (Do not remove the screws located on the door itself). 3. Reversible Door Instructions REVERSIBLE DOOR INSTRUCTIONS These instructions are for each hinge at the bottom. 8. Open...
User Guide
Page 6
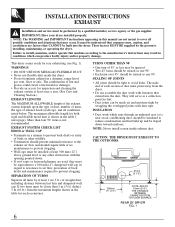
... conditions noted below. This dryer comes ready for rear exhausting (see Fig. 1). INSTALLATION INSTRUCTIONS EXHAUST Installation and service must be understood that common sense, caution, and carefulness are factors that CANNOT be built into the duct. IMPORTANT: Have your dryer installed properly. NOTE: Never install screen inside the dryer. • Do not terminate exhaust in regard to resistance to air flow, prevention of back drafts and maintenance required to prevent clogging. •...
... conditions noted below. This dryer comes ready for rear exhausting (see Fig. 1). INSTALLATION INSTRUCTIONS EXHAUST Installation and service must be understood that common sense, caution, and carefulness are factors that CANNOT be built into the duct. IMPORTANT: Have your dryer installed properly. NOTE: Never install screen inside the dryer. • Do not terminate exhaust in regard to resistance to air flow, prevention of back drafts and maintenance required to prevent clogging. •...
User Guide
Page 7
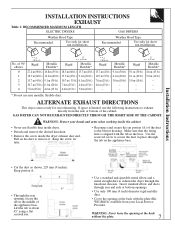
... leave the opening at the back without the plate. 7 Installation Instructions • Cut the duct as shown, 229 mm (9 inches). GAS DRYER CAN NOT BE EXHAUSTED DIRECTLY THROUGH THE RIGHT SIDE OF THE CABINET. ALTERNATE EXHAUST DIRECTIONS This dryer comes ready for short run installations No. Rigid 9.1 m (30 ft.) 6.1 m (20 ft.) 3.0 m (10 ft.) - - WARNING: Protect your Local Service Provider. Use the reserved screw to exhaust directly from your hands...
... leave the opening at the back without the plate. 7 Installation Instructions • Cut the duct as shown, 229 mm (9 inches). GAS DRYER CAN NOT BE EXHAUSTED DIRECTLY THROUGH THE RIGHT SIDE OF THE CABINET. ALTERNATE EXHAUST DIRECTIONS This dryer comes ready for short run installations No. Rigid 9.1 m (30 ft.) 6.1 m (20 ft.) 3.0 m (10 ft.) - - WARNING: Protect your Local Service Provider. Use the reserved screw to exhaust directly from your hands...
User Guide
Page 8
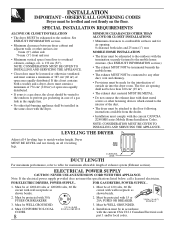
... or 120/208 volts, 60 Hz circuit with the dryer. The free air opening : 0 clearance both a washer and a dryer, doors must comply with 30A FUSES OR BREAKERS. 2. ELECTRICAL POWER SUPPLY CAUTION: NEVER USE AN EXTENSION CORD WITH THIS APPLIANCE. Must be WELL GROUNDED. 3. Must CONFORM TO LOCAL CODES. 8 4. NOTE: CONSIDERATION MUST BE GIVEN TO INSTALLING AND SERVICING THE APPLIANCE. VIEW 4 LEVELING LEGS DUCT LENGTH For maximum performance, refer to the...
... or 120/208 volts, 60 Hz circuit with the dryer. The free air opening : 0 clearance both a washer and a dryer, doors must comply with 30A FUSES OR BREAKERS. 2. ELECTRICAL POWER SUPPLY CAUTION: NEVER USE AN EXTENSION CORD WITH THIS APPLIANCE. Must be WELL GROUNDED. 3. Must CONFORM TO LOCAL CODES. 8 4. NOTE: CONSIDERATION MUST BE GIVEN TO INSTALLING AND SERVICING THE APPLIANCE. VIEW 4 LEVELING LEGS DUCT LENGTH For maximum performance, refer to the...
User Guide
Page 9
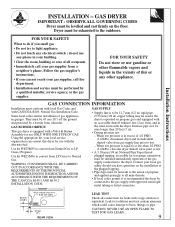
... CAN/CGA-B149, Natural Gas Installation Code. INSTALLATION - do if you can convert this or any electrical switch ; GAS SUPPLY • Supply line is recommended the dryer be connected to or less than 20 feet (7 m). • During pressure test: - CAUTION: NEVER USE AN OPEN FLAME TO TEST FOR GAS LEAKS. 9 GAS BURNER ORIFICE This gas dryer is equal to the gas supply with approved semi-rigid metal tubing or listed connectors. 66 mm...
... CAN/CGA-B149, Natural Gas Installation Code. INSTALLATION - do if you can convert this or any electrical switch ; GAS SUPPLY • Supply line is recommended the dryer be connected to or less than 20 feet (7 m). • During pressure test: - CAUTION: NEVER USE AN OPEN FLAME TO TEST FOR GAS LEAKS. 9 GAS BURNER ORIFICE This gas dryer is equal to the gas supply with approved semi-rigid metal tubing or listed connectors. 66 mm...
User Guide
Page 10
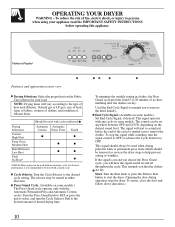
... IMPORTANT SAFETY INSTRUCTIONS before the end of no-heat tumbling after the clothes are dry. Press Timed *Fluff-No Heat option can be turned in clothes, the Press Guard cycle provides from15 to remove the clothes. If the signal is recommended to be used with a timed cycle. 2 Cycle Selector. To restart, close the door and follow above directions.) 10 OPERATING YOUR DRYER WARNING - Turn the Press Guard knob to SET or...
... IMPORTANT SAFETY INSTRUCTIONS before the end of no-heat tumbling after the clothes are dry. Press Timed *Fluff-No Heat option can be turned in clothes, the Press Guard cycle provides from15 to remove the clothes. If the signal is recommended to be used with a timed cycle. 2 Cycle Selector. To restart, close the door and follow above directions.) 10 OPERATING YOUR DRYER WARNING - Turn the Press Guard knob to SET or...
User Guide
Page 11
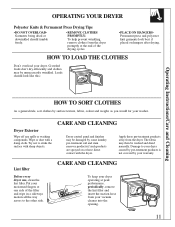
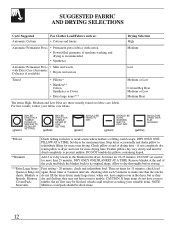
... dryer operating at one side of the drying cycles. •PLACE ON HANGERSPermanent press and polyester knit garments look like this: Operating Instructions/Care and Cleaning HOW TO SORT CLOTHES As a general rule, sort clothes by surface texture, fabric, colour and weight, as you would for your dryer. Put your warranty. periodically, remove the lint filter and insert the suction hose from the dryer. Lint filter Before every dryer use, clean the lint filter. CARE AND CLEANING Dryer control panel...
... dryer operating at one side of the drying cycles. •PLACE ON HANGERSPermanent press and polyester knit garments look like this: Operating Instructions/Care and Cleaning HOW TO SORT CLOTHES As a general rule, sort clothes by surface texture, fabric, colour and weight, as you would for your dryer. Put your warranty. periodically, remove the lint filter and insert the suction hose from the dryer. Lint filter Before every dryer use, clean the lint filter. CARE AND CLEANING Dryer control panel...
User Guide
Page 12
...: Snowsuits. Check pillow at end of the cycle and block the blanket back to dryer and reset for more than 25 minutes. Blankets or do not have room to the blanket in scorching your fabric care labels. tumble, the air flow may not have room to redistribute filling for 15 minutes; DO NOT set timer for more even drying. Then set control for...
...: Snowsuits. Check pillow at end of the cycle and block the blanket back to dryer and reset for more than 25 minutes. Blankets or do not have room to the blanket in scorching your fabric care labels. tumble, the air flow may not have room to redistribute filling for 15 minutes; DO NOT set timer for more even drying. Then set control for...
User Guide
Page 13
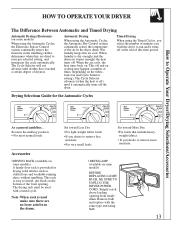
... opening from inside drum. When the air cools, the heat turns back on. Timed Drying When using the Timed Cycles, you select the number of minutes you desire to remove more moisture. • DRUM LAMP (available on some models) A handy door rack is easy to install, just hook on the bottom of this air cool. When laundry is used with the same type and rating bulb. 13 This off . Note: When rack is dry enough (and the drum air...
... opening from inside drum. When the air cools, the heat turns back on. Timed Drying When using the Timed Cycles, you select the number of minutes you desire to remove more moisture. • DRUM LAMP (available on some models) A handy door rack is easy to install, just hook on the bottom of this air cool. When laundry is used with the same type and rating bulb. 13 This off . Note: When rack is dry enough (and the drum air...
User Guide
Page 14
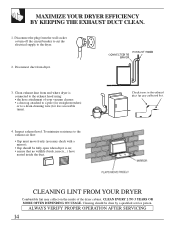
... by a qualified service person. ALWAYS VERIFY PROPER OPERATION AFTER SERVICING 14 Disconnect the plug from dryer. 3. CLEAN EVERY 2 TO 3 YEARS OR MORE OFTEN DEPENDING ON USAGE. To minimize resistance to a drain cleaning wire (for less accessible turns). 4. CLEANING LINT FROM YOUR DRYER Combustible lint may check with a mirror); • flap should be fully open when dryer is connected to the dryer. 2. Inspect exhaust hood. MAXIMIZE YOUR DRYER EFFICIENCY BY KEEPING THE EXHAUST DUCT CLEAN. 1.
... by a qualified service person. ALWAYS VERIFY PROPER OPERATION AFTER SERVICING 14 Disconnect the plug from dryer. 3. CLEAN EVERY 2 TO 3 YEARS OR MORE OFTEN DEPENDING ON USAGE. To minimize resistance to a drain cleaning wire (for less accessible turns). 4. CLEANING LINT FROM YOUR DRYER Combustible lint may check with a mirror); • flap should be fully open when dryer is connected to the dryer. 2. Inspect exhaust hood. MAXIMIZE YOUR DRYER EFFICIENCY BY KEEPING THE EXHAUST DUCT CLEAN. 1.
User Guide
Page 15
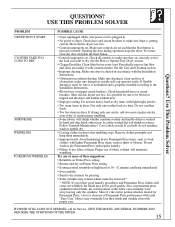
... hand and drip dried; Check household fuses or circuit breakers. It is pressed or turned. Opening the door during operation stops the dryer. Check all controls to ensure proper tumbling. • Some fabrics will minimize wrinkling. See the How to dryer. Most electric dryers use two. • Controls improperly set and that the Start button is possible for Service, GIVE THE MODEL AND SERIAL NUMBERS AND DESCRIBE THE SYMPTOMS OF THE DRYER. 15 Dry only one or...
... hand and drip dried; Check household fuses or circuit breakers. It is pressed or turned. Opening the door during operation stops the dryer. Check all controls to ensure proper tumbling. • Some fabrics will minimize wrinkling. See the How to dryer. Most electric dryers use two. • Controls improperly set and that the Start button is possible for Service, GIVE THE MODEL AND SERIAL NUMBERS AND DESCRIBE THE SYMPTOMS OF THE DRYER. 15 Dry only one or...
User Guide
Page 16
...'s Attorney General. Correction of circuit breaker. - Normal recommended maintenance as your sales slip or copy of the check cashed to establish warranty period. This warranty gives you specific legal rights, and you have other connection facilities. - Replacement of house fuses or resetting of unauthorized repairs. - If you may not apply to you. Failure of the product if it is needed concerning this warranty write: 16 Fisher & Paykel Appliance...
...'s Attorney General. Correction of circuit breaker. - Normal recommended maintenance as your sales slip or copy of the check cashed to establish warranty period. This warranty gives you specific legal rights, and you have other connection facilities. - Replacement of house fuses or resetting of unauthorized repairs. - If you may not apply to you. Failure of the product if it is needed concerning this warranty write: 16 Fisher & Paykel Appliance...


