
Installation Manual
Page 2
...must be sure the power is manufactured for connection to our 1 website www.fisherpaykel.com or contact your local Fisher & Paykel dealer. If the dishwasher is equipped with the appliance - Do not use caution could invalidate any time. This appliance is installed as to...permanently connected appliance: GROUNDING INSTRUCTIONS - IMPORTANT! 1 SAFETY AND WARNINGS ! if it must be reused. ● Failure to install the dishwasher correctly could result in your expense or pay the service technician's travel to the location of the product. ● This dishdrawer is ...
...must be sure the power is manufactured for connection to our 1 website www.fisherpaykel.com or contact your local Fisher & Paykel dealer. If the dishwasher is equipped with the appliance - Do not use caution could invalidate any time. This appliance is installed as to...permanently connected appliance: GROUNDING INSTRUCTIONS - IMPORTANT! 1 SAFETY AND WARNINGS ! if it must be reused. ● Failure to install the dishwasher correctly could result in your expense or pay the service technician's travel to the location of the product. ● This dishdrawer is ...
Installation Manual
Page 8
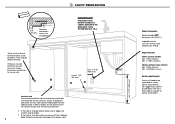
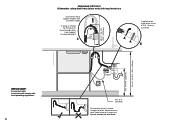
... Drains will need to be made higher to clear toekick space. We suggest you confirm acceptability with your local rabbi in a cabinet adjacent to the dishwasher cavity. 110-120 VAC max. 15 A ø max. 1 1/2" (38 mm) max. 17 11⁄16" (450 mm) Services hole Can be located either side of... dishwasher, preferably at the bottom of the cavity, as something to secure into the waste connection. ● If the hole is through metal, ensure you can ...
... Drains will need to be made higher to clear toekick space. We suggest you confirm acceptability with your local rabbi in a cabinet adjacent to the dishwasher cavity. 110-120 VAC max. 15 A ø max. 1 1/2" (38 mm) max. 17 11⁄16" (450 mm) Services hole Can be located either side of... dishwasher, preferably at the bottom of the cavity, as something to secure into the waste connection. ● If the hole is through metal, ensure you can ...
Installation Manual
Page 15
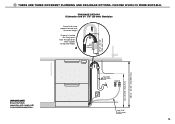
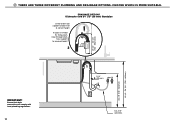
Ensure that drain connection will comply with local plumbing regulations. CHOOSE WHICH IS MORE SUITABLE. min. R 8" (200 mm) 14 29 1/2"-34 3/4" (750-882.5 mm) min. 19 11/16" (500 mm) 29 1/2 - 34 3/4" (750-883 mm) !5 THERE ARE THREE DIFFERENT PLUMBING AND DRAINAGE OPTIONS. DRAINAGE OPTION 1 Dishwasher and Ø 1 1/2" (38 mm) Standpipe Screw Drain hose support to back wall at correct height If space is limited for fixing, push hose through drain hose support to required height 2 max. 4 3/4 po (120 mm) 1 1 1/2 po (38 mm) step 16 IMPORTANT!
Ensure that drain connection will comply with local plumbing regulations. CHOOSE WHICH IS MORE SUITABLE. min. R 8" (200 mm) 14 29 1/2"-34 3/4" (750-882.5 mm) min. 19 11/16" (500 mm) 29 1/2 - 34 3/4" (750-883 mm) !5 THERE ARE THREE DIFFERENT PLUMBING AND DRAINAGE OPTIONS. DRAINAGE OPTION 1 Dishwasher and Ø 1 1/2" (38 mm) Standpipe Screw Drain hose support to back wall at correct height If space is limited for fixing, push hose through drain hose support to required height 2 max. 4 3/4 po (120 mm) 1 1 1/2 po (38 mm) step 16 IMPORTANT!
Installation Manual
Page 16
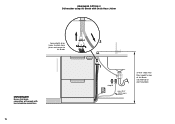
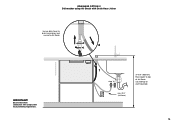
height to Air Break IMPORTANT! DRAINAGE OPTION 2 Dishwasher using Air Break with local plumbing regulations. 15 2 1 step 16 min. Ensure that drain connection will comply with Drain Hose Joiner Secure both drain hoses to drain hose joiner and secure to top of Air Break (countertop or wall mounted) R 8" (200 mm) 37 3/8" (950 mm) Max.
height to Air Break IMPORTANT! DRAINAGE OPTION 2 Dishwasher using Air Break with local plumbing regulations. 15 2 1 step 16 min. Ensure that drain connection will comply with Drain Hose Joiner Secure both drain hoses to drain hose joiner and secure to top of Air Break (countertop or wall mounted) R 8" (200 mm) 37 3/8" (950 mm) Max.
Installation Manual
Page 17
... connection will comply with local plumbing regulations. 29 1/2"-34 3/4" (750-882.5 mm) min. 19 11/16" (500 mm) 29 1/2 - 34 3/4" (750-883 mm) DRAINAGE OPTION 3 Dishwasher using drain hose joiner onto sink trap/waste tee Screw Drain hose support to back wall at correct height If space is routed straight to...
... connection will comply with local plumbing regulations. 29 1/2"-34 3/4" (750-882.5 mm) min. 19 11/16" (500 mm) 29 1/2 - 34 3/4" (750-883 mm) DRAINAGE OPTION 3 Dishwasher using drain hose joiner onto sink trap/waste tee Screw Drain hose support to back wall at correct height If space is routed straight to...
Installation Manual
Page 18
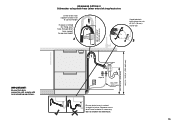
... INLET HOSE TO HOT WATER !7 SWITCH PRODUCT ON Ensure the supplied rubber washer is a fault. An option called 'Open drawer auto power-on . ● The dishwasher is beeping continuously There is fitted inside the coupling. 1 180o No leaks! Tighten coupling with spanner. 2 !8 TROUBLESHOOTING ● Excessive water remaining above the filter plate...
... INLET HOSE TO HOT WATER !7 SWITCH PRODUCT ON Ensure the supplied rubber washer is a fault. An option called 'Open drawer auto power-on . ● The dishwasher is beeping continuously There is fitted inside the coupling. 1 180o No leaks! Tighten coupling with spanner. 2 !8 TROUBLESHOOTING ● Excessive water remaining above the filter plate...

Installation Manual
Page 19
The drain hose joiner must be kept on the dishwasher side of issue. Keep drain hose as fully extended as possible to rotate, by physically rotating by hand. Water softener models only: adjust ...program has finished, ensure the dishwasher has run and drained correctly. The product specifications in this booklet correctly describes the product currently available. 18 See the Quick start the program. Purchase Date Purchaser Dealer Address Installer's Name Installer's Signature Installation Company Installation Date Copyright © Fisher & Paykel Appliances 2016. You should ...
The drain hose joiner must be kept on the dishwasher side of issue. Keep drain hose as fully extended as possible to rotate, by physically rotating by hand. Water softener models only: adjust ...program has finished, ensure the dishwasher has run and drained correctly. The product specifications in this booklet correctly describes the product currently available. 18 See the Quick start the program. Purchase Date Purchaser Dealer Address Installer's Name Installer's Signature Installation Company Installation Date Copyright © Fisher & Paykel Appliances 2016. You should ...
Installation Manual
Page 22
INSTALLATION INSTRUCTIONS Single DishDrawerTM dishwasher DD24SA & DD24SCT models US CA www.fisherpaykel.com 591153A 07.16
INSTALLATION INSTRUCTIONS Single DishDrawerTM dishwasher DD24SA & DD24SCT models US CA www.fisherpaykel.com 591153A 07.16
Installation Manual
Page 23
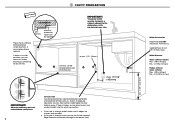
...must be kept upright to reduce the likelihood of least resistance for electric current. IMPORTANT SAFETY INSTRUCTIONS ● Installation of this dishwasher requires basic mechanical and electrical skills. ● Be sure to leave these Instructions with the Customer. ● Installation must comply... installation guide may result in this advice may not be run with the circuit conductors and connected to change at your local Fisher & Paykel dealer. Failure to our 1 website www.fisherpaykel.com or contact your expense or pay the service technician's travel to the ...
...must be kept upright to reduce the likelihood of least resistance for electric current. IMPORTANT SAFETY INSTRUCTIONS ● Installation of this dishwasher requires basic mechanical and electrical skills. ● Be sure to leave these Instructions with the Customer. ● Installation must comply... installation guide may result in this advice may not be run with the circuit conductors and connected to change at your local Fisher & Paykel dealer. Failure to our 1 website www.fisherpaykel.com or contact your expense or pay the service technician's travel to the ...
Installation Manual
Page 28
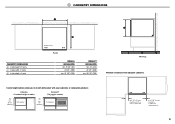
... 1/16" (560) K PROFILE Minimum clearances from adjacent cabinetry Cavity height options allow you to match dishwasher with your cabinetry or companion products DD24SA (Standard height models) K min. 16 1/4" (412mm) Dishwasher K min. 18" (456mm) DD24SCT (Tall (he)ight models) Dishwasher Oven min. 1/2" (13 mm) clearance from a corner cupboard min. 1/16" (2 mm) clearance to adjacent...
... 1/16" (560) K PROFILE Minimum clearances from adjacent cabinetry Cavity height options allow you to match dishwasher with your cabinetry or companion products DD24SA (Standard height models) K min. 16 1/4" (412mm) Dishwasher K min. 18" (456mm) DD24SCT (Tall (he)ight models) Dishwasher Oven min. 1/2" (13 mm) clearance from a corner cupboard min. 1/16" (2 mm) clearance to adjacent...
Installation Manual
Page 29
.... 110-120 VAC max. 15 A ø max. 1 1/2" (38mm) Services can be located either side of dishwasher, preferably at the bottom of dishwasher. Supplied hose to secure into the waste connection. ● If the hole is through wood, make sure its edges are smooth and rounded. ● If ...
.... 110-120 VAC max. 15 A ø max. 1 1/2" (38mm) Services can be located either side of dishwasher, preferably at the bottom of dishwasher. Supplied hose to secure into the waste connection. ● If the hole is through wood, make sure its edges are smooth and rounded. ● If ...
Installation Manual
Page 35
29 1/2" - 34 3/4" (750 - 882.5 mm) min. 19 11/16" (500mm) 29 1/2 - 34 3/4" (750 - 883mm) !3 THERE ARE THREE DIFFERENT PLUMBING AND DRAINAGE OPTIONS. CHOOSE WHICH IS MORE SUITABLE. R 8" (200mm) Ensure that drain connection will comply with local plumbing regulations. 13 min. DRAINAGE OPTION 1 Dishwasher and Ø 1 1/2" (38 mm) Standpipe Screw Drain hose support to back wall at correct height If space is limited for fixing, push hose through drain hose support to required height 2 max. 4 3/4" (120mm) 1 1 1/2" (38 mm) step 14 IMPORTANT!
29 1/2" - 34 3/4" (750 - 882.5 mm) min. 19 11/16" (500mm) 29 1/2 - 34 3/4" (750 - 883mm) !3 THERE ARE THREE DIFFERENT PLUMBING AND DRAINAGE OPTIONS. CHOOSE WHICH IS MORE SUITABLE. R 8" (200mm) Ensure that drain connection will comply with local plumbing regulations. 13 min. DRAINAGE OPTION 1 Dishwasher and Ø 1 1/2" (38 mm) Standpipe Screw Drain hose support to back wall at correct height If space is limited for fixing, push hose through drain hose support to required height 2 max. 4 3/4" (120mm) 1 1 1/2" (38 mm) step 14 IMPORTANT!
Installation Manual
Page 36
Ensure that drain connection will comply with Drain Hose Joiner Secure drain hose to drain hose joiner and secure to top of Air Break (countertop or wall mounted) 14 height to Air Break 2 IMPORTANT! R 8" (200mm) 37 3/8" (950mm) Max. DRAINAGE OPTION 2 Dishwasher using Air Break with local plumbing regulations. 1 step 14 min.
Ensure that drain connection will comply with Drain Hose Joiner Secure drain hose to drain hose joiner and secure to top of Air Break (countertop or wall mounted) 14 height to Air Break 2 IMPORTANT! R 8" (200mm) 37 3/8" (950mm) Max. DRAINAGE OPTION 2 Dishwasher using Air Break with local plumbing regulations. 1 step 14 min.
Installation Manual
Page 37
... drain connection will comply with local plumbing regulations. 15 29 1/2"- 34 3/4" (750 - 882.5mm) min. 19 11/16" (500mm) 29 1/2 - 34 3/4" (750 - 883mm) DRAINAGE OPTION 3 Dishwasher using drain hose joiner onto sink trap/waste tee Screw Drain hose support to back wall at correct height If space is routed straight to...
... drain connection will comply with local plumbing regulations. 15 29 1/2"- 34 3/4" (750 - 882.5mm) min. 19 11/16" (500mm) 29 1/2 - 34 3/4" (750 - 883mm) DRAINAGE OPTION 3 Dishwasher using drain hose joiner onto sink trap/waste tee Screw Drain hose support to back wall at correct height If space is routed straight to...
Installation Manual
Page 39
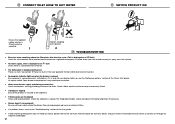
... a fault. If it is and still no indicator lights up when the drawer is opened Ensure power is connected and is switched on . ● The dishwasher is beeping continuously There is connected and turned on .
... a fault. If it is and still no indicator lights up when the drawer is opened Ensure power is connected and is switched on . ● The dishwasher is beeping continuously There is connected and turned on .

Installation Manual
Page 40
...leakage. All rights reserved. Check the spray arm is in the User guide. After the Rinse program has finished, ensure the dishwasher has run and drained correctly. Under our policy of continuous product improvement, these specifications may change at the date of issue.... must be kept on the dishwasher side of excess hose material. Close the drawer and press to the cabinetry and opens and closes freely. Purchase Date Purchaser Dealer Address Installer's Name Installer's Signature Installation Company Installation Date Copyright © Fisher & Paykel Appliances 2016. Ensure that it...
...leakage. All rights reserved. Check the spray arm is in the User guide. After the Rinse program has finished, ensure the dishwasher has run and drained correctly. Under our policy of continuous product improvement, these specifications may change at the date of issue.... must be kept on the dishwasher side of excess hose material. Close the drawer and press to the cabinetry and opens and closes freely. Purchase Date Purchaser Dealer Address Installer's Name Installer's Signature Installation Company Installation Date Copyright © Fisher & Paykel Appliances 2016. Ensure that it...


