

Installation Manual
Page 2
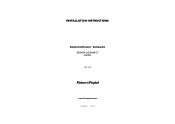
...country, please go to our 1 website www.fisherpaykel.com or contact your local Fisher & Paykel dealer. panel edges are turned OFF. This appliance is to be relocated from one installation to install the dishwasher correctly could result in doubt as a permanently connected appliance: GROUNDING ...that it must be kept upright to the hot-water supply. ! 1 SAFETY AND WARNINGS ! WARNING! Electrical Shock Hazard Before installing the dishwasher, remove the house fuse or open the circuit breaker. In the event of a malfunction or breakdown, grounding will...
...country, please go to our 1 website www.fisherpaykel.com or contact your local Fisher & Paykel dealer. panel edges are turned OFF. This appliance is to be relocated from one installation to install the dishwasher correctly could result in doubt as a permanently connected appliance: GROUNDING ...that it must be kept upright to the hot-water supply. ! 1 SAFETY AND WARNINGS ! WARNING! Electrical Shock Hazard Before installing the dishwasher, remove the house fuse or open the circuit breaker. In the event of a malfunction or breakdown, grounding will...

Installation Manual
Page 4
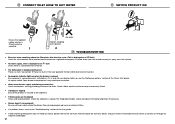
... to unlock and hinge open to release drawer from the product. 2 Electronics module 5 Terminal Block cover 4 Remove existing power cord 7 6 7 3 3 OPTIONALLY HARD WIRING PRIOR TO INSTALLATION 3-A REMOVE THE LOWER DRAWER 3-B REMOVE THE ACCESS COVER & REMOVE POWER To prevent kinked hoses Either sit the drawer down 3 Press the release tabs in on...
... to unlock and hinge open to release drawer from the product. 2 Electronics module 5 Terminal Block cover 4 Remove existing power cord 7 6 7 3 3 OPTIONALLY HARD WIRING PRIOR TO INSTALLATION 3-A REMOVE THE LOWER DRAWER 3-B REMOVE THE ACCESS COVER & REMOVE POWER To prevent kinked hoses Either sit the drawer down 3 Press the release tabs in on...

Installation Manual
Page 5
... under housing ribs. 9 Screw down and slide back the terminal block cover. 12 Refit the electronics module back into place. 3 OPTIONALLY HARD WIRING PRIOR TO INSTALLATION 3-C TERMINATE MAINS WIRING AS SHOWN AND REPLACE MODULE AND COVERS 12 8 9 13 14 11 IMPORTANT! NOTE: Use copper conductors only. 3-D REFIT THE DRAWER ONTO THE...
... under housing ribs. 9 Screw down and slide back the terminal block cover. 12 Refit the electronics module back into place. 3 OPTIONALLY HARD WIRING PRIOR TO INSTALLATION 3-C TERMINATE MAINS WIRING AS SHOWN AND REPLACE MODULE AND COVERS 12 8 9 13 14 11 IMPORTANT! NOTE: Use copper conductors only. 3-D REFIT THE DRAWER ONTO THE...
Installation Manual
Page 8
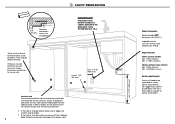
COUNTERTOP 3/8" (10 mm) Moisture protection tape must be located in respect to kosher installations. The power outlet must be located either side of dishwasher, preferably at the bottom of the cavity, as something to secure into the waste connection. &#...
COUNTERTOP 3/8" (10 mm) Moisture protection tape must be located in respect to kosher installations. The power outlet must be located either side of dishwasher, preferably at the bottom of the cavity, as something to secure into the waste connection. &#...

Installation Manual
Page 10
... attach the two top mounting brackets (x2) Initially level the product You can raise or lower the product by twisting the feet. NOW CHOOSE WHICH INSTALLATION METHOD (A) OR (B) IS MORE SUITABLE FOR YOUR CABINETRY... 8 RECOMMENDED METHOD (A) - Then take care when pushing the product into their slots using a flat-bladed B screwdriver. As...
... attach the two top mounting brackets (x2) Initially level the product You can raise or lower the product by twisting the feet. NOW CHOOSE WHICH INSTALLATION METHOD (A) OR (B) IS MORE SUITABLE FOR YOUR CABINETRY... 8 RECOMMENDED METHOD (A) - Then take care when pushing the product into their slots using a flat-bladed B screwdriver. As...
Installation Manual
Page 18
... a fault' in place. ● No water supply. (This is displayed as an A3 fault) Check for a kinked drain hose, blocked waste connection, highloop not properly installed, drain hose not routed correctly or spray arms not in the User guide for leaks. Check rubber washer and hose clamp are misaligned Check and...
... a fault' in place. ● No water supply. (This is displayed as an A3 fault) Check for a kinked drain hose, blocked waste connection, highloop not properly installed, drain hose not routed correctly or spray arms not in the User guide for leaks. Check rubber washer and hose clamp are misaligned Check and...

Installation Manual
Page 19
...parts are in place, mounted correctly and free to ensure this booklet apply to prevent sagging. Check the spray arms are installed. Close the drawer and press Repeat for safe reference: Model Serial No. Complete and keep for the other drawer. All... the date of water into the drawer. Purchase Date Purchaser Dealer Address Installer's Name Installer's Signature Installation Company Installation Date Copyright © Fisher & Paykel Appliances 2016. !9 FINAL CHECKLIST TO BE COMPLETED BY THE INSTALLER Check all panels and parts thereof are secure and final electrical tests have...
...parts are in place, mounted correctly and free to ensure this booklet apply to prevent sagging. Check the spray arms are installed. Close the drawer and press Repeat for safe reference: Model Serial No. Complete and keep for the other drawer. All... the date of water into the drawer. Purchase Date Purchaser Dealer Address Installer's Name Installer's Signature Installation Company Installation Date Copyright © Fisher & Paykel Appliances 2016. !9 FINAL CHECKLIST TO BE COMPLETED BY THE INSTALLER Check all panels and parts thereof are secure and final electrical tests have...
Installation Manual
Page 22
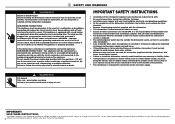
INSTALLATION INSTRUCTIONS Single DishDrawerTM dishwasher DD24SA & DD24SCT models US CA www.fisherpaykel.com 591153A 07.16
INSTALLATION INSTRUCTIONS Single DishDrawerTM dishwasher DD24SA & DD24SCT models US CA www.fisherpaykel.com 591153A 07.16
Installation Manual
Page 23
...9679; The switched power outlet must be plugged into an appropriate outlet that it is accessible after installation. ● Care should not be run with your local Fisher & Paykel dealer. 1 SAFETY AND WARNINGS ! Check with a cord having an equipment-grounding conductor and ...a grounding plug. IMPORTANT SAFETY INSTRUCTIONS ● Installation of electric shock by a qualified electrician. panel edges are used...
...9679; The switched power outlet must be plugged into an appropriate outlet that it is accessible after installation. ● Care should not be run with your local Fisher & Paykel dealer. 1 SAFETY AND WARNINGS ! Check with a cord having an equipment-grounding conductor and ...a grounding plug. IMPORTANT SAFETY INSTRUCTIONS ● Installation of electric shock by a qualified electrician. panel edges are used...

Installation Manual
Page 25
... and Earth wires as shown. 7 Unscrew the three screws on the base as shown and remove the cord from runners. 3 OPTIONALLY HARD WIRING PRIOR TO INSTALLATION 3-A REMOVE THE DRAWER 3-B REMOVE THE ACCESS COVER & REMOVE POWER To prevent kinked hoses Either sit the drawer down 3 4" (100 mm) 3 Press the release tabs in...
... and Earth wires as shown. 7 Unscrew the three screws on the base as shown and remove the cord from runners. 3 OPTIONALLY HARD WIRING PRIOR TO INSTALLATION 3-A REMOVE THE DRAWER 3-B REMOVE THE ACCESS COVER & REMOVE POWER To prevent kinked hoses Either sit the drawer down 3 4" (100 mm) 3 Press the release tabs in...

Installation Manual
Page 26
... & CLOSE 2 Lift or rotate anti-clockwise the 4 drawer back onto the drawer runners on both sides 4" (100 mm). Release tab 4 3 OPTIONALLY HARD WIRING PRIOR TO INSTALLATION 3-C TERMINATE MAINS WIRING AS SHOWN AND REPLACE MODULE AND COVERS 12 8 9 13 14 11 IMPORTANT! It should clip back into place 11 Fold down the...
... & CLOSE 2 Lift or rotate anti-clockwise the 4 drawer back onto the drawer runners on both sides 4" (100 mm). Release tab 4 3 OPTIONALLY HARD WIRING PRIOR TO INSTALLATION 3-C TERMINATE MAINS WIRING AS SHOWN AND REPLACE MODULE AND COVERS 12 8 9 13 14 11 IMPORTANT! It should clip back into place 11 Fold down the...

Installation Manual
Page 31
NOW CHOOSE WHICH INSTALLATION METHOD (A) OR (B) IS MORE SUITABLE FOR YOUR CABINETRY... 8 RECOMMENDED METHOD (A) - A bracket must match A slot and B bracket must match B slot. Ensure they don't get kinked or ...
NOW CHOOSE WHICH INSTALLATION METHOD (A) OR (B) IS MORE SUITABLE FOR YOUR CABINETRY... 8 RECOMMENDED METHOD (A) - A bracket must match A slot and B bracket must match B slot. Ensure they don't get kinked or ...
Installation Manual
Page 39
... guide. ● If after the rinse cycle. (This is displayed as an A3 fault) Check for a kinked drain hose, blocked waste connection, highloop not properly installed, drain hose not routed correctly or spray arms not in the User guide for leaks. If it is and still no indicator lights up when...
... guide. ● If after the rinse cycle. (This is displayed as an A3 fault) Check for a kinked drain hose, blocked waste connection, highloop not properly installed, drain hose not routed correctly or spray arms not in the User guide for leaks. If it is and still no indicator lights up when...

Installation Manual
Page 40
...prevent sagging. After the Rinse program has finished, ensure the dishwasher has run and drained correctly. Purchase Date Purchaser Dealer Address Installer's Name Installer's Signature Installation Company Installation Date Copyright © Fisher & Paykel Appliances 2016. Under our policy of continuous product improvement, these specifications may change at the date of the 'Rinse' program ...keep for leakage. You should be free to fully close with no resistance from the cabinetry. !7 FINAL CHECKLIST TO BE COMPLETED BY THE INSTALLER Check all panels and parts thereof are...
...prevent sagging. After the Rinse program has finished, ensure the dishwasher has run and drained correctly. Purchase Date Purchaser Dealer Address Installer's Name Installer's Signature Installation Company Installation Date Copyright © Fisher & Paykel Appliances 2016. Under our policy of continuous product improvement, these specifications may change at the date of the 'Rinse' program ...keep for leakage. You should be free to fully close with no resistance from the cabinetry. !7 FINAL CHECKLIST TO BE COMPLETED BY THE INSTALLER Check all panels and parts thereof are...