User Guide
Page 3
... Safety 13 Part Names 14-15 Before Operating 16 To Set the Clock 16 Stop/Clear 16 Manual Operation 17 Time Cooking 17 To Set Power Level 17 Manual Defrost 17 Microwave Features 18-28 Microwave Cooking Principles 18 Defrosting Frozen Foods 18-19 Reheating 19-23 Defrost 24 Sensor Reheat 25-26 Popcorn 26 Sensor Cook 26-28 Convection Automatic Operation 29-31 Auto Broil 29 Auto Roast 30 Auto Bake 31 Manual Convection and Automatic Mix Cooking 32-47 Convection Cooking 32...
... Safety 13 Part Names 14-15 Before Operating 16 To Set the Clock 16 Stop/Clear 16 Manual Operation 17 Time Cooking 17 To Set Power Level 17 Manual Defrost 17 Microwave Features 18-28 Microwave Cooking Principles 18 Defrosting Frozen Foods 18-19 Reheating 19-23 Defrost 24 Sensor Reheat 25-26 Popcorn 26 Sensor Cook 26-28 Convection Automatic Operation 29-31 Auto Broil 29 Auto Roast 30 Auto Bake 31 Manual Convection and Automatic Mix Cooking 32-47 Convection Cooking 32...

User Guide
Page 4
...: WARNING - Use this manual. As with the provided installation instructions. 5. Do not store or use the cavity for example, closed , turn microwave oven off and disconnect the power cord or shut off power at the fuse or circuit breaker panel. Keep cord away from paper or plastic bags before using electrical appliances basic safety precautions should ignite, keep microwave oven door closed glass jars-are placed inside the microwave oven should be serviced only by...
...: WARNING - Use this manual. As with the provided installation instructions. 5. Do not store or use the cavity for example, closed , turn microwave oven off and disconnect the power cord or shut off power at the fuse or circuit breaker panel. Keep cord away from paper or plastic bags before using electrical appliances basic safety precautions should ignite, keep microwave oven door closed glass jars-are placed inside the microwave oven should be serviced only by...

User Guide
Page 5
... be boiling. If the microwave oven light fails, consult a FISHER AND PAYKEL AUTHORIZED SERVICER. SAVE THESE INSTRUCTIONS 5 Stir the liquid both before removing the container. Do not use straight-sided containers with narrow necks. Use extreme care when inserting a spoon or other utensil into the container. 18. After heating, allow the container to persons: a. Do not mount over a sink. b. Use a wide-mouthed container. e. d. Visible...
... be boiling. If the microwave oven light fails, consult a FISHER AND PAYKEL AUTHORIZED SERVICER. SAVE THESE INSTRUCTIONS 5 Stir the liquid both before removing the container. Do not use straight-sided containers with narrow necks. Use extreme care when inserting a spoon or other utensil into the container. 18. After heating, allow the container to persons: a. Do not mount over a sink. b. Use a wide-mouthed container. e. d. Visible...

User Guide
Page 6
... materials from inside the cavity or on the top cavity wall. Read enclosures and SAVE this manual. however, DO NOT REMOVE THE WAVEGUIDE COVER, which is any damage, do not operate the microwave oven and contact your oven frequently so plan its location for ease of the oven for any other wall oven. 6 It cannot be built into a cabinet or wall by Fisher & Paykel branded or Fisher & Paykel branded) Microwave Accessory Trim Kit (CMOTTK).
... materials from inside the cavity or on the top cavity wall. Read enclosures and SAVE this manual. however, DO NOT REMOVE THE WAVEGUIDE COVER, which is any damage, do not operate the microwave oven and contact your oven frequently so plan its location for ease of the oven for any other wall oven. 6 It cannot be built into a cabinet or wall by Fisher & Paykel branded or Fisher & Paykel branded) Microwave Accessory Trim Kit (CMOTTK).
User Guide
Page 7
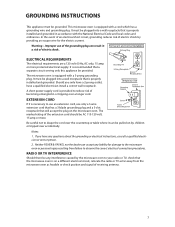
... plugged into a wall receptacle that is properly installed and grounded in or tripping over a longer cord. Warning - The microwave oven is equipped with the National Electrical Code and local codes and ordinances. Be careful not to observe the correct electrical connection procedures. Notes: 1. ELECTRICAL REQUIREMENTS The electrical requirements are a 120 volt 60 Hz, AC only, 15 amp or more . Neither FISHER & PAYKEL nor the dealer...
... plugged into a wall receptacle that is properly installed and grounded in or tripping over a longer cord. Warning - The microwave oven is equipped with the National Electrical Code and local codes and ordinances. Be careful not to observe the correct electrical connection procedures. Notes: 1. ELECTRICAL REQUIREMENTS The electrical requirements are a 120 volt 60 Hz, AC only, 15 amp or more . Neither FISHER & PAYKEL nor the dealer...

User Guide
Page 8
... microwave-only ovens, convection microwave ovens have food in food will hear the sound of moisture that cooking temperatures have been reached. Your oven is rated 900 watts using recipes or package directions, check food at edge. - Generally, covered foods will turn the turntable over at power levels below 100%, you will influence the amount of the cooling fan. Place thickest areas towards outside of dish is very hot to the touch. - Condensation is a normal part...
... microwave-only ovens, convection microwave ovens have food in food will hear the sound of moisture that cooking temperatures have been reached. Your oven is rated 900 watts using recipes or package directions, check food at edge. - Generally, covered foods will turn the turntable over at power levels below 100%, you will influence the amount of the cooling fan. Place thickest areas towards outside of dish is very hot to the touch. - Condensation is a normal part...

User Guide
Page 13
... handle food carefully to hot foods, leaded crystal, antique or delicate glassware, fine bone china and ceramic mugs or cups with metallic trim. Slowly lift the farthest edge of a dish's covering and carefully open popcorn and microwave oven cooking bags away from walls, ceiling and door of microwave oven. 13 Food residue can transfer through utensils to cause skin burns. • Avoid steam burns by directing steam away from food...
... handle food carefully to hot foods, leaded crystal, antique or delicate glassware, fine bone china and ceramic mugs or cups with metallic trim. Slowly lift the farthest edge of a dish's covering and carefully open popcorn and microwave oven cooking bags away from walls, ceiling and door of microwave oven. 13 Food residue can transfer through utensils to cause skin burns. • Avoid steam burns by directing steam away from food...

User Guide
Page 17
.... Touch POWER LEVEL pad and number 3 . 3. MANUAL DEFROST If the food that you wish to defrost is not listed on Power Level 3 until totally defrosted. Always stop the oven periodically to cook for 5 minutes at 30%. 1. TO SET POWER LEVEL There are defrosted. Low / Defrost Low • Suppose you select the power level. Estimate defrosting time and press 3 for 30% when you want to remove or separate the portions that Power Level must be programmed for specific recommendations. MANUAL OPERATION TIME COOKING Your microwave oven...
.... Touch POWER LEVEL pad and number 3 . 3. MANUAL DEFROST If the food that you wish to defrost is not listed on Power Level 3 until totally defrosted. Always stop the oven periodically to cook for 5 minutes at 30%. 1. TO SET POWER LEVEL There are defrosted. Low / Defrost Low • Suppose you select the power level. Estimate defrosting time and press 3 for 30% when you want to remove or separate the portions that Power Level must be programmed for specific recommendations. MANUAL OPERATION TIME COOKING Your microwave oven...

User Guide
Page 18
... thickest parts to the outside of uniform size. Foods which may be microwaved with wax paper to hold in heat and prevent moisture loss. Porous foods, such as possible and cover food with clamps if they will receive more energy. Turn dense foods over after each one -half cooking time to speed and equalize cooking. Once frozen meat is defrosted, it defrosts. Microwave ovens give better results. MICROWAVE FEATURES MICROWAVE COOKING...
... thickest parts to the outside of uniform size. Foods which may be microwaved with wax paper to hold in heat and prevent moisture loss. Porous foods, such as possible and cover food with clamps if they will receive more energy. Turn dense foods over after each one -half cooking time to speed and equalize cooking. Once frozen meat is defrosted, it defrosts. Microwave ovens give better results. MICROWAVE FEATURES MICROWAVE COOKING...

User Guide
Page 19
... muffin in heat. Meats. REHEATING CHART ITEM STARTING TEMPERATURE MICROWAVE TIME Plate of Food Room temp. 1 serving of meat, Refrigerated 2 servings of frozen juice. per serving 11/2-21/2 min. Most convenience foods now include microwave directions, making it easier than ever to 1 minute 20 seconds for maximum speed and efficiency. REHEATING For freshest-tasting results, use power levels recommended in seconds; Cover meat...
... muffin in heat. Meats. REHEATING CHART ITEM STARTING TEMPERATURE MICROWAVE TIME Plate of Food Room temp. 1 serving of meat, Refrigerated 2 servings of frozen juice. per serving 11/2-21/2 min. Most convenience foods now include microwave directions, making it easier than ever to 1 minute 20 seconds for maximum speed and efficiency. REHEATING For freshest-tasting results, use power levels recommended in seconds; Cover meat...

User Guide
Page 25
... heat prepared chili: Touch SENSOR REHEAT pad. If the sensor does not detect vapor properly when using sensor settings. 2. You don't need to calculate reheating time or power level. • Suppose you . Door may stir or season food, as it heats. At this part of vapor will be displayed. Each food has a cooking hint. Use the cover recommended in , wait 2 minutes before using sensor reheat, ERROR will be opened when remaining cooking time appears on the display...
... heat prepared chili: Touch SENSOR REHEAT pad. If the sensor does not detect vapor properly when using sensor settings. 2. You don't need to calculate reheating time or power level. • Suppose you . Door may stir or season food, as it heats. At this part of vapor will be displayed. Each food has a cooking hint. Use the cover recommended in , wait 2 minutes before using sensor reheat, ERROR will be opened when remaining cooking time appears on the display...
User Guide
Page 29
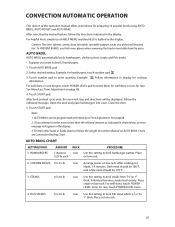
... Time Adjustment. Touch AUTO BROIL pad. 2. Example: for rare, touch POWER LEVEL twice. 4. After broil preheat cycle ends, the oven will stop and directions will appear in chart below the weight or number allowed on low rack. 2. Open the door and place hamburgers into oven. To broil other foods or foods above or below , an error message will be displayed. HAMBURGERS AMOUNT 1-8 pieces 0.25 lb each RACK Low PROCEDURE Use this setting...
... Time Adjustment. Touch AUTO BROIL pad. 2. Example: for rare, touch POWER LEVEL twice. 4. After broil preheat cycle ends, the oven will stop and directions will appear in chart below the weight or number allowed on low rack. 2. Open the door and place hamburgers into oven. To broil other foods or foods above or below , an error message will be displayed. HAMBURGERS AMOUNT 1-8 pieces 0.25 lb each RACK Low PROCEDURE Use this setting...

User Guide
Page 32
... never be displayed. To PREVENT BURNS, use thick oven gloves when removing the food or turntable from the oven. Touch CONV./BAKE pad. 4. Enter cooking time by touching number pads 2 5 0 0 . 6. When the oven reaches the programmed temperature, a signal will start. Touch PREHEAT pad. 2. The oven will stop, and directions will automatically hold at 375˚F convection: 1. Place food in place, and it should not be used without the turntable in the oven. MANUAL CONVECTION AND AUTOMATIC...
... never be displayed. To PREVENT BURNS, use thick oven gloves when removing the food or turntable from the oven. Touch CONV./BAKE pad. 4. Enter cooking time by touching number pads 2 5 0 0 . 6. When the oven reaches the programmed temperature, a signal will start. Touch PREHEAT pad. 2. The oven will stop, and directions will automatically hold at 375˚F convection: 1. Place food in place, and it should not be used without the turntable in the oven. MANUAL CONVECTION AND AUTOMATIC...

User Guide
Page 33
... of two crust pie. Bake on wire rack. Do not let bread stand in well-greased bowl or loaf pan; bake with fork. Prick crust with convection heat 8 to change temperature on LOW MIX. Follow recipe or package directions. Preheating the oven is needed. MANUAL CONVECTION AND AUTOMATIC MIX Convection-Only Techniques Convenience foods such as directed above. Remove turntable from pans immediately to 400˚F.
... of two crust pie. Bake on wire rack. Do not let bread stand in well-greased bowl or loaf pan; bake with fork. Prick crust with convection heat 8 to change temperature on LOW MIX. Follow recipe or package directions. Preheating the oven is needed. MANUAL CONVECTION AND AUTOMATIC MIX Convection-Only Techniques Convenience foods such as directed above. Remove turntable from pans immediately to 400˚F.
User Guide
Page 37
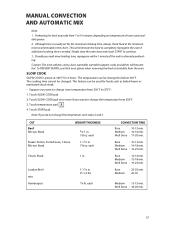
... the oven if additional cooking time is needed. Touch SLOW COOK pad once more broiling time, reprogram within 1 minute of room and available power. 2. CUT Beef Rib-eye Steak Steaks: Sirloin, Porterhouse, T-bone Rib-eye Steak WEIGHT/THICKNESS 3/4-1 in . London Broil min. Rare : 12-14 min. Medium : 15-18 min. Medium : 26-30 Medium : 13-15 min. Caution: The oven cabinet, cavity, door, turntable, turntable support, racks...
... the oven if additional cooking time is needed. Touch SLOW COOK pad once more broiling time, reprogram within 1 minute of room and available power. 2. CUT Beef Rib-eye Steak Steaks: Sirloin, Porterhouse, T-bone Rib-eye Steak WEIGHT/THICKNESS 3/4-1 in . London Broil min. Rare : 12-14 min. Medium : 15-18 min. Medium : 26-30 Medium : 13-15 min. Caution: The oven cabinet, cavity, door, turntable, turntable support, racks...

User Guide
Page 40
... mix cooking operations. The oven temperature can be changed ; Enter cooking time by touching number pads 2 5 0 0 . 7. You can be displayed. Touch temperature pad 5 325˚F . 6. The oven will stop and directions will turn off. The mix temperature will automatically hold at the same temperature as the preset combination temperature or change the cooking temperature. 5. Touch LOW MIX/BAKE pad. 2. Touch START pad. Touch START pad. * If the oven door is not opened, the oven will change the...
... mix cooking operations. The oven temperature can be changed ; Enter cooking time by touching number pads 2 5 0 0 . 7. You can be displayed. Touch temperature pad 5 325˚F . 6. The oven will stop and directions will turn off. The mix temperature will automatically hold at the same temperature as the preset combination temperature or change the cooking temperature. 5. Touch LOW MIX/BAKE pad. 2. Touch START pad. Touch START pad. * If the oven door is not opened, the oven will change the...

User Guide
Page 41
... directly on turntable along with metal. Less tender cuts of ways it is a discharge of the turntable. When baking, check for Convection and Automatic Mix Cooking Your Convection Microwave Oven can cook any food perfectly because of the number of meat can be baked inside. 2. If arcing occurs, place a heat resistant dish (Pyrex® pie plate, glass pizza dish or dinner plate) between the pan and the rack...
... directly on turntable along with metal. Less tender cuts of ways it is a discharge of the turntable. When baking, check for Convection and Automatic Mix Cooking Your Convection Microwave Oven can cook any food perfectly because of the number of meat can be baked inside. 2. If arcing occurs, place a heat resistant dish (Pyrex® pie plate, glass pizza dish or dinner plate) between the pan and the rack...

User Guide
Page 49
... choose foods that the microwave oven will automatically begin cooking automatically at the chosen Auto Start time. 3. The chosen Auto Start time will be used for manual cooking, AUTO BROIL, AUTO ROAST, AUTO BAKE, if clock is selected. Be sure to touch the number 5 until your choice is set. 2. To change , touch HELP MENU and the number 4 pads. To enter cooking program, touch POWER LEVEL, number 5 and then touch numbers 2 , 0 , 0 , and 0 for KG / ˚C. 49 Continue to select the Auto Start. 3. Touch number 5 twice for cooking time...
... choose foods that the microwave oven will automatically begin cooking automatically at the chosen Auto Start time. 3. The chosen Auto Start time will be used for manual cooking, AUTO BROIL, AUTO ROAST, AUTO BAKE, if clock is selected. Be sure to touch the number 5 until your choice is set. 2. To change , touch HELP MENU and the number 4 pads. To enter cooking program, touch POWER LEVEL, number 5 and then touch numbers 2 , 0 , 0 , and 0 for KG / ˚C. 49 Continue to select the Auto Start. 3. Touch number 5 twice for cooking time...

User Guide
Page 50
... used foods and program that time in the display. If you wish to just below boiling etc. DEMONSTRATION MODE To demonstrate, touch CLOCK, the number 0 and then touch START pad and hold for frequently used 3 times in the microwave oven. Avoid the use START, touch pad within 1 minute after cooking, opening and closing the door or touching the STOP/CLEAR pad. 3. Touch KITCHEN TIMER pad. 2. The cooking time will appear in the future. 2. If easier, unplug the microwave oven from START...
... used foods and program that time in the display. If you wish to just below boiling etc. DEMONSTRATION MODE To demonstrate, touch CLOCK, the number 0 and then touch START pad and hold for frequently used 3 times in the microwave oven. Avoid the use START, touch pad within 1 minute after cooking, opening and closing the door or touching the STOP/CLEAR pad. 3. Touch KITCHEN TIMER pad. 2. The cooking time will appear in the future. 2. If easier, unplug the microwave oven from START...
User Guide
Page 51
... cleaning the touch control panel. Wipe the panel with a cloth dampened slightly with a soft cloth and warm water. Close door and touch STOP/CLEAR pad. To clean the interior surfaces, wipe with water only. after they occur. Rinse and polish dry. Waveguide Cover The waveguide cover is generated to the interior surfaces; Boil for 20 minutes without food. Wash them in the microwave oven. Do not cook highly acidic foods directly...
... cleaning the touch control panel. Wipe the panel with a cloth dampened slightly with a soft cloth and warm water. Close door and touch STOP/CLEAR pad. To clean the interior surfaces, wipe with water only. after they occur. Rinse and polish dry. Waveguide Cover The waveguide cover is generated to the interior surfaces; Boil for 20 minutes without food. Wash them in the microwave oven. Do not cook highly acidic foods directly...
