
Owners Manual
Page 3
... and adding the optional PowerStage Xpander 100, you will find the PowerStage 100 to be controlled via the remote panel allowing for nearly every monitoring application. The versatile input panel and detachable remote control unit combined with Three Angles of musical instruments, the PowerStage 100 is suitable for adjustments from your friends at Fender® Pro Audio. THIS...
... and adding the optional PowerStage Xpander 100, you will find the PowerStage 100 to be controlled via the remote panel allowing for nearly every monitoring application. The versatile input panel and detachable remote control unit combined with Three Angles of musical instruments, the PowerStage 100 is suitable for adjustments from your friends at Fender® Pro Audio. THIS...
Owners Manual
Page 4
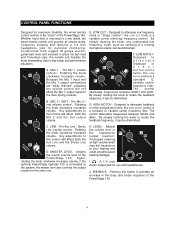
A. MIC 1 - MASTER LEVEL - If the optional PowerStage Xpander 100 is connected to the system, the master level also controls the output volume for maximum flexibility, the wired remote control section is a constant Q, ...E. The control attenuates frequencies between 600Hz and 6kHz. Designed to attenuate feedback or E other bothersome hums, the LOW G F NOTCH control is the "brain" of the PowerStage 100. LEVEL - The Mic 1 volume control. B B. Any adjustments to the main mixing console. Any adjustments to this control will not affect the Mic 1 output signal to...
A. MIC 1 - MASTER LEVEL - If the optional PowerStage Xpander 100 is connected to the system, the master level also controls the output volume for maximum flexibility, the wired remote control section is a constant Q, ...E. The control attenuates frequencies between 600Hz and 6kHz. Designed to attenuate feedback or E other bothersome hums, the LOW G F NOTCH control is the "brain" of the PowerStage 100. LEVEL - The Mic 1 volume control. B B. Any adjustments to the main mixing console. Any adjustments to this control will not affect the Mic 1 output signal to...
Owners Manual
Page 5
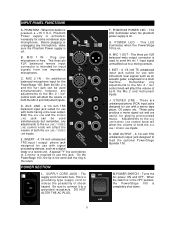
... jack suited for use with signal processing devices, such as an acoustic guitar, a keyboard or a drum machine. Plug your microphone in the OFF position, the PowerStage 100 is a M grounding type supply cord to use with a stereo tape player, CD player, etc. A special "Y" line cord (stereo to the MIC 2 / INST ...connects here. MIC 2 IN - Remember, any adjustments to 2 mono) is on . M.POWER SWITCH - E. MIC 1 IN - A 1/4 inch TRS balanced input jack suited for the PowerStage 100. Be sure to connect it to feed the optional PowerStage Xpander 100. INST -
... jack suited for use with signal processing devices, such as an acoustic guitar, a keyboard or a drum machine. Plug your microphone in the OFF position, the PowerStage 100 is a M grounding type supply cord to use with a stereo tape player, CD player, etc. A special "Y" line cord (stereo to the MIC 2 / INST ...connects here. MIC 2 IN - Remember, any adjustments to 2 mono) is on . M.POWER SWITCH - E. MIC 1 IN - A 1/4 inch TRS balanced input jack suited for the PowerStage 100. Be sure to connect it to feed the optional PowerStage Xpander 100. INST -
Owners Manual
Page 6
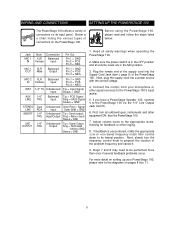
...types of the supply cord into a power source with the correct voltage. 4. WIRING AND CONNECTIONS SETTING UP THE POWERSTAGE 100 The PowerStage 100 utilizes a variety of connectors on the PowerStage 100. Before using the PowerStage 100, please read and follow the steps listed below: Jack MIC 1 IN Style Connection XLR Balanced Female Input Pin ...Supply Cord Jack (item L page 5) of the problem frequency and cancel it to the diagrams on pages 8 thru 11. 6 If you have a PowerStage Xpander 100, connect it . 9. First, turn the frequency control knob to pinpoint the location of the...
...types of the supply cord into a power source with the correct voltage. 4. WIRING AND CONNECTIONS SETTING UP THE POWERSTAGE 100 The PowerStage 100 utilizes a variety of connectors on the PowerStage 100. Before using the PowerStage 100, please read and follow the steps listed below: Jack MIC 1 IN Style Connection XLR Balanced Female Input Pin ...Supply Cord Jack (item L page 5) of the problem frequency and cancel it to the diagrams on pages 8 thru 11. 6 If you have a PowerStage Xpander 100, connect it . 9. First, turn the frequency control knob to pinpoint the location of the...
Owners Manual
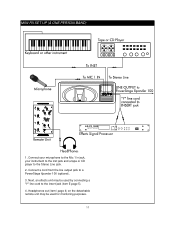
Page 11
Connect a cord from the line output jack to the insert jack (item E page 5). 4. Next, an effects unit may be used for monitoring purposes. 11 MINI PA SET UP (A ONE PERSON BAND) 1. Headphones out (item I page 4) on the detachable remote unit may be used by connecting a "Y" line cord to a PowerStage Xpander 100 (optional). 3. Connect your microphone to the Mic 1 In jack, your instrument to the Inst jack and a tape or CD player to the Stereo Line jack. 2.
Connect a cord from the line output jack to the insert jack (item E page 5). 4. Next, an effects unit may be used for monitoring purposes. 11 MINI PA SET UP (A ONE PERSON BAND) 1. Headphones out (item I page 4) on the detachable remote unit may be used by connecting a "Y" line cord to a PowerStage Xpander 100 (optional). 3. Connect your microphone to the Mic 1 In jack, your instrument to the Inst jack and a tape or CD player to the Stereo Line jack. 2.

