
Owners Manual
Page 2
... meet your decision to purchase Fender pro audio gear is foremost in Fender's mind. Whether you , Bill Schultz Chairman Fender Musical Instruments Corporation From the simple box-top mixer to today's professional touring concert systems, the need a simple box top powered mixer for years to come.... In fact, many of sound reinforcement. Fender Musical Instruments 7975 North Hayden Road, Scottsdale, Arizona 85258 U.S.A. You see, your band's sound. It is an integral part of dials, wires and speakers. Perhaps no...
... meet your decision to purchase Fender pro audio gear is foremost in Fender's mind. Whether you , Bill Schultz Chairman Fender Musical Instruments Corporation From the simple box-top mixer to today's professional touring concert systems, the need a simple box top powered mixer for years to come.... In fact, many of sound reinforcement. Fender Musical Instruments 7975 North Hayden Road, Scottsdale, Arizona 85258 U.S.A. You see, your band's sound. It is an integral part of dials, wires and speakers. Perhaps no...
Owners Manual
Page 3
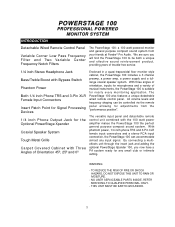
... and a stereo RCA input connection, the PowerStage 100 can be both a unique and effective sound reinforcement product, providing years of Orientation 45º, 25º and 0º Enclosed in a quasi-trapezoidal floor monitor style cabinet, the PowerStage 100 includes a 3 channel preamp, a power amp, a power supply and a fullrange coaxial speaker system. NO USER SERVICEABLE PARTS INSIDE, REFER SERVICING TO QUALIFIED PERSONAL ONLY. - THIS...
... and a stereo RCA input connection, the PowerStage 100 can be both a unique and effective sound reinforcement product, providing years of Orientation 45º, 25º and 0º Enclosed in a quasi-trapezoidal floor monitor style cabinet, the PowerStage 100 includes a 3 channel preamp, a power amp, a power supply and a fullrange coaxial speaker system. NO USER SERVICEABLE PARTS INSIDE, REFER SERVICING TO QUALIFIED PERSONAL ONLY. - THIS...
Owners Manual
Page 4
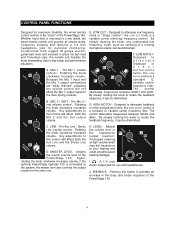
... rotating the knob, any undesirable low frequency noise, such as rumbling of the PowerStage 100. By slowly rotating the knob to the system, the master level also controls the output volume for use with headphones. Adjusts the volume level of the PowerStage 100. 4 Constructed from rugged 18 gauge electrogalvanized steel and secured in the bass...
... rotating the knob, any undesirable low frequency noise, such as rumbling of the PowerStage 100. By slowly rotating the knob to the system, the master level also controls the output volume for use with headphones. Adjusts the volume level of the PowerStage 100. 4 Constructed from rugged 18 gauge electrogalvanized steel and secured in the bass...
Owners Manual
Page 5
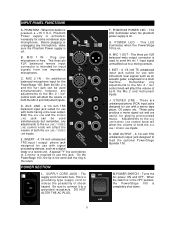
... processing devices, such as an acoustic guitar, a keyboard or a drum machine. When this jack. Phantom Power supply is in here. D J D. A 1/4 inch unbalanced TRS input / output phone jack designed for the PowerStage 100. B H B. When the switch is activated, necessary for use with instrument level signals such as a digital delay or a reverb unit. A 1/4 inch TS unbalanced...
... processing devices, such as an acoustic guitar, a keyboard or a drum machine. When this jack. Phantom Power supply is in here. D J D. A 1/4 inch unbalanced TRS input / output phone jack designed for the PowerStage 100. B H B. When the switch is activated, necessary for use with instrument level signals such as a digital delay or a reverb unit. A 1/4 inch TS unbalanced...
Owners Manual
Page 6
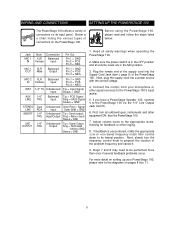
...and other ringing. 8. Plug the female end of the supply cord into a power source with the correct voltage. 4. Before using the PowerStage 100, please read and follow the steps listed below: Jack MIC 1 IN Style ...PowerStage 100. For more than once if several feedback problems occur. First, turn the frequency control knob to pinpoint the location of the problem frequency and cancel it to its input panel. WIRING AND CONNECTIONS SETTING UP THE POWERSTAGE 100 The PowerStage 100 utilizes a variety of connectors on the PowerStage 100. If you have a PowerStage Xpander 100...
...and other ringing. 8. Plug the female end of the supply cord into a power source with the correct voltage. 4. Before using the PowerStage 100, please read and follow the steps listed below: Jack MIC 1 IN Style ...PowerStage 100. For more than once if several feedback problems occur. First, turn the frequency control knob to pinpoint the location of the problem frequency and cancel it to its input panel. WIRING AND CONNECTIONS SETTING UP THE POWERSTAGE 100 The PowerStage 100 utilizes a variety of connectors on the PowerStage 100. If you have a PowerStage Xpander 100...
Owners Manual
Page 7
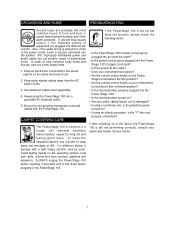
... AC power cords. 3. CARPET COVERING CARE The PowerStage 100 is placed too close to wipe away any smudges or dirt. To clean the carpeted cabinet, use properly maintained cords and cables with a light soapy solution may be used. In order to the sound system on your authorized Fender Service Center. 7 Be sure to use a brush to the power cords...
... AC power cords. 3. CARPET COVERING CARE The PowerStage 100 is placed too close to wipe away any smudges or dirt. To clean the carpeted cabinet, use properly maintained cords and cables with a light soapy solution may be used. In order to the sound system on your authorized Fender Service Center. 7 Be sure to use a brush to the power cords...
Owners Manual
Page 8
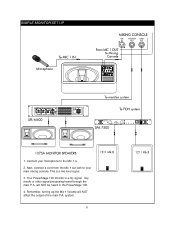
This is a dry signal. Your PowerStage 100 monitor is a mic level signal. 3. will NOT affect the output of the main P.A. system. 8 Remember, turning up the Mic 1 Volume will NOT be heard in the PowerStage 100. 4. Connect your microphone to your main mixing console. Any reverb or other signal processing heard through the main P.A. Next, connect a cord from the Mic 1 out jack to the Mic 1 IN. 2. SIMPLE MONITOR SET UP 1.
This is a dry signal. Your PowerStage 100 monitor is a mic level signal. 3. will NOT affect the output of the main P.A. system. 8 Remember, turning up the Mic 1 Volume will NOT be heard in the PowerStage 100. 4. Connect your microphone to your main mixing console. Any reverb or other signal processing heard through the main P.A. Next, connect a cord from the Mic 1 out jack to the Mic 1 IN. 2. SIMPLE MONITOR SET UP 1.

Owners Manual
Page 9
... your mixing console back to the Mic 1 In. 2. You now have a full monitor mix with all effects from the Mic 1 Out jack to your microphone to the Aux Line In jack on the PowerStage 100. FULL MIX MONITOR SET UP 1. Connect your main mixing console. Remember, turning up the Line volume (item C page 4). 4. To...
... your mixing console back to the Mic 1 In. 2. You now have a full monitor mix with all effects from the Mic 1 Out jack to your microphone to the Aux Line In jack on the PowerStage 100. FULL MIX MONITOR SET UP 1. Connect your main mixing console. Remember, turning up the Line volume (item C page 4). 4. To...
Owners Manual
Page 10
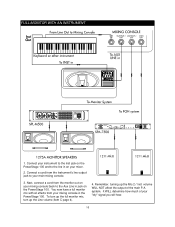
... WILL determine how much of the main P.A. Next, connect a cord from the monitor out on your mixing console back to the Aux Line in the PowerStage 100. Remember, turning up the Line volume (item C page 4). 4. To turn up the full monitor mix, turn up the Mic 2 / Inst volume WILL...console. 3. Connect a cord from your mixer. 2. You now have a full monitor mix with all effects from the Instrument's line output jack to the line in on your mixing console in jack on the PowerStage 100 and to your "dry" signal you will hear. 10 system. FULL MONITOR WITH AN INSTRUMENT 1. ...
... WILL determine how much of the main P.A. Next, connect a cord from the monitor out on your mixing console back to the Aux Line in the PowerStage 100. Remember, turning up the Line volume (item C page 4). 4. To turn up the full monitor mix, turn up the Mic 2 / Inst volume WILL...console. 3. Connect a cord from your mixer. 2. You now have a full monitor mix with all effects from the Instrument's line output jack to the line in on your mixing console in jack on the PowerStage 100 and to your "dry" signal you will hear. 10 system. FULL MONITOR WITH AN INSTRUMENT 1. ...
Owners Manual
Page 11
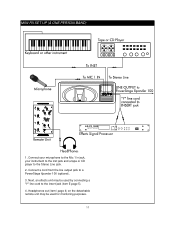
Connect your microphone to the Mic 1 In jack, your instrument to the Inst jack and a tape or CD player to a PowerStage Xpander 100 (optional). 3. Next, an effects unit may be used for monitoring purposes. 11 Connect a cord from the line output jack to the Stereo Line jack. 2. MINI PA SET UP (A ONE PERSON BAND) 1. Headphones out (item I page 4) on the detachable remote unit may be used by connecting a "Y" line cord to the insert jack (item E page 5). 4.
Connect your microphone to the Mic 1 In jack, your instrument to the Inst jack and a tape or CD player to a PowerStage Xpander 100 (optional). 3. Next, an effects unit may be used for monitoring purposes. 11 Connect a cord from the line output jack to the Stereo Line jack. 2. MINI PA SET UP (A ONE PERSON BAND) 1. Headphones out (item I page 4) on the detachable remote unit may be used by connecting a "Y" line cord to the insert jack (item E page 5). 4.
Owners Manual
Page 12
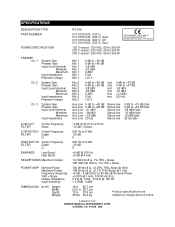
SPECIFICATIONS DESIGNATION TYPE PART NUMBER POWER SPECIFICATION PREAMP Ch. 1 Ch. 2 Ch. 3 System Gain Preamp Gain Input Level ... Center Frequency FILTER Depth Q HIGH NOTCH Center Frequency FILTER Depth Q ENHANCE Low Boost High Boost HEADPHONES Maximum Output POWER AMP Nominal Power Maximum Power Frequency Response THD + Noise Output Impedance Input Sensitivity DIMENSIONS (At 25º) Height: Width: Depth: Weight: ... Octave 200 Hz to 2 kHz -20 dB 5 600 Hz to 6 kHz -20 dB 5 +9 dB @ 100 Hz +5 dB @ 4 kHz 14 mW into 8 Ω, 1% THD + Noise 165 mW into 300 Ω, 1% THD + Noise...
SPECIFICATIONS DESIGNATION TYPE PART NUMBER POWER SPECIFICATION PREAMP Ch. 1 Ch. 2 Ch. 3 System Gain Preamp Gain Input Level ... Center Frequency FILTER Depth Q HIGH NOTCH Center Frequency FILTER Depth Q ENHANCE Low Boost High Boost HEADPHONES Maximum Output POWER AMP Nominal Power Maximum Power Frequency Response THD + Noise Output Impedance Input Sensitivity DIMENSIONS (At 25º) Height: Width: Depth: Weight: ... Octave 200 Hz to 2 kHz -20 dB 5 600 Hz to 6 kHz -20 dB 5 +9 dB @ 100 Hz +5 dB @ 4 kHz 14 mW into 8 Ω, 1% THD + Noise 165 mW into 300 Ω, 1% THD + Noise...


