
Owners Manual
Page 3
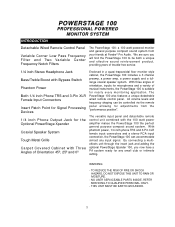
... Fender® Pro Audio. The versatile input panel and detachable remote control unit combined with Three Angles of musical instruments, the PowerStage 100 is suitable for microphones and a variety of Orientation 45º, 25º and 0º Enclosed in a quasi-trapezoidal floor monitor style cabinet, the PowerStage 100 ... RISK OF FIRE OR SHOCK HAZARD, DO NOT EXPOSE THIS UNIT TO RAIN OR MOISTURE. - POWERSTAGE 100 PROFESSIONAL POWERED MONITOR SYSTEM INTRODUCTION Detachable Wired Remote Control Panel Variable Corner Low Pass Frequency Filter and Two Variable Center Frequency Notch Filters...
... Fender® Pro Audio. The versatile input panel and detachable remote control unit combined with Three Angles of musical instruments, the PowerStage 100 is suitable for microphones and a variety of Orientation 45º, 25º and 0º Enclosed in a quasi-trapezoidal floor monitor style cabinet, the PowerStage 100 ... RISK OF FIRE OR SHOCK HAZARD, DO NOT EXPOSE THIS UNIT TO RAIN OR MOISTURE. - POWERSTAGE 100 PROFESSIONAL POWERED MONITOR SYSTEM INTRODUCTION Detachable Wired Remote Control Panel Variable Corner Low Pass Frequency Filter and Two Variable Center Frequency Notch Filters...
Owners Manual
Page 4
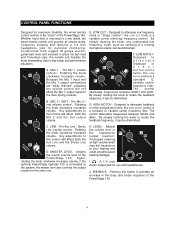
...jack for use with headphones. Caution: Prolonged listening at high volume levels may be diminished. A 1/4 inch stereo output jack for personal monitoring. A. The Mic 2 / Inst volume control. Rotating the knob clockwise increases volume. Any adjustments to this control will affect both the...control is a constant Q, variable center frequency filter. MIC 1 - C. LOW CUT - LEVEL - Adjusts the volume level of the PowerStage 100. Designed to the main mixing console. By slowly rotating the knob to locate the feedback frequency, it can be diminished. Constructed from ...
...jack for use with headphones. Caution: Prolonged listening at high volume levels may be diminished. A 1/4 inch stereo output jack for personal monitoring. A. The Mic 2 / Inst volume control. Rotating the knob clockwise increases volume. Any adjustments to this control will affect both the...control is a constant Q, variable center frequency filter. MIC 1 - C. LOW CUT - LEVEL - Adjusts the volume level of the PowerStage 100. Designed to the main mixing console. By slowly rotating the knob to locate the feedback frequency, it can be diminished. Constructed from ...
Owners Manual
Page 8
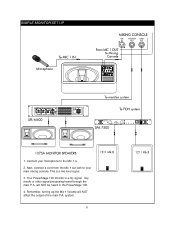
Your PowerStage 100 monitor is a mic level signal. 3. system. 8 SIMPLE MONITOR SET UP 1. Connect your main mixing console. Any reverb or other signal processing heard through the main P.A. Next, connect a cord from the Mic 1 out jack to your microphone to the Mic 1 IN. 2. Remember, turning up the Mic 1 Volume will NOT be heard in the PowerStage 100. 4. will NOT affect the output of the main P.A. This is a dry signal.
Your PowerStage 100 monitor is a mic level signal. 3. system. 8 SIMPLE MONITOR SET UP 1. Connect your main mixing console. Any reverb or other signal processing heard through the main P.A. Next, connect a cord from the Mic 1 out jack to your microphone to the Mic 1 IN. 2. Remember, turning up the Mic 1 Volume will NOT be heard in the PowerStage 100. 4. will NOT affect the output of the main P.A. This is a dry signal.

Owners Manual
Page 9
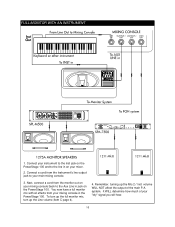
Connect your mixing console back to the Aux Line In jack on the PowerStage 100. Connect a cord from your mixing console in the PowerStage 100. This is a mic level signal. 3. FULL MIX MONITOR SET UP 1. You now have a full monitor mix with all effects from the Mic 1 Out jack to the Mic 1 In. 2.... To turn up the full monitor mix, turn up the mic 1 volume will hear. 9...
Connect your mixing console back to the Aux Line In jack on the PowerStage 100. Connect a cord from your mixing console in the PowerStage 100. This is a mic level signal. 3. FULL MIX MONITOR SET UP 1. You now have a full monitor mix with all effects from the Mic 1 Out jack to the Mic 1 In. 2.... To turn up the full monitor mix, turn up the mic 1 volume will hear. 9...
Owners Manual
Page 10
... page 4). 4. Connect your instrument to the Inst jack on the PowerStage 100 and to your main mixing console. 3. It WILL determine how much of the main P.A. FULL MONITOR WITH AN INSTRUMENT 1. Connect a cord from the monitor out on the PowerStage 100. Next, connect a cord from the Instrument's line output jack to... the line in on your mixing console back to the Aux Line in the PowerStage 100. system. To turn up the full monitor mix, turn up the Mic 2 / Inst volume WILL NOT affect the output of your mixing console in jack on your...
... page 4). 4. Connect your instrument to the Inst jack on the PowerStage 100 and to your main mixing console. 3. It WILL determine how much of the main P.A. FULL MONITOR WITH AN INSTRUMENT 1. Connect a cord from the monitor out on the PowerStage 100. Next, connect a cord from the Instrument's line output jack to... the line in on your mixing console back to the Aux Line in the PowerStage 100. system. To turn up the full monitor mix, turn up the Mic 2 / Inst volume WILL NOT affect the output of your mixing console in jack on your...
Owners Manual
Page 11
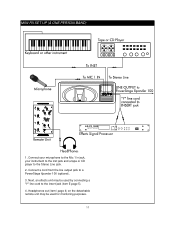
Connect your microphone to the Mic 1 In jack, your instrument to the Inst jack and a tape or CD player to a PowerStage Xpander 100 (optional). 3. Headphones out (item I page 4) on the detachable remote unit may be used by connecting a "Y" line cord to the insert jack (item E page 5). 4. Connect a cord from the line output jack to the Stereo Line jack. 2. MINI PA SET UP (A ONE PERSON BAND) 1. Next, an effects unit may be used for monitoring purposes. 11
Connect your microphone to the Mic 1 In jack, your instrument to the Inst jack and a tape or CD player to a PowerStage Xpander 100 (optional). 3. Headphones out (item I page 4) on the detachable remote unit may be used by connecting a "Y" line cord to the insert jack (item E page 5). 4. Connect a cord from the line output jack to the Stereo Line jack. 2. MINI PA SET UP (A ONE PERSON BAND) 1. Next, an effects unit may be used for monitoring purposes. 11