Manual
Page 1
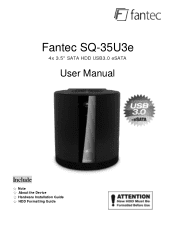
Fantec SQ-35U3e 4x 3.5" SATA HDD USB3.0 eSATA User Manual Include ☆ Note ☆ About the Device ☆ Hardware Installation Guide ☆ HDD Formatting Guide
Fantec SQ-35U3e 4x 3.5" SATA HDD USB3.0 eSATA User Manual Include ☆ Note ☆ About the Device ☆ Hardware Installation Guide ☆ HDD Formatting Guide

Manual
Page 2
... well secured and fixed to 5Gbps transfer speed with USB 2.0 and USB 1.1) - Reduce 25% power consumption with 80 mm Cooling FAN and smart ventilation design. - Fantec SQ-35U3e User Manual 1. Reduce 33% of the ventilation on the product in a well ventilated environment. 3. Doing so will sleep/wake the drives with a relative humidity between...
... well secured and fixed to 5Gbps transfer speed with USB 2.0 and USB 1.1) - Reduce 25% power consumption with 80 mm Cooling FAN and smart ventilation design. - Fantec SQ-35U3e User Manual 1. Reduce 33% of the ventilation on the product in a well ventilated environment. 3. Doing so will sleep/wake the drives with a relative humidity between...
Manual
Page 3
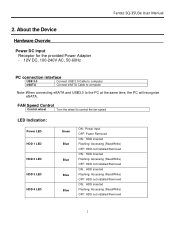
.../Removed ON : HDD inserted Flashing: Accessing (Read/Write) OFF: HDD not installed/Removed ON : HDD inserted Flashing: Accessing (Read/Write) OFF: HDD not installed/Removed 2 Fantec SQ-35U3e User Manual 2. FAN Speed Control Control wheel Turn the wheel to the PC at the same time, the PC will recognize eSATA.
.../Removed ON : HDD inserted Flashing: Accessing (Read/Write) OFF: HDD not installed/Removed ON : HDD inserted Flashing: Accessing (Read/Write) OFF: HDD not installed/Removed 2 Fantec SQ-35U3e User Manual 2. FAN Speed Control Control wheel Turn the wheel to the PC at the same time, the PC will recognize eSATA.
Manual
Page 5
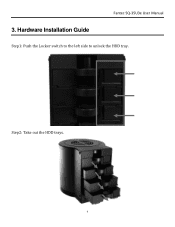
Fantec SQ-35U3e User Manual 3. Step2: Take out the HDD trays. 4 Hardware Installation Guide Step1: Push the Locker switch to the left side to unlock the HDD tray.
Fantec SQ-35U3e User Manual 3. Step2: Take out the HDD trays. 4 Hardware Installation Guide Step1: Push the Locker switch to the left side to unlock the HDD tray.
Manual
Page 6
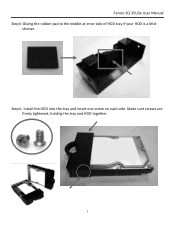
Step4: Install the HDD into the tray and insert one screw on each side. Make sure screws are firmly tightened, holding the tray and HDD together. 5 Fantec SQ-35U3e User Manual Step3: Gluing the rubber pad to the middle at inner side of HDD tray if your HDD is a little shorter.
Step4: Install the HDD into the tray and insert one screw on each side. Make sure screws are firmly tightened, holding the tray and HDD together. 5 Fantec SQ-35U3e User Manual Step3: Gluing the rubber pad to the middle at inner side of HDD tray if your HDD is a little shorter.

Manual
Page 7
Fantec SQ-35U3e User Manual Step5: Push the switch to the right side to lock the HDD tray. 6 Step5: Slide HDD trays into the case.
Fantec SQ-35U3e User Manual Step5: Push the switch to the right side to lock the HDD tray. 6 Step5: Slide HDD trays into the case.
Manual
Page 8
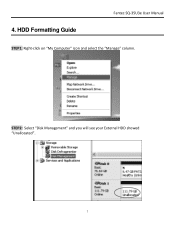
4. HDD Formatting Guide Fantec SQ-35U3e User Manual STEP1: Right-click on "My Computer" icon and select the "Manage" column. STEP2: Select "Disk Management" and you will see your External HDD showed "Unallocated". 7
4. HDD Formatting Guide Fantec SQ-35U3e User Manual STEP1: Right-click on "My Computer" icon and select the "Manage" column. STEP2: Select "Disk Management" and you will see your External HDD showed "Unallocated". 7
Manual
Page 9
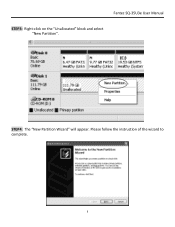
Fantec SQ-35U3e User Manual STEP3: Right-click on the "Unallocated" block and select "New Partition". Please follow the instruction of the wizard to complete. 8 STEP4: The "New Partition Wizard" will appear.
Fantec SQ-35U3e User Manual STEP3: Right-click on the "Unallocated" block and select "New Partition". Please follow the instruction of the wizard to complete. 8 STEP4: The "New Partition Wizard" will appear.

Manual
Page 10
STEP6: Double-click "My Computer". You will be recognized as a "New Volume". Fantec SQ-35U3e User Manual STEP5: When partitioning is completed, the external HDD will see the new volume appears on your PC. 9
STEP6: Double-click "My Computer". You will be recognized as a "New Volume". Fantec SQ-35U3e User Manual STEP5: When partitioning is completed, the external HDD will see the new volume appears on your PC. 9

Manual
Page 11
View the box to complete disk initialization. 10 Select "Initialize Disk" and follow the steps of the HDD Formatting Guide wizard to the left of the "Unallocated" box.You most likely would see the "Not Initialized" message displayed. The Hard Disk Drive must be set to initialization the device. Fantec SQ-35U3e User Manual Initialize a Disk If the HDD is new you have to "Online" before partitioning and formatting the Hard Disk Drive. 1. Right-click the "Not Initialized" area, a disk's initialization menu will appear as below.
View the box to complete disk initialization. 10 Select "Initialize Disk" and follow the steps of the HDD Formatting Guide wizard to the left of the "Unallocated" box.You most likely would see the "Not Initialized" message displayed. The Hard Disk Drive must be set to initialization the device. Fantec SQ-35U3e User Manual Initialize a Disk If the HDD is new you have to "Online" before partitioning and formatting the Hard Disk Drive. 1. Right-click the "Not Initialized" area, a disk's initialization menu will appear as below.
Manual
Page 12
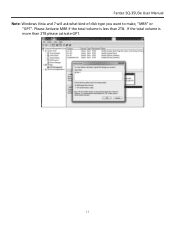
Please Activate MBR if the total volume is more than 2TB. If the total volume is less than 2TB please activate GPT. 11 Fantec SQ-35U3e User Manual Note: Windows Vista and 7 will ask what kind of disk type you want to make, "MBR" or "GPT".
Please Activate MBR if the total volume is more than 2TB. If the total volume is less than 2TB please activate GPT. 11 Fantec SQ-35U3e User Manual Note: Windows Vista and 7 will ask what kind of disk type you want to make, "MBR" or "GPT".
