

Manual
Page 2
... LOGIN...25 8. IOS DEVICE CLIENT ...26 8.2. SHARING PHOTOS/IMAGES (IOS ONLY 37 8.9. 1. PRODUCT PARAMETERS ...5 2.1 PRODUCT DIMENSIONS...5 2.2. RJ45 WAN PORT ...6 3.2. HARDWARE INSTALLATION 8 5. HDD FORMAT ...10 5.1. MS WINDOWS ...10 5.2. MAC OS X ...13 6. WIFI HDD CONFIGURATION WIZARD 16 7. IOS CLIENT APP INSTALLATION 20 7.2. IOS USER LOGIN ...22 7.4. ANDROID CLIENT APP INSTALLATION 23 7.5. PLAYING MOVIE...
... LOGIN...25 8. IOS DEVICE CLIENT ...26 8.2. SHARING PHOTOS/IMAGES (IOS ONLY 37 8.9. 1. PRODUCT PARAMETERS ...5 2.1 PRODUCT DIMENSIONS...5 2.2. RJ45 WAN PORT ...6 3.2. HARDWARE INSTALLATION 8 5. HDD FORMAT ...10 5.1. MS WINDOWS ...10 5.2. MAC OS X ...13 6. WIFI HDD CONFIGURATION WIZARD 16 7. IOS CLIENT APP INSTALLATION 20 7.2. IOS USER LOGIN ...22 7.4. ANDROID CLIENT APP INSTALLATION 23 7.5. PLAYING MOVIE...
Manual
Page 3
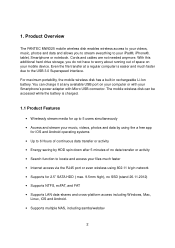
... LAN data-shares and cross-platform access including Windows, Mac, Linux, iOS and Android. • Supports multiple NAS, including samba/webdav 2 Even the file transfer at any available USB port on your iPad®, iPhone®, tablet, Smartphone or notebook. Product Overview The FANTEC MWiD25 mobile wireless disk enables wireless access to your...
... LAN data-shares and cross-platform access including Windows, Mac, Linux, iOS and Android. • Supports multiple NAS, including samba/webdav 2 Even the file transfer at any available USB port on your iPad®, iPhone®, tablet, Smartphone or notebook. Product Overview The FANTEC MWiD25 mobile wireless disk enables wireless access to your...
Manual
Page 5
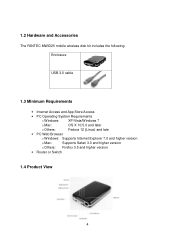
1.2 Hardware and Accessories The FANTEC MWiD25 mobile wireless disk kit includes the following: Enclosure USB 3.0 cable 1.3 Minimum Requirements • Internet Access and App Store Access • PC Operating System Requirements o Windows: XP/Vista/Windows 7 o Mac: OS X 10.5.0 and later o Others: Fedora 12 (Linux) and late • PC Web Browser o Windows: Supports Internet Explorer 7.0 and higher version o Mac: Supports Safari 3.0 and higher version o Others: Firefox 3.5 and higher version • Router or Switch 1.4 Product View 4
1.2 Hardware and Accessories The FANTEC MWiD25 mobile wireless disk kit includes the following: Enclosure USB 3.0 cable 1.3 Minimum Requirements • Internet Access and App Store Access • PC Operating System Requirements o Windows: XP/Vista/Windows 7 o Mac: OS X 10.5.0 and later o Others: Fedora 12 (Linux) and late • PC Web Browser o Windows: Supports Internet Explorer 7.0 and higher version o Mac: Supports Safari 3.0 and higher version o Others: Firefox 3.5 and higher version • Router or Switch 1.4 Product View 4

Manual
Page 11
Refer to open the Windows Disk Manager. 10 If no hard disk drives are supported: FAT, FAT32, NTFS, exFAT 5.1. Right-click the My Computer icon on your desktop and select ... from the pop-up your computer's USB 3.0 interface. Select Disk Management under Storage to the operating system's documentation for further guidance. MS Windows Important: Before reconfiguring a volume, back up window. 2. Note: Following file formats are connected to the device, the disks appear as "Not Initialized" with no capacity allocated to it. HDD...
Refer to open the Windows Disk Manager. 10 If no hard disk drives are supported: FAT, FAT32, NTFS, exFAT 5.1. Right-click the My Computer icon on your desktop and select ... from the pop-up your computer's USB 3.0 interface. Select Disk Management under Storage to the operating system's documentation for further guidance. MS Windows Important: Before reconfiguring a volume, back up window. 2. Note: Following file formats are connected to the device, the disks appear as "Not Initialized" with no capacity allocated to it. HDD...

Manual
Page 12
A window opens with the word "Basic", a size value that shows the available storage capacity, and a status of Basic, a disk could appear Unknown, Dynamic, or Not Initialized. ... the Partition Wizard. 11 Uncheck the Disk item and click OK. Right-click the configured disk's unallocated space and select New Partition. To do this window).
A window opens with the word "Basic", a size value that shows the available storage capacity, and a status of Basic, a disk could appear Unknown, Dynamic, or Not Initialized. ... the Partition Wizard. 11 Uncheck the Disk item and click OK. Right-click the configured disk's unallocated space and select New Partition. To do this window).
Manual
Page 17
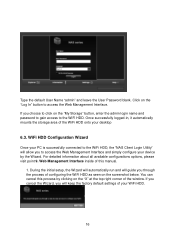
... PC is successfully connected to the WiFi HDD. For detailed information about all available configurations options, please visit point 9. Web Management Interface inside of the window. You can cancel this manual. 1. WiFi HDD Configuration Wizard Once your WiFi HDD. 16 Type the default User Name "admin" and leave the User Password...
... PC is successfully connected to the WiFi HDD. For detailed information about all available configurations options, please visit point 9. Web Management Interface inside of the window. You can cancel this manual. 1. WiFi HDD Configuration Wizard Once your WiFi HDD. 16 Type the default User Name "admin" and leave the User Password...
Manual
Page 18
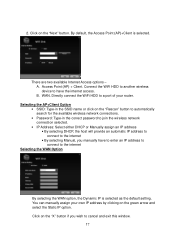
...)+Client is selected as the default setting. There are two available Internet Access options - WAN. Directly connect the WiFi HDD to cancel and exit this window. 17 Selecting the AP+Client Option • SSID: Type-in the correct password to join the wireless network connection selected. • IP Address: Select either...
...)+Client is selected as the default setting. There are two available Internet Access options - WAN. Directly connect the WiFi HDD to cancel and exit this window. 17 Selecting the AP+Client Option • SSID: Type-in the correct password to join the wireless network connection selected. • IP Address: Select either...

Manual
Page 20
The step-by-step wizard can be canceled at the top right of the window as seen on the image below . Click on the "OK" button to complete and save the changes made. Click on the "X" located at anytime. This process will start rebooting. Click on the image below . 5. The system will take approximately 5 minutes as seen on the "Finish" button to exit or "Cancel". 19
The step-by-step wizard can be canceled at the top right of the window as seen on the image below . Click on the "OK" button to complete and save the changes made. Click on the "X" located at anytime. This process will start rebooting. Click on the image below . 5. The system will take approximately 5 minutes as seen on the "Finish" button to exit or "Cancel". 19

Manual
Page 46
... copying/transferring files as seen on the screen and you will be created to the previous screen. Enter the new folder name inside the "Recent" window as seen on the to exit. 5. Note: Successfully copied/transferred file or files will return to copy/transfer the selected file or files. The folder...
... copying/transferring files as seen on the screen and you will be created to the previous screen. Enter the new folder name inside the "Recent" window as seen on the to exit. 5. Note: Successfully copied/transferred file or files will return to copy/transfer the selected file or files. The folder...

Manual
Page 50
We provide similar functionality as the windows explorer which makes the interface much easier to use . Refresh button - Maximum length of the device. WEB Management Functions The built-in Web Management interface ...
We provide similar functionality as the windows explorer which makes the interface much easier to use . Refresh button - Maximum length of the device. WEB Management Functions The built-in Web Management interface ...

Manual
Page 52
Right-clicking at the bottom of the window as seen on the screenshot below. 4. Select multiple files and right-click on the screenshot below will allow to either Paste, Create or Upload file or files. 51 On the folder level, you can Open, Copy, Cut, Delete or Rename the folder as seen on the mouse will appear. 2. You can right-click using your mouse and a pop-up menu will allow to either Copy, Cut or Delete the files as seen below . 3.
Right-clicking at the bottom of the window as seen on the screenshot below. 4. Select multiple files and right-click on the screenshot below will allow to either Paste, Create or Upload file or files. 51 On the folder level, you can Open, Copy, Cut, Delete or Rename the folder as seen on the mouse will appear. 2. You can right-click using your mouse and a pop-up menu will allow to either Copy, Cut or Delete the files as seen below . 3.

Manual
Page 53
... or the file name and select "Rename". Inside the pop-up menu, select "Download". Right-click on the blank area inside the Create Folder window and click on the "Save" after the name has been changed. • Upload Command - Right-click at the empty area inside the pop-...-click to view the contents or open the folder. • Copy Command - Enter the folder name inside the window and a pop-up menu will appear. Select "Upload" inside the window. Select and right-click on the computer supports this file type otherwise, it will automatically be openned if any of...
... or the file name and select "Rename". Inside the pop-up menu, select "Download". Right-click on the blank area inside the Create Folder window and click on the "Save" after the name has been changed. • Upload Command - Right-click at the empty area inside the pop-...-click to view the contents or open the folder. • Copy Command - Enter the folder name inside the window and a pop-up menu will appear. Select "Upload" inside the window. Select and right-click on the computer supports this file type otherwise, it will automatically be openned if any of...
Manual
Page 54
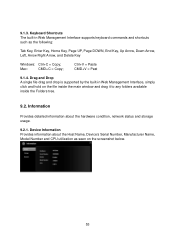
... and drop is supported by the built-in Web Management Interface supports keyboard commands and shortcuts such as seen on the file inside the main window and drag it to any folders available inside the Folders tree. 9.2. Ctrl+V = Paste CMD+V = Past 9.1.4. Device Information Provides information about the hardware condition, ...: Tab Key, Enter Key, Home Key, Page UP, Page DOWN, End Key, Up Arrow, Down Arrow, Left, Arrow Right Arrow, and Delete Key Windows: Ctrl+C = Copy; Keyboard Shortcuts The built-in Web Management Interface, simply click and hold on the screenshot below. 53
... and drop is supported by the built-in Web Management Interface supports keyboard commands and shortcuts such as seen on the file inside the main window and drag it to any folders available inside the Folders tree. 9.2. Ctrl+V = Paste CMD+V = Past 9.1.4. Device Information Provides information about the hardware condition, ...: Tab Key, Enter Key, Home Key, Page UP, Page DOWN, End Key, Up Arrow, Down Arrow, Left, Arrow Right Arrow, and Delete Key Windows: Ctrl+C = Copy; Keyboard Shortcuts The built-in Web Management Interface, simply click and hold on the screenshot below. 53

Manual
Page 56
... allow you to modify the admin password as seen on the "X" to exit. 55 Click on the screenshot below . This window provides information about the File System of the internal hard disk drive as well as seen on the "X" to cancel and exit. 9.3.2. As seen on ...
... allow you to modify the admin password as seen on the "X" to exit. 55 Click on the screenshot below . This window provides information about the File System of the internal hard disk drive as well as seen on the "X" to cancel and exit. 9.3.2. As seen on ...

Manual
Page 59
...By default, this feature is selected as seen on the screenshot below. 58 Windows Sharing Services Data sharing and accessing the WiFi HD product makes it simple by ... SSID name or click on the green arrow and select the Static IP option. 9.3.4. Services Windows sharing and network services are available to the internet. You can manually assign your own IP address by enabling the... Windows File Services. o By selecting Manual, you have to manually assign an IP address to connect to...
...By default, this feature is selected as seen on the screenshot below. 58 Windows Sharing Services Data sharing and accessing the WiFi HD product makes it simple by ... SSID name or click on the green arrow and select the Static IP option. 9.3.4. Services Windows sharing and network services are available to the internet. You can manually assign your own IP address by enabling the... Windows File Services. o By selecting Manual, you have to manually assign an IP address to connect to...
Manual
Page 63
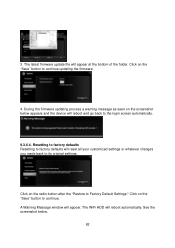
See the screenshot below appears and the device will reset all your customized settings or whatever changes you made back to continue. A Warning Message window will reboot automatically. Click on the "Save" button to its original settings. The WiFi HDD will appear. During the firmware updating process a warning message as ...
See the screenshot below appears and the device will reset all your customized settings or whatever changes you made back to continue. A Warning Message window will reboot automatically. Click on the "Save" button to its original settings. The WiFi HDD will appear. During the firmware updating process a warning message as ...