
Manual
Page 2
...9.2. PRODUCT PARAMETERS ...5 2.1 PRODUCT DIMENSIONS...5 2.2. HDD FORMAT ...10 5.1. USING PERSONAL COMPUTER 15 6.1. DELETING/ERASING A SINGLE FILE OR MULTIPLE FILES (IOS AND ANDROID 48 8.16. HELP...63 10. HARDWARE INSTALLATION 8 5. SHARING PHOTOS/IMAGES (IOS ONLY 37 8.9. SETTINGS ...54 9.4. OPENING/VIEWING DOCUMENTS (ANDROID ONLY 41 8.12. UPLOAD/DOWNLOAD HISTORY AND STATUS 48 9. GPL STATEMENT...64 1 PRODUCT OVERVIEW...2 1.1 PRODUCT FEATURES ...2 1.2 HARDWARE AND ACCESSORIES 4 1.3 MINIMUM REQUIREMENTS...4 1.4 PRODUCT VIEW ...4 2. WIRELESS CONNECTION TO PC 15 6.2. IOS USER...
...9.2. PRODUCT PARAMETERS ...5 2.1 PRODUCT DIMENSIONS...5 2.2. HDD FORMAT ...10 5.1. USING PERSONAL COMPUTER 15 6.1. DELETING/ERASING A SINGLE FILE OR MULTIPLE FILES (IOS AND ANDROID 48 8.16. HELP...63 10. HARDWARE INSTALLATION 8 5. SHARING PHOTOS/IMAGES (IOS ONLY 37 8.9. SETTINGS ...54 9.4. OPENING/VIEWING DOCUMENTS (ANDROID ONLY 41 8.12. UPLOAD/DOWNLOAD HISTORY AND STATUS 48 9. GPL STATEMENT...64 1 PRODUCT OVERVIEW...2 1.1 PRODUCT FEATURES ...2 1.2 HARDWARE AND ACCESSORIES 4 1.3 MINIMUM REQUIREMENTS...4 1.4 PRODUCT VIEW ...4 2. WIRELESS CONNECTION TO PC 15 6.2. IOS USER...
Manual
Page 3
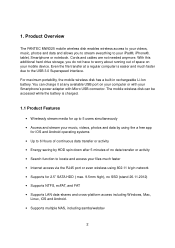
...; Internet access via the RJ45 port or even wireless using the a free app for 2.5" SATA HDD ( max. 9.5mm high), no data transfer or activity • Search function to worry about running out of no SSD (stand 26.11.2012) • Supports NTFS, exFAT, and FAT • Supports LAN data-shares and cross-platform access including Windows, Mac, Linux, iOS and Android. • Supports multiple NAS, including...
...; Internet access via the RJ45 port or even wireless using the a free app for 2.5" SATA HDD ( max. 9.5mm high), no data transfer or activity • Search function to worry about running out of no SSD (stand 26.11.2012) • Supports NTFS, exFAT, and FAT • Supports LAN data-shares and cross-platform access including Windows, Mac, Linux, iOS and Android. • Supports multiple NAS, including...

Manual
Page 4
The WiFi HDD now works as illustrated below. Wireless mode: Wirelessly connect the WiFi HDD to your existing wireless router to automatically assign an IP address. Once the battery is fully charged, the battery LED is blinking in green color. 3 Wired mode: Connect the RJ45 cable to an available RJ45 port of the WiFi HDD to have internet access as an external USB 3.0 hard drive and the internal battery will...
The WiFi HDD now works as illustrated below. Wireless mode: Wirelessly connect the WiFi HDD to your existing wireless router to automatically assign an IP address. Once the battery is fully charged, the battery LED is blinking in green color. 3 Wired mode: Connect the RJ45 cable to an available RJ45 port of the WiFi HDD to have internet access as an external USB 3.0 hard drive and the internal battery will...
Manual
Page 5
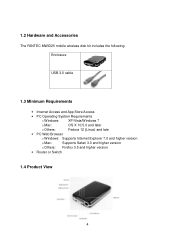
1.2 Hardware and Accessories The FANTEC MWiD25 mobile wireless disk kit includes the following: Enclosure USB 3.0 cable 1.3 Minimum Requirements • Internet Access and App Store Access • PC Operating System Requirements o Windows: XP/Vista/Windows 7 o Mac: OS X 10.5.0 and later o Others: Fedora 12 (Linux) and late • PC Web Browser o Windows: Supports Internet Explorer 7.0 and higher version o Mac: Supports Safari 3.0 and higher version o Others: Firefox 3.5 and higher version • Router or Switch 1.4 Product View 4
1.2 Hardware and Accessories The FANTEC MWiD25 mobile wireless disk kit includes the following: Enclosure USB 3.0 cable 1.3 Minimum Requirements • Internet Access and App Store Access • PC Operating System Requirements o Windows: XP/Vista/Windows 7 o Mac: OS X 10.5.0 and later o Others: Fedora 12 (Linux) and late • PC Web Browser o Windows: Supports Internet Explorer 7.0 and higher version o Mac: Supports Safari 3.0 and higher version o Others: Firefox 3.5 and higher version • Router or Switch 1.4 Product View 4

Manual
Page 6
... (D) X 25mm (H) Operating Temperature: The normal operating temperature is between 5-35°C. 2.2. 2. Product Specification WiFi: Network Interface: USB Interface: Battery Capacity: Power consumption: Standard: 802.11 b/g/n, Frequency: 2.4 GHz Speed: 72Mbps at 20MHz 150Mbps at 40MHz 100Mbps Ethernet RJ45 (WAN port for Internet access) Micro USB 3.0, for data transfer and charging 3000mAh Maximum (reading and writing data): 3.7W Stand-by (HDD Spinning, no activity): 2.5W Stand-by (HDD Sleep Mode): 2.1W 5
... (D) X 25mm (H) Operating Temperature: The normal operating temperature is between 5-35°C. 2.2. 2. Product Specification WiFi: Network Interface: USB Interface: Battery Capacity: Power consumption: Standard: 802.11 b/g/n, Frequency: 2.4 GHz Speed: 72Mbps at 20MHz 150Mbps at 40MHz 100Mbps Ethernet RJ45 (WAN port for Internet access) Micro USB 3.0, for data transfer and charging 3000mAh Maximum (reading and writing data): 3.7W Stand-by (HDD Spinning, no activity): 2.5W Stand-by (HDD Sleep Mode): 2.1W 5

Manual
Page 10
... internal hard drive is not possible Note: If you installed a brand new HDD or want to open it . Now you have closed the enclosure, it's not possible to format the HDD, please follow Point 5. HDD Format. 9 Important Note: Once you can use the device as an external USB3.0 hard drive when connected directly to the computer's USB Port or as shown on the image below. 4. Congratulations. A simultaneous usage as external USB3.0 hard drive...
... internal hard drive is not possible Note: If you installed a brand new HDD or want to open it . Now you have closed the enclosure, it's not possible to format the HDD, please follow Point 5. HDD Format. 9 Important Note: Once you can use the device as an external USB3.0 hard drive when connected directly to the computer's USB Port or as shown on the image below. 4. Congratulations. A simultaneous usage as external USB3.0 hard drive...

Manual
Page 11
... window. 2. Select Disk Management under Storage to format the HDD before usage. Please connect the device to the device, the disks appear as "Not Initialized" with no hard disk drives are supported: FAT, FAT32, NTFS, exFAT 5.1. HDD Format This section explains how to open the Windows Disk Manager. 10 5. Right-click the My Computer icon on your desktop and select Manage from the pop-up your computer's USB 3.0 interface. Refer to it. If no capacity...
... window. 2. Select Disk Management under Storage to format the HDD before usage. Please connect the device to the device, the disks appear as "Not Initialized" with no hard disk drives are supported: FAT, FAT32, NTFS, exFAT 5.1. HDD Format This section explains how to open the Windows Disk Manager. 10 5. Right-click the My Computer icon on your desktop and select Manage from the pop-up your computer's USB 3.0 interface. Refer to it. If no capacity...

Manual
Page 12
... disks to start the Partition Wizard. 11 A window opens with the word "Basic", a size value that shows the available storage capacity, and a status of Basic, a disk could appear Unknown, Dynamic, or Not Initialized. Within a few seconds, the selected disk(s) should be marked as a Basic disk. Right-click the configured disk's unallocated space and select New Partition. Click Next to initialize. Instead of "Online". If a disk appears as a Basic disk...
... disks to start the Partition Wizard. 11 A window opens with the word "Basic", a size value that shows the available storage capacity, and a status of Basic, a disk could appear Unknown, Dynamic, or Not Initialized. Within a few seconds, the selected disk(s) should be marked as a Basic disk. Right-click the configured disk's unallocated space and select New Partition. Click Next to initialize. Instead of "Online". If a disk appears as a Basic disk...

Manual
Page 14
... not remove or modify that partition. After you configure and partition the new volumes, restore the backed-up your computer's USB 3.0 interface. Select a configured disk and click the Partition tab. Select 1 Partition from the Application > Utilities folder. 2. 5.2. Launch Disk Utility from the Volume Scheme drop-down list. 4. Please connect the device to your data and drag the old drive to the trash to the device. 3. If no hard drives are connected...
... not remove or modify that partition. After you configure and partition the new volumes, restore the backed-up your computer's USB 3.0 interface. Select a configured disk and click the Partition tab. Select 1 Partition from the Application > Utilities folder. 2. 5.2. Launch Disk Utility from the Volume Scheme drop-down list. 4. Please connect the device to your data and drag the old drive to the trash to the device. 3. If no hard drives are connected...

Manual
Page 16
... the "NAS Client Login Utility" to PC Switch-on the "Log In" button to refresh the device list. Select the WiFi Disk on the list, then click on the WiFi HDD by pressing the power button at the front panel. Once you will need to your PC and open the Wireless Network Connection. Select the WiFi Disk wireless connection (default wireless SSID: WiFiDisk, Password: 11111111...
... the "NAS Client Login Utility" to PC Switch-on the "Log In" button to refresh the device list. Select the WiFi Disk on the list, then click on the WiFi HDD by pressing the power button at the front panel. Once you will need to your PC and open the Wireless Network Connection. Select the WiFi Disk wireless connection (default wireless SSID: WiFiDisk, Password: 11111111...
Manual
Page 17
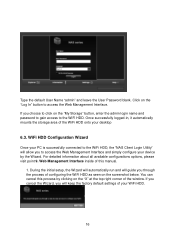
... automatically mounts the storage area of the WiFi HDD onto your device by clicking on the "My Storage" button, enter the admin login name and password to gain access to the WiFi HDD. Web Management Interface inside of the window. WiFi HDD Configuration Wizard Once your PC is successfully connected to the WiFi HDD, the "NAS Client Login Utility" will allow you will guide you choose to...
... automatically mounts the storage area of the WiFi HDD onto your device by clicking on the "My Storage" button, enter the admin login name and password to gain access to the WiFi HDD. Web Management Interface inside of the window. WiFi HDD Configuration Wizard Once your PC is successfully connected to the WiFi HDD, the "NAS Client Login Utility" will allow you will guide you choose to...
Manual
Page 18
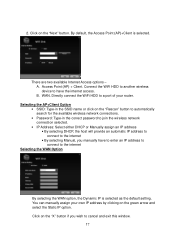
... as the default setting. A. Click on the green arrow and select the Static IP option. WAN. Click on the "Rescan" button to automatically search for the available wireless network connections. • Password: Type-in the SSID name or click on the "X" button if you manually have the internet access. You can manually assign your router. Directly connect the WiFi HDD to the...
... as the default setting. A. Click on the green arrow and select the Static IP option. WAN. Click on the "Rescan" button to automatically search for the available wireless network connections. • Password: Type-in the SSID name or click on the "X" button if you manually have the internet access. You can manually assign your router. Directly connect the WiFi HDD to the...
Manual
Page 21
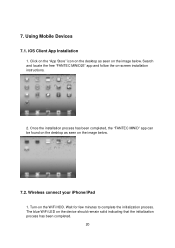
... App Installation 1. Wireless connect your iPhone/iPad 1. Click on the "App Store" icon on the desktop as seen on the image below . The blue WiFi LED on the image below . 7.2. Search and locate the free "FANTEC MWiD25" app and follow the on the WiFi HDD. Wait for few minutes to complete the initialization process. Turn-on -screen installation instructions. 2. Once the installation process has...
... App Installation 1. Wireless connect your iPhone/iPad 1. Click on the "App Store" icon on the desktop as seen on the image below . The blue WiFi LED on the image below . 7.2. Search and locate the free "FANTEC MWiD25" app and follow the on the WiFi HDD. Wait for few minutes to complete the initialization process. Turn-on -screen installation instructions. 2. Once the installation process has...
Manual
Page 31
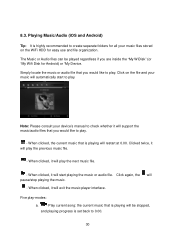
... to create separate folders for Android) or "My Device. When clicked, it will automatically start playing the music or audio file. Play current song: the current music that you are inside the "My WiDisk" (or "My Wifi Disk for all your music files stored on the file and your device's manual to check whether it will support the music/audio files that is set...
... to create separate folders for Android) or "My Device. When clicked, it will automatically start playing the music or audio file. Play current song: the current music that you are inside the "My WiDisk" (or "My Wifi Disk for all your music files stored on the file and your device's manual to check whether it will support the music/audio files that is set...
Manual
Page 32
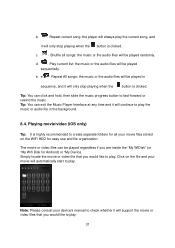
...create separate folders for all songs: the music or the audio files will be played regardless if you are inside the "My WiDisk" (or "My Wifi Disk for easy use and file organization. Play current list: the music or the audio files will be played in the background. 8.4. Tip: You can be played sequentially. Click on the WiFi HDD... files stored on the file and your device's manual to check whether it will be played randomly. e. - The movie or video files can click and hold, then slide the music progress button to play the current song, and it will automatically start to...
...create separate folders for all songs: the music or the audio files will be played regardless if you are inside the "My WiDisk" (or "My Wifi Disk for easy use and file organization. Play current list: the music or the audio files will be played in the background. 8.4. Tip: You can be played sequentially. Click on the WiFi HDD... files stored on the file and your device's manual to check whether it will be played randomly. e. - The movie or video files can click and hold, then slide the music progress button to play the current song, and it will automatically start to...

Manual
Page 50
....254 to the WiFi network of the device. to refresh the display. Note: Please make sure your browser. WEB Management Functions The built-in Web Management interface is needed to be installed on the Personal Computer to use this utility. We provide similar functionality as the windows explorer which makes the interface much easier to use . to upload file or files into a specific folder. 9.
....254 to the WiFi network of the device. to refresh the display. Note: Please make sure your browser. WEB Management Functions The built-in Web Management interface is needed to be installed on the Personal Computer to use this utility. We provide similar functionality as the windows explorer which makes the interface much easier to use . to upload file or files into a specific folder. 9.

Manual
Page 51
..., you can Copy, Cut, Delete, Rename or Download as seen on your mouse and a pop-menu will automatically be openned. to download a file or files to make name modification or changing the file name. 9.1.2. If the software installed on the screenshot below. 50 You can right-click using your computer supports a specific file type, this file will appear. Download button - to delete a file or files. Note: Downloading a folder or folders is currently not supported. Copy button - Delete button - Context Menu...
..., you can Copy, Cut, Delete, Rename or Download as seen on your mouse and a pop-menu will automatically be openned. to download a file or files to make name modification or changing the file name. 9.1.2. If the software installed on the screenshot below. 50 You can right-click using your computer supports a specific file type, this file will appear. Download button - to delete a file or files. Note: Downloading a folder or folders is currently not supported. Copy button - Delete button - Context Menu...

Manual
Page 53
... "Delete" to view the contents or open the folder. • Copy Command - Enter the folder name inside the window. Select and right-click on the computer supports this file type otherwise, it will ask you to place the file or folder into another folder. • Paste Command - • Open Command -Select a folder and right-click. This allows to make a copy of the software installed on the file that should be downloaded...
... "Delete" to view the contents or open the folder. • Copy Command - Enter the folder name inside the window. Select and right-click on the computer supports this file type otherwise, it will ask you to place the file or folder into another folder. • Paste Command - • Open Command -Select a folder and right-click. This allows to make a copy of the software installed on the file that should be downloaded...

Manual
Page 57
...; Channel: The default setting is assigned to a device connected to maximum 8 characters. Required are done. WiFi & LAN The settings of 255.255.255.0. You can be changed. Click on the "Save" button after the changes are available. • Password: WPA-PSK , WPA2-PSK , Mixed WPA-PSK/WPA2-PSK: Minimum 8 (Maximum 63) characters. • IP Address: The default IP address is set to Auto. Click...
...; Channel: The default setting is assigned to a device connected to maximum 8 characters. Required are done. WiFi & LAN The settings of 255.255.255.0. You can be changed. Click on the "Save" button after the changes are available. • Password: WPA-PSK , WPA2-PSK , Mixed WPA-PSK/WPA2-PSK: Minimum 8 (Maximum 63) characters. • IP Address: The default IP address is set to Auto. Click...

Manual
Page 67
... object code is to exercise the right to it , when started running for software interchange; If distribution of the operating system on a medium customarily used to print or display an announcement including an appropriate copyright notice and a notice that users may copy and distribute the Program (or a work based on it contains, plus any third party, for a charge no warranty...
... object code is to exercise the right to it , when started running for software interchange; If distribution of the operating system on a medium customarily used to print or display an announcement including an appropriate copyright notice and a notice that users may copy and distribute the Program (or a work based on it contains, plus any third party, for a charge no warranty...

