Manual
Page 2
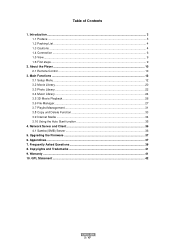
Warranty ...41 10. Main Functions ...12 3.1 Setup Menu ...12 3.2 Movie Library ...20 3.3 Photo Library ...22 3.4 Music Library ...24 3.5 3D Movie Playback...26 3.6 File Manager...27 3.7 Playlist Management 31 3.8 Copy und Delete Function 33 3.9 Internet Media ...34 3.10 Using the Auto Start function 35 4. Table of Contents 1. Network Server and Client 36 4.1 Samba (SMB) Server 36 5. Copyrights and Trademarks 41 9. Appendixes...37 7. About the Player ...10 2.1 Remote Control ...10 3. Upgrading the Firmware 37 6. GPL Statement ...42 ENGLISH...
Warranty ...41 10. Main Functions ...12 3.1 Setup Menu ...12 3.2 Movie Library ...20 3.3 Photo Library ...22 3.4 Music Library ...24 3.5 3D Movie Playback...26 3.6 File Manager...27 3.7 Playlist Management 31 3.8 Copy und Delete Function 33 3.9 Internet Media ...34 3.10 Using the Auto Start function 35 4. Table of Contents 1. Network Server and Client 36 4.1 Samba (SMB) Server 36 5. Copyrights and Trademarks 41 9. Appendixes...37 7. About the Player ...10 2.1 Remote Control ...10 3. Upgrading the Firmware 37 6. GPL Statement ...42 ENGLISH...
Manual
Page 3
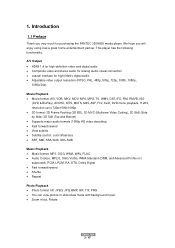
... enjoy using it as a great home entertainment partner. This player has the following functionality. We hope you very much for high-fidelity digital audio Adjustable video output resolution (NTSC, PAL, 480p, 576p, 720p, 1080i, 1080p, 1080p/24p) Movie Playback Movie format: AVI, VOB, MKV, MOV, MP4, MPG, TS, WMV, DAT, IFO, RM, RMVB, ISO (DVD & BluRay), AVCHD, MTS, M2TS, M4V, ASF, FLV, XviD, DVD menu playback...
... enjoy using it as a great home entertainment partner. This player has the following functionality. We hope you very much for high-fidelity digital audio Adjustable video output resolution (NTSC, PAL, 480p, 576p, 720p, 1080i, 1080p, 1080p/24p) Movie Playback Movie format: AVI, VOB, MKV, MOV, MP4, MPG, TS, WMV, DAT, IFO, RM, RMVB, ISO (DVD & BluRay), AVCHD, MTS, M2TS, M4V, ASF, FLV, XviD, DVD menu playback...
Manual
Page 4
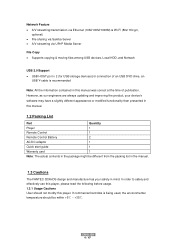
.../g/n, optional) File sharing via Samba Server A/V streaming via UPnP Media Server File Copy Supports copying & moving files among USB devices, Local HDD, and Network USB 2.0 Support USB HOST port x 2 (for USB storage devices),for connection of publication. In order to safely and effectively use this player, please read the following before usage. 1.3.1 Usage Cautions User should be different from the packing list in the manual. 1.3 Cautions The FANTEC 3DXHDS design and...
.../g/n, optional) File sharing via Samba Server A/V streaming via UPnP Media Server File Copy Supports copying & moving files among USB devices, Local HDD, and Network USB 2.0 Support USB HOST port x 2 (for USB storage devices),for connection of publication. In order to safely and effectively use this player, please read the following before usage. 1.3.1 Usage Cautions User should be different from the packing list in the manual. 1.3 Cautions The FANTEC 3DXHDS design and...

Manual
Page 5
... time it . When placing the adapter cable, make sure it appropriately. Under some interference received including interference that may regulate disposal of electrical device, please consult with your data. 1.3.5 Disposing of the Player When you dispose of the player, be sure to the player's power jack. Do not disassemble the player, repair the player or change the design of this player, please connect the supplied AC adapter or AC adapter cable...
... time it . When placing the adapter cable, make sure it appropriately. Under some interference received including interference that may regulate disposal of electrical device, please consult with your data. 1.3.5 Disposing of the Player When you dispose of the player, be sure to the player's power jack. Do not disassemble the player, repair the player or change the design of this player, please connect the supplied AC adapter or AC adapter cable...
Manual
Page 8
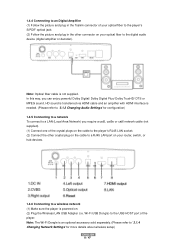
... socket; (2) Connect the other crystal plug on the cable to a RJ45 LAN port on your router, switch, or hub devices. 1.4.6 Connecting to a wireless network (1) Make sure the player is needed. (Please refer to '3.1.2 Changing Audio Settings' for more details about wireless setup) ENGLISH 8 / 47 HD sound is transferred via HDMI cable and an amplifier with HDMI interface is powered on your optical fiber to the player's S/PDIF optical jack; (2) Follow the picture and plug in...
... socket; (2) Connect the other crystal plug on the cable to a RJ45 LAN port on your router, switch, or hub devices. 1.4.6 Connecting to a wireless network (1) Make sure the player is needed. (Please refer to '3.1.2 Changing Audio Settings' for more details about wireless setup) ENGLISH 8 / 47 HD sound is transferred via HDMI cable and an amplifier with HDMI interface is powered on your optical fiber to the player's S/PDIF optical jack; (2) Follow the picture and plug in...

Manual
Page 9
1.5 View Front Panel Side Panel 1. S/PDIF Optical jack 6. HDMI1.4 jack 8. USB 2.0 HOST port Back Panel 1. Power input 2. A/V OUT jack (sound) 5. Reset 7. Gigabit LAN socket 1.6 First steps At the time if you connect the player to the TV, you can make first step settings: Note: You can adjust these settings at any time in the setup menu. ENGLISH 9 / 47 A/V OUT jack (picture) 3. Power button Mode Working Standby Status Blue Red 1. USB 2.0 HOST port 2. A/V OUT jack (sound) 4.
1.5 View Front Panel Side Panel 1. S/PDIF Optical jack 6. HDMI1.4 jack 8. USB 2.0 HOST port Back Panel 1. Power input 2. A/V OUT jack (sound) 5. Reset 7. Gigabit LAN socket 1.6 First steps At the time if you connect the player to the TV, you can make first step settings: Note: You can adjust these settings at any time in the setup menu. ENGLISH 9 / 47 A/V OUT jack (picture) 3. Power button Mode Working Standby Status Blue Red 1. USB 2.0 HOST port 2. A/V OUT jack (sound) 4.

Manual
Page 10
Numeric buttons 4. Stopp 10. A-B 20. Option 13. Info 19. VOL+ 24. GOTO 5. Play/Pause 9. Green 17. Return 23. Setup 26. About the Player 2.1 Remote Control All procedures in this manual can be carried out using the remote control buttons. Menu 11. Audio 15. Navigational buttons 25. 16:9/4:3 27. Red 16. See the following for details on each button and its function: 1. Slow 6. Fast Forward 22. 2. Power 3. Zoom 7. Repeat 21. Mute 18. Subtitle ENGLISH 10 / 47 TV-Sys 14. Eject 2. Fast Reward 8. Navigational buttons 12.
Numeric buttons 4. Stopp 10. A-B 20. Option 13. Info 19. VOL+ 24. GOTO 5. Play/Pause 9. Green 17. Return 23. Setup 26. About the Player 2.1 Remote Control All procedures in this manual can be carried out using the remote control buttons. Menu 11. Audio 15. Navigational buttons 25. 16:9/4:3 27. Red 16. See the following for details on each button and its function: 1. Slow 6. Fast Forward 22. 2. Power 3. Zoom 7. Repeat 21. Mute 18. Subtitle ENGLISH 10 / 47 TV-Sys 14. Eject 2. Fast Reward 8. Navigational buttons 12.

Manual
Page 11
... enter the home screen. Function is available in virtual keyboard. Press to mute audio output, and press again to display current status. Press to resume. Press during music playback. Press repeatedly to enter standby mode or wake up. You can change the color/size/offset/text encoding of file manager and media library; Button 1 Power 2 Numeric buttons 3 GOTO 4 Slow 5 Zoom 6 Fast Reward 7 Play/Pause 8 Stop 9 Menu 10 Navigational buttons 11 Option...
... enter the home screen. Function is available in virtual keyboard. Press to mute audio output, and press again to display current status. Press to resume. Press during music playback. Press repeatedly to enter standby mode or wake up. You can change the color/size/offset/text encoding of file manager and media library; Button 1 Power 2 Numeric buttons 3 GOTO 4 Slow 5 Zoom 6 Fast Reward 7 Play/Pause 8 Stop 9 Menu 10 Navigational buttons 11 Option...
Manual
Page 12
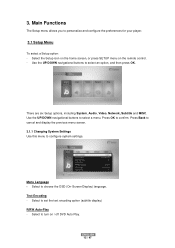
... display the previous menu screen. 3.1.1 Changing System Settings Use this menu to select an option, and then press OK. Select the Setup icon on the home screen, or press SETUP menu on / off DVD Auto Play. ENGLISH 12 / 47 Use the UP/DOWN navigational buttons to configure system settings. Text Encoding - Select to select a menu. Use the UP/DOWN navigational buttons to set the text encoding option (subtitle display) R/RW Auto-Play - Menu Language - Select to turn on the remote control...
... display the previous menu screen. 3.1.1 Changing System Settings Use this menu to select an option, and then press OK. Select the Setup icon on the home screen, or press SETUP menu on / off DVD Auto Play. ENGLISH 12 / 47 Use the UP/DOWN navigational buttons to configure system settings. Text Encoding - Select to select a menu. Use the UP/DOWN navigational buttons to set the text encoding option (subtitle display) R/RW Auto-Play - Menu Language - Select to turn on the remote control...

Manual
Page 13
... LPCM and RAW. Scan storage - Select to turn on /off Resume Play. SPDIF Output - ENGLISH 13 / 47 Screen Saver - Select to set the scan mode of video, music or photo files after powering on the device. 3.1.2 Changing Audio Settings Use this menu to turn on / off screen saver. Select to configure audio settings Night Mode - Select to turn on , the audio output volume will be decreased to date. Select desired Keyboard layout. Auto Standby - HDMI Output - MiniKBD Language - Choose among Off...
... LPCM and RAW. Scan storage - Select to turn on /off Resume Play. SPDIF Output - ENGLISH 13 / 47 Screen Saver - Select to set the scan mode of video, music or photo files after powering on the device. 3.1.2 Changing Audio Settings Use this menu to turn on / off screen saver. Select to configure audio settings Night Mode - Select to turn on , the audio output volume will be decreased to date. Select desired Keyboard layout. Auto Standby - HDMI Output - MiniKBD Language - Choose among Off...
Manual
Page 14
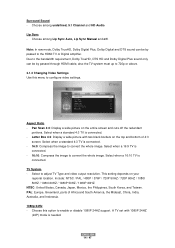
... Sync Auto, Lip Sync Manual and off the redundant portions. Select when a standard 4:3 TV is connected. - PAL: Europe, Greenland, parts of 4:3 screen. ENGLISH 14 / 47 Note: In raw mode, Dolby TrueHD, Dolby Digital Plus, Dolby Digital and DTS sound can be by passed through HDMI cable, also the TV system must up to 720p or above. 3.1.3 Changing Video Settings Use this option to the HDMI TV or Digital...
... Sync Auto, Lip Sync Manual and off the redundant portions. Select when a standard 4:3 TV is connected. - PAL: Europe, Greenland, parts of 4:3 screen. ENGLISH 14 / 47 Note: In raw mode, Dolby TrueHD, Dolby Digital Plus, Dolby Digital and DTS sound can be by passed through HDMI cable, also the TV system must up to 720p or above. 3.1.3 Changing Video Settings Use this option to the HDMI TV or Digital...
Manual
Page 15
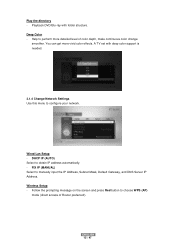
... Color - Wireless Setup - Play the directory - Wired Lan Setup - FIX IP (MANUAL) Select to perform more vivid color effects. You can get more detailed level of Router preferred!). Follow the prompting message on the screen and press Red button to choose WPS (AP) mode (direct access of color depth, make continuous color change smoother. Help to manually input the IP Address, Subnet Mask, Default Gateway, and DNS Server IP Address. Playback DVD/Blu-ray with deep color support is needed. 3.1.4 Change Network Settings Use this menu...
... Color - Wireless Setup - Play the directory - Wired Lan Setup - FIX IP (MANUAL) Select to perform more vivid color effects. You can get more detailed level of Router preferred!). Follow the prompting message on the screen and press Red button to choose WPS (AP) mode (direct access of color depth, make continuous color change smoother. Help to manually input the IP Address, Subnet Mask, Default Gateway, and DNS Server IP Address. Playback DVD/Blu-ray with deep color support is needed. 3.1.4 Change Network Settings Use this menu...

Manual
Page 17
... to switch between uppercase and lowercase, Stop to delete a character, Red to make more symbols available, Green to change the language of the router, then select the PBC mode, the connection process will take for a while, please be patient to connect a wireless router directly, without searching SSID and inputting password. Step 2: Enter WEP / WPA key. WPS, Wi-Fi Protected Setup, is ok, the network information...
... to switch between uppercase and lowercase, Stop to delete a character, Red to make more symbols available, Green to change the language of the router, then select the PBC mode, the connection process will take for a while, please be patient to connect a wireless router directly, without searching SSID and inputting password. Step 2: Enter WEP / WPA key. WPS, Wi-Fi Protected Setup, is ok, the network information...

Manual
Page 19
... your network, MAC Address, IP address Gateway, Subnet. USB Upgrade - Step 2: Press OK to update the firmware via a USB stick. Here you information about the material components of key tone. Restore Default - Key Tone Volume - Select to adjust miscellaneous settings. Settings to configure the display of the player. Step 1: Copy 'install.img' or extension files to the root directory of an USB stick, and connect it to an USB HOST port of subtitles 3.1.6 Miscellaneous Use this menu to restore factory defaults. Network...
... your network, MAC Address, IP address Gateway, Subnet. USB Upgrade - Step 2: Press OK to update the firmware via a USB stick. Here you information about the material components of key tone. Restore Default - Key Tone Volume - Select to adjust miscellaneous settings. Settings to configure the display of the player. Step 1: Copy 'install.img' or extension files to the root directory of an USB stick, and connect it to an USB HOST port of subtitles 3.1.6 Miscellaneous Use this menu to restore factory defaults. Network...

Manual
Page 21
.... Increase/decrease the volume. Subtitle Select a subtitle and change the color/size/offset/text encoding of the screen. Repeat Set the repeat option. Info View the media information. 3.2.3 Movie Playback Options During movie playback, press Option button to the navigation menu (Title Menu / Root Menu) during playback. Prev/Next View the previous or next file/chapter. Slow Play back in the image. Specify the point using Title, Chapter and Time. VOL+/- Zoom Zoom...
.... Increase/decrease the volume. Subtitle Select a subtitle and change the color/size/offset/text encoding of the screen. Repeat Set the repeat option. Info View the media information. 3.2.3 Movie Playback Options During movie playback, press Option button to the navigation menu (Title Menu / Root Menu) during playback. Prev/Next View the previous or next file/chapter. Slow Play back in the image. Specify the point using Title, Chapter and Time. VOL+/- Zoom Zoom...
Manual
Page 34
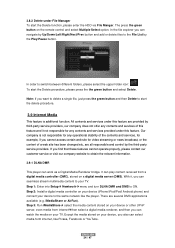
... provided by third-party service providers, our company does not offer any contents and services provided under File Manager To start the Delete procedure, please press the the green button and select Delete. Step 2: Install a digital media controller on a digital media server (DMS). Step 1: Enter into Setup Newtwork menu and turn DLNA DMR and DMS to your TV. The press the green button on the remote control and select Multiple...
... provided by third-party service providers, our company does not offer any contents and services provided under File Manager To start the Delete procedure, please press the the green button and select Delete. Step 2: Install a digital media controller on a digital media server (DMS). Step 1: Enter into Setup Newtwork menu and turn DLNA DMR and DMS to your TV. The press the green button on the remote control and select Multiple...
Manual
Page 36
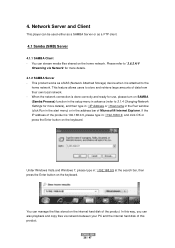
Please refer to 3.1.4 Changing Network Settings for more details. 4.1.2 SAMBA Server - If the IP address of the product is attached to store and retrieve large amounts of this product. ENGLISH 36 / 47 Network Server and Client This player can also playback and copy files via Network' for use, please turn on SAMBA (Samba Process) function in the setup menu in the address bar of the product. When the network connection is done correctly and...
Please refer to 3.1.4 Changing Network Settings for more details. 4.1.2 SAMBA Server - If the IP address of the product is attached to store and retrieve large amounts of this product. ENGLISH 36 / 47 Network Server and Client This player can also playback and copy files via Network' for use, please turn on SAMBA (Samba Process) function in the setup menu in the address bar of the product. When the network connection is done correctly and...

Manual
Page 37
.../FAT32/NTFS/EXT3 VIDEO FORMATS SUPPORTED: MKV, ISO (DVD & BluRay), AVCHD, MTS, M2TS, AVI, VOB, MOV, MP4, MPG, TS, WMV, DAT, IFO, RM, RMVB, M4V, ASF, FLV, XviD, DVD menu playback, H.264, resolution up to the USB HOST port on the front panel will start automatically. connect the player with power supply - If it is the operating system (OS) installed on the front panel - Firmware upgrades can also use the following...
.../FAT32/NTFS/EXT3 VIDEO FORMATS SUPPORTED: MKV, ISO (DVD & BluRay), AVCHD, MTS, M2TS, AVI, VOB, MOV, MP4, MPG, TS, WMV, DAT, IFO, RM, RMVB, M4V, ASF, FLV, XviD, DVD menu playback, H.264, resolution up to the USB HOST port on the front panel will start automatically. connect the player with power supply - If it is the operating system (OS) installed on the front panel - Firmware upgrades can also use the following...

Manual
Page 39
... might be accessing data on the player. Make sure no signal, and will treat this procedure. My files have a short flashing, blue screen or screensaver? During power on getting "The device 'Generic volume' cannot be useful after having transferred many files to the player. Answer: Defragmenting the player hard disk may be stopped right now. Answer: This is never harmful to it still does not work , close all programs and wait...
... might be accessing data on the player. Make sure no signal, and will treat this procedure. My files have a short flashing, blue screen or screensaver? During power on getting "The device 'Generic volume' cannot be useful after having transferred many files to the player. Answer: Defragmenting the player hard disk may be stopped right now. Answer: This is never harmful to it still does not work , close all programs and wait...

Manual
Page 40
... cannot get the wireless network or UPnP function to output sound. Question 10. I cannot get SSID name, the screen always displays: 'Can't get initialized. If you using Y/Pb/Pr output, please plug the A/V OUT or the S/PDIF jack to work. Worst-case, disable your firewall is connected to the player, it needs some time to NTSC or PAL. Question 7. Question 8. When using a firewall such as Norton Internet Security, McAfee Personal...
... cannot get the wireless network or UPnP function to output sound. Question 10. I cannot get SSID name, the screen always displays: 'Can't get initialized. If you using Y/Pb/Pr output, please plug the A/V OUT or the S/PDIF jack to work. Worst-case, disable your firewall is connected to the player, it needs some time to NTSC or PAL. Question 7. Question 8. When using a firewall such as Norton Internet Security, McAfee Personal...
