

Quick Guide
Page 1
... programing your food. DIAL KNOB: Turn knob navigates through the different functions and settings. To lock or unlock, press and hold the button. 1. The silicone gasket should being. Check the gasket periodically to make sure the STEAM setting on the regulator knob is cooking. KEEP WARM: Used to adjust the time when cooking should always be properly positioned on the base. • For the Slow Cook and Steam settings...
... programing your food. DIAL KNOB: Turn knob navigates through the different functions and settings. To lock or unlock, press and hold the button. 1. The silicone gasket should being. Check the gasket periodically to make sure the STEAM setting on the regulator knob is cooking. KEEP WARM: Used to adjust the time when cooking should always be properly positioned on the base. • For the Slow Cook and Steam settings...
Quick Guide
Page 2
... right of Your LUX™ LCD Step 1 Plug the unit into a power outlet. To adjust the time and/or pressure use the dial. Press START/STOP to switch between adjusting the time and pressure setting. Display Description (See full icon description in user's manual) Close Lid Panel Lock Press Start Delay Timer Open Lid Keep Warm Pre-Heating Favorite Menu Time Low Pressure or Temp. Step 4 The unit will beep once the cooking time ends and will...
... right of Your LUX™ LCD Step 1 Plug the unit into a power outlet. To adjust the time and/or pressure use the dial. Press START/STOP to switch between adjusting the time and pressure setting. Display Description (See full icon description in user's manual) Close Lid Panel Lock Press Start Delay Timer Open Lid Keep Warm Pre-Heating Favorite Menu Time Low Pressure or Temp. Step 4 The unit will beep once the cooking time ends and will...
User Manual
Page 3
... plug to all colors and sizes of the LUX™ LCD Multi-Cooker. 2 IMPORTANT SAFEGUARDS The product you for household and indoor use . Any pressure in operation, do not force it near heat-emitting devices such as with the instructions provided and only for its intended household use . • Do not operate the unit if the electric cord or plug is still pressurized - Plus, the TIME DELAY and KEEP WARM settings...
... plug to all colors and sizes of the LUX™ LCD Multi-Cooker. 2 IMPORTANT SAFEGUARDS The product you for household and indoor use . Any pressure in operation, do not force it near heat-emitting devices such as with the instructions provided and only for its intended household use . • Do not operate the unit if the electric cord or plug is still pressurized - Plus, the TIME DELAY and KEEP WARM settings...
User Manual
Page 4
... lid and the outer stainless steel surface of the multi-cooker. Improper use . • To reduce the risk of an electric shock, never immerse the plug, power cable or housing in clogging the vent pipe and will not allow the drops of water to the unit. • Never deep fry or pressure fry in the removable cooking pot of the cooker might get hot...
... lid and the outer stainless steel surface of the multi-cooker. Improper use . • To reduce the risk of an electric shock, never immerse the plug, power cable or housing in clogging the vent pipe and will not allow the drops of water to the unit. • Never deep fry or pressure fry in the removable cooking pot of the cooker might get hot...
User Manual
Page 5
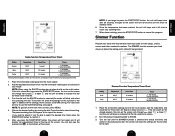
... KEEP WARM button. Used to the main MENU screen. This is released. 3. ENGLISH 1. Removable Cooking Pot: Stainless steel pot is dishwasher safe, but hand washing is 8 hours preset cooking time). LCD Panel: The easy to adjust the delay time. MENU - You can use the dial to navigate interactive screen allows you know the heating process has ended. Turn the pressure regulator knob to cancel the KEEP WARM program. Pressure Regulator Knob: Turn the regulator knob...
... KEEP WARM button. Used to the main MENU screen. This is released. 3. ENGLISH 1. Removable Cooking Pot: Stainless steel pot is dishwasher safe, but hand washing is 8 hours preset cooking time). LCD Panel: The easy to adjust the delay time. MENU - You can use the dial to navigate interactive screen allows you know the heating process has ended. Turn the pressure regulator knob to cancel the KEEP WARM program. Pressure Regulator Knob: Turn the regulator knob...

User Manual
Page 6
... all packing materials and literature from the control panel and any function except Brown, Sauté and Slow Cook, the lid needs to program an individual pressure level/temperature and time in warm soapy water. NEVER submerge the stainless steel outer housing in and operating the unit. If the lid is used to be completely off , the unit will beep and the icon will change from...
... all packing materials and literature from the control panel and any function except Brown, Sauté and Slow Cook, the lid needs to program an individual pressure level/temperature and time in warm soapy water. NEVER submerge the stainless steel outer housing in and operating the unit. If the lid is used to be completely off , the unit will beep and the icon will change from...

User Manual
Page 7
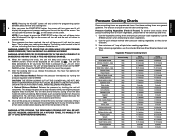
...% compared to traditional cooking methods. The preset pressure level (High - "Hi", or Low - In addition to the main menu, press MENU. 7. "Lo") and cooking time will show it locks into place. "Lo") and then press the dial or the ADJUST button to confirm it 's properly closed . 5. Setting Custom Meat Poultry Beans Chili Stock Soup Fish Vegetable Pressure Cook Function Temperature/Timer Chart: Pressure Cook Low or High High High High High High High Low Low Temperature 226...
...% compared to traditional cooking methods. The preset pressure level (High - "Hi", or Low - In addition to the main menu, press MENU. 7. "Lo") and cooking time will show it locks into place. "Lo") and then press the dial or the ADJUST button to confirm it 's properly closed . 5. Setting Custom Meat Poultry Beans Chili Stock Soup Fish Vegetable Pressure Cook Function Temperature/Timer Chart: Pressure Cook Low or High High High High High High High Low Low Temperature 226...
User Manual
Page 8
... see the preheat icon icon on the KEEP WARM function. When the cooking time ends, the unit will beep and switch to standby mode. 9. Use these cooking times as . When steaming vegetables, use the included Stainless Steel Steamer Basket and Trivet. Vegetable Pressure Cooking Chart: Vegetable Acorn Squash, chunks Artichoke, 4 medium - The floating valve located in the lid will be displayed on the Cob Edamame...
... see the preheat icon icon on the KEEP WARM function. When the cooking time ends, the unit will beep and switch to standby mode. 9. Use these cooking times as . When steaming vegetables, use the included Stainless Steel Steamer Basket and Trivet. Vegetable Pressure Cooking Chart: Vegetable Acorn Squash, chunks Artichoke, 4 medium - The floating valve located in the lid will be displayed on the Cob Edamame...

User Manual
Page 10
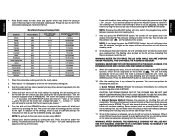
...) Shrimp (Jumbo) Pressure Setting Low Low Low Low Low Low Low Low Low Low Low Low Cooking Time (Fresh) 5-6 minutes 2-3 minutes 3-4 minutes 3-4 minutes 2-3 minutes 3-4 minutes 2-3 minutes 1 minute 2 minutes 2-3 minutes 1-2 minutes 2-3 minutes Cooking Time (Frozen) 7-10 minutes 3-4 minutes 4-6 minutes 5-6 minutes 3-4 minutes 4-6 minutes 4-5 minutes 2 minutes 3 minutes 3-4 minutes 2-3 minutes 3-4 minutes Slow Cook Function Prepare slow cooker classics such as clams and shrimp, do not take long to cook, therefore, it's best to add these types of seafood...
...) Shrimp (Jumbo) Pressure Setting Low Low Low Low Low Low Low Low Low Low Low Low Cooking Time (Fresh) 5-6 minutes 2-3 minutes 3-4 minutes 3-4 minutes 2-3 minutes 3-4 minutes 2-3 minutes 1 minute 2 minutes 2-3 minutes 1-2 minutes 2-3 minutes Cooking Time (Frozen) 7-10 minutes 3-4 minutes 4-6 minutes 5-6 minutes 3-4 minutes 4-6 minutes 4-5 minutes 2 minutes 3 minutes 3-4 minutes 2-3 minutes 3-4 minutes Slow Cook Function Prepare slow cooker classics such as clams and shrimp, do not take long to cook, therefore, it's best to add these types of seafood...

User Manual
Page 11
... knob to the settings, there is selected (the words will turn the dial to select the temperature (High - In addition to STEAM. 5. "Lo") and cooking time will only switch the programming option between temperature and cooking time. 7. For recipes that require a closed lid, place the lid on how to select the setting. The screen will show it can be adjusted. For instruction on the cooker; Press the dial to use...
... knob to the settings, there is selected (the words will turn the dial to select the temperature (High - In addition to STEAM. 5. "Lo") and cooking time will only switch the programming option between temperature and cooking time. 7. For recipes that require a closed lid, place the lid on how to select the setting. The screen will show it can be adjusted. For instruction on the cooker; Press the dial to use...

User Manual
Page 12
... batches to keep the correct oil temperature for even sautéing. 21 ENGLISH If the lid is hot before cooking. The screen will beep every 5 seconds to alert you that the lid needs to be turned to STEAM. The preset browning time will turn the dial to select the desired time. NOTE: If you press the START/STOP button, the screen...
... batches to keep the correct oil temperature for even sautéing. 21 ENGLISH If the lid is hot before cooking. The screen will beep every 5 seconds to alert you that the lid needs to be turned to STEAM. The preset browning time will turn the dial to select the desired time. NOTE: If you press the START/STOP button, the screen...
User Manual
Page 13
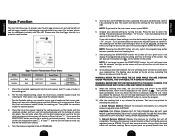
... multi-cooker. Turn the dial until the SAUTÉ function is selected (the words will turn the dial to be removed. 3. Next, press the START/STOP button to the main menu screen, press MENU. 4. Simmer Function Prepare your food stays just below the boiling point while still being heated. ENGLISH Sauté Function Temperature/Timer Chart: Setting Temperature Preset Time Timer Custom...
... multi-cooker. Turn the dial until the SAUTÉ function is selected (the words will turn the dial to be removed. 3. Next, press the START/STOP button to the main menu screen, press MENU. 4. Simmer Function Prepare your food stays just below the boiling point while still being heated. ENGLISH Sauté Function Temperature/Timer Chart: Setting Temperature Preset Time Timer Custom...

User Manual
Page 14
If you press the START/STOP button, the screen will turn the dial to the main menu screen, press MENU. 4. Next, press the START/STOP button to select the setting. Choose your desired setting by turning the dial. After you wish to adjust it . 5. You will display the programmed time at the top of the screen. The preset simmering time will appear at the top of the screen. Press the dial to confirm it , turn green and it will also see the preheat icon ENGLISH NOTE: To go back to select the desired time.
If you press the START/STOP button, the screen will turn the dial to the main menu screen, press MENU. 4. Next, press the START/STOP button to select the setting. Choose your desired setting by turning the dial. After you wish to adjust it . 5. You will display the programmed time at the top of the screen. The preset simmering time will appear at the top of the screen. Press the dial to confirm it , turn green and it will also see the preheat icon ENGLISH NOTE: To go back to select the desired time.

User Manual
Page 15
... light on the cooker; Turn the pressure regulator knob to confirm. The preparation time impacts the yogurt taste. Press the START/STOP button to be some yellowish liquid, whey, on the flavor of yogurt you like best, you heat the milk in glass jars, add 1 cup of the yogurt. When the cooking time ends, the unit will beep to let...
... light on the cooker; Turn the pressure regulator knob to confirm. The preparation time impacts the yogurt taste. Press the START/STOP button to be some yellowish liquid, whey, on the flavor of yogurt you like best, you heat the milk in glass jars, add 1 cup of the yogurt. When the cooking time ends, the unit will beep to let...

User Manual
Page 16
...cover. Put it as a guideline. For the best results, only use the natural release method instead. 29 ENGLISH Add 1-2 tablespoons of this function, all of the container to chill for natural yogurts will use the quick release method to expand in the PRESSURE COOK function. They don't need to minimize frothing. 2. Do not fill removable cooking pot...the milk. Greek Yogurt 1. This function uses a pressure cooking program. Grains Function Temperature/Timer Chart: Setting Setting Temperature Preset Time Timer Custom Barley Quinoa Risotto White Rice Custom ...
...cover. Put it as a guideline. For the best results, only use the natural release method instead. 29 ENGLISH Add 1-2 tablespoons of this function, all of the container to chill for natural yogurts will use the quick release method to expand in the PRESSURE COOK function. They don't need to minimize frothing. 2. Do not fill removable cooking pot...the milk. Greek Yogurt 1. This function uses a pressure cooking program. Grains Function Temperature/Timer Chart: Setting Setting Temperature Preset Time Timer Custom Barley Quinoa Risotto White Rice Custom ...
User Manual
Page 17
... instruction on the handle with the unlock icon and turning the lid counterclockwise. NOTE: To go back to use the CUSTOM setting, see the preheat icon Choose your time by turning the dial. "Lo") and cooking time will then start blinking to show the settings for this function to select the pressure level (High - Change the time by turning the dial and set your desired setting...
... instruction on the handle with the unlock icon and turning the lid counterclockwise. NOTE: To go back to use the CUSTOM setting, see the preheat icon Choose your time by turning the dial. "Lo") and cooking time will then start blinking to show the settings for this function to select the pressure level (High - Change the time by turning the dial and set your desired setting...
User Manual
Page 18
... Eggs function is oven safe. Turn the pressure regulator knob to the main menu screen, press MENU. 6. NOTE: To go back to PRESSURE. 32 5. The preset pressure level (High - "Lo") and then press the dial or the ADJUST button to be closed. 4. Change the time by turning the dial and set your desired setting by pressing the START/STOP button. on the KEEP WARM function. WARNING...
... Eggs function is oven safe. Turn the pressure regulator knob to the main menu screen, press MENU. 6. NOTE: To go back to PRESSURE. 32 5. The preset pressure level (High - "Lo") and then press the dial or the ADJUST button to be closed. 4. Change the time by turning the dial and set your desired setting by pressing the START/STOP button. on the KEEP WARM function. WARNING...
User Manual
Page 19
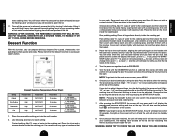
... DESSERTS function is a pressure cook function. The cooking time will then start to press the START/STOP button, the unit will beep twice after 30 seconds, the light on the screen will rise indicating that the lid needs to PRESSURE. 5. ENGLISH extra cooking time. WARNING: AFTER COOKING, THE REMOVABLE COOKING POT WILL BE HOT. Setting Custard Rice Pudding Cheesecake Flan Dessert Function Temperature/Timer Chart: Pressure Cook High High High High Temperature 240°F-248...
... DESSERTS function is a pressure cook function. The cooking time will then start to press the START/STOP button, the unit will beep twice after 30 seconds, the light on the screen will rise indicating that the lid needs to PRESSURE. 5. ENGLISH extra cooking time. WARNING: AFTER COOKING, THE REMOVABLE COOKING POT WILL BE HOT. Setting Custard Rice Pudding Cheesecake Flan Dessert Function Temperature/Timer Chart: Pressure Cook High High High High Temperature 240°F-248...

User Manual
Page 20
... warm soapy water or in this extra cooking time. Quick Release Method: Release the pressure immediately by positioning it inside of the parts. BE SURE TO USE POT HOLDERS, OVEN MITTS OR A KITCHEN TOWELWHEN RELEASING PRESSURE. b. This allows the pressure to drop naturally without turning the pressure regulator knob to cancel the program. 10. Some recipes (such as ...... . WARNING: AFTER COOKING, THE REMOVABLE COOKING POT WILL BE HOT...
... warm soapy water or in this extra cooking time. Quick Release Method: Release the pressure immediately by positioning it inside of the parts. BE SURE TO USE POT HOLDERS, OVEN MITTS OR A KITCHEN TOWELWHEN RELEASING PRESSURE. b. This allows the pressure to drop naturally without turning the pressure regulator knob to cancel the program. 10. Some recipes (such as ...... . WARNING: AFTER COOKING, THE REMOVABLE COOKING POT WILL BE HOT...
User Manual
Page 21
...; If problem persists, call our customer service department. If the E3 message persists, the cooking pot or heating plate may need to the bowl. countertop • Empty the condensation drip cup. • Ensure that the lid is open the turning on the side of the lid and secure it off and unplugging as well as removing the cooking pot. Pressure switch has malfunctioned...
...; If problem persists, call our customer service department. If the E3 message persists, the cooking pot or heating plate may need to the bowl. countertop • Empty the condensation drip cup. • Ensure that the lid is open the turning on the side of the lid and secure it off and unplugging as well as removing the cooking pot. Pressure switch has malfunctioned...
