
Owner's Guide
Page 3
... not measure dirt removal, only the amount of electricity used by or near children. • � Use only as a handle, close door on some models) SAVE THESE INSTRUCTIONS To reduce the risk of electrical shock, this manual. Turn off all parts of dust, lint, hair, and anything that may be followed, including the following: READ ALL INSTRUCTIONS BEFORE USING THIS VACUUM CLEANER. Keep cord away from openings and moving parts. •...
... not measure dirt removal, only the amount of electricity used by or near children. • � Use only as a handle, close door on some models) SAVE THESE INSTRUCTIONS To reduce the risk of electrical shock, this manual. Turn off all parts of dust, lint, hair, and anything that may be followed, including the following: READ ALL INSTRUCTIONS BEFORE USING THIS VACUUM CLEANER. Keep cord away from openings and moving parts. •...
Owner's Guide
Page 6
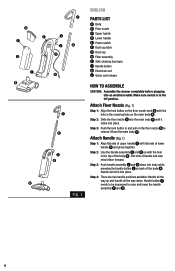
... A . Handle button J needs to be depressed to remove it clicks into the main body A until it from the main body A . Step 2: Slide the floor nozzle B into place. Attach Handle (Fig. 1) Step 1: Align flat side of upper handle C with the hole in the receiving tube on back of the body A . Step 3: Push handle assembly C and D down . H F G I B B C E L J D A K ENGLISH PARTS LIST A Body B Floor nozzle C Upper handle D Lower handle E Power switch F Dust cup latch G Dust cup H Filter assembly I Stair cleaning hand grip J Handle button K Electrical cord L Quick cord release...
... A . Handle button J needs to be depressed to remove it clicks into the main body A until it from the main body A . Step 2: Slide the floor nozzle B into place. Attach Handle (Fig. 1) Step 1: Align flat side of upper handle C with the hole in the receiving tube on back of the body A . Step 3: Push handle assembly C and D down . H F G I B B C E L J D A K ENGLISH PARTS LIST A Body B Floor nozzle C Upper handle D Lower handle E Power switch F Dust cup latch G Dust cup H Filter assembly I Stair cleaning hand grip J Handle button K Electrical cord L Quick cord release...

Owner's Guide
Page 8
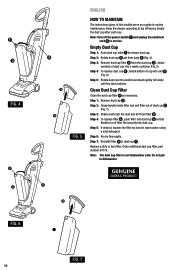
... before plugging into electrical outlet. To Clean Bare Floors and Rugs (Fig. 2) Note: Experiment with your hard floor surface, sometimes it is best to clean bare floors. The handle will lock in place. The "Floors" setting is suction only and the "Carpet" setting is suction and brushroll. The "Off" setting turns the cleaner off. I while J cleaning stairs. E E ENGLISH HOW TO USE CAUTION: Moving parts, make sure power switch E is in the "carpet" position). J Power Switch...
... before plugging into electrical outlet. To Clean Bare Floors and Rugs (Fig. 2) Note: Experiment with your hard floor surface, sometimes it is best to clean bare floors. The handle will lock in place. The "Floors" setting is suction only and the "Carpet" setting is suction and brushroll. The "Off" setting turns the cleaner off. I while J cleaning stairs. E E ENGLISH HOW TO USE CAUTION: Moving parts, make sure power switch E is in the "carpet" position). J Power Switch...
Owner's Guide
Page 10
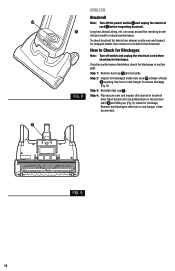
... booklet serve as necessary. Step 3: Remove dust cup filter H from body A (Fig. 4). Empty Dust Cup Step 1: Push dust cup latch F to routine maintenance. Step 3: Shake and brush the dust and dirt from filter H . FIG. 5 Replace a dirty or torn filter. Do not put in dust cup G . Empty the dust cup after each use. FIG. 5 Step 5: If desired, launder the filter by hand in warm water using a mild detergent. Note: Turn off the power switch E and unplug the electrical cord K to service.
... booklet serve as necessary. Step 3: Remove dust cup filter H from body A (Fig. 4). Empty Dust Cup Step 1: Push dust cup latch F to routine maintenance. Step 3: Shake and brush the dust and dirt from filter H . FIG. 5 Replace a dirty or torn filter. Do not put in dust cup G . Empty the dust cup after each use. FIG. 5 Step 5: If desired, launder the filter by hand in warm water using a mild detergent. Note: Turn off the power switch E and unplug the electrical cord K to service.
Owner's Guide
Page 12
... brush- To check brushroll for debris turn cleaner nozzle over and inspect dirt channel in suction path. Step 1: Remove dust cup G and set aside. If suction performance diminishes, check for blockages in brushroll area. roll and result in reduced performance. How to Check for Blockages Note: Turn off the power switch E and unplug the electrical cord K before checking for blockages. N PUSH TO OPEN FIG. 9 12 ENGLISH Brushroll M Note: Turn off switch and unplug the electrical cord...
... brush- To check brushroll for debris turn cleaner nozzle over and inspect dirt channel in suction path. Step 1: Remove dust cup G and set aside. If suction performance diminishes, check for blockages in brushroll area. roll and result in reduced performance. How to Check for Blockages Note: Turn off the power switch E and unplug the electrical cord K before checking for blockages. N PUSH TO OPEN FIG. 9 12 ENGLISH Brushroll M Note: Turn off switch and unplug the electrical cord...

Owner's Guide
Page 17
... the cleaner that require replacement under normal use, such as disposable dust bags, filters, drive belts, light bulbs, brushroll bristles, impellers and cleaning. • � Damages or malfunctions caused by negligence, abuse, or use not in accordance with the Owner's Guide. • � Defects or damages caused by unauthorized service or the use of this saves you must pay the shipping charges to the Eureka Authorized Warranty...
... the cleaner that require replacement under normal use, such as disposable dust bags, filters, drive belts, light bulbs, brushroll bristles, impellers and cleaning. • � Damages or malfunctions caused by negligence, abuse, or use not in accordance with the Owner's Guide. • � Defects or damages caused by unauthorized service or the use of this saves you must pay the shipping charges to the Eureka Authorized Warranty...


