Owner's Guide
Page 2
...service is tested and thoroughly inspected before shipping. This Owner's Guide provides important instructions to prolong the life of the vacuum cleaner. For instructions regarding any shipping damage, call Eureka Customer Service HELPLINE 1-800-282-2886 immediately. How to replace type S belt 5 How to use . Each unit ...owner's guide 14-20 Order forms and parts list 21-22 ! Registration: To register your product visit www.eureka.com and click on the middle back side of your vacuum cleaner Refer to these numbers on a label on the 'Register Your Product' link in the top right ...
...service is tested and thoroughly inspected before shipping. This Owner's Guide provides important instructions to prolong the life of the vacuum cleaner. For instructions regarding any shipping damage, call Eureka Customer Service HELPLINE 1-800-282-2886 immediately. How to replace type S belt 5 How to use . Each unit ...owner's guide 14-20 Order forms and parts list 21-22 ! Registration: To register your product visit www.eureka.com and click on the middle back side of your vacuum cleaner Refer to these numbers on a label on the 'Register Your Product' link in the top right ...
Owner's Guide
Page 3
...shock, this manual. SAVE THESE INSTRUCTIONS To reduce the risk of dust, lint, hair, and anything that may reduce airflow. • This vacuum cleaner creates suction and contains a revolving brush roll. ENGLISH IMPORTANT SAFEGUARDS When using an electrical appliance, basic precautions should , has been dropped,...time. If it still does not fit, contact a qualified electrician to whip when rewinding. • Do not handle plug or vacuum cleaner with the handle in this appliance has a polarized plug (one way. Eureka Customer Service HELPLINE 1-800-282-2886 www.eureka.com 1
...shock, this manual. SAVE THESE INSTRUCTIONS To reduce the risk of dust, lint, hair, and anything that may reduce airflow. • This vacuum cleaner creates suction and contains a revolving brush roll. ENGLISH IMPORTANT SAFEGUARDS When using an electrical appliance, basic precautions should , has been dropped,...time. If it still does not fit, contact a qualified electrician to whip when rewinding. • Do not handle plug or vacuum cleaner with the handle in this appliance has a polarized plug (one way. Eureka Customer Service HELPLINE 1-800-282-2886 www.eureka.com 1
Owner's Guide
Page 4
...bottom lid. Press lever to lock. Power switch is also located on back side of dust cup. ! allow to prevent air restriction. Remove vacuum cover for belt change instructions Lift out filter tube and screen. Reinstall cup filter. Close cover. BRUSH ROLL - Clean monthly TYPE S BELT ...filter DCF25 Clean as needed to release dust cup cover. dry thoroughly. Filter assembly Exhaust/HEPA filter EF6 Type S belt Brush roll 2 Eureka Customer Service HELPLINE 1-800-282-2886 Lift out filter and replace. Rinse; Moving parts! Pull filter latch to maintain suction Washable Washable ...
...bottom lid. Press lever to lock. Power switch is also located on back side of dust cup. ! allow to prevent air restriction. Remove vacuum cover for belt change instructions Lift out filter tube and screen. Reinstall cup filter. Close cover. BRUSH ROLL - Clean monthly TYPE S BELT ...filter DCF25 Clean as needed to release dust cup cover. dry thoroughly. Filter assembly Exhaust/HEPA filter EF6 Type S belt Brush roll 2 Eureka Customer Service HELPLINE 1-800-282-2886 Lift out filter and replace. Rinse; Moving parts! Pull filter latch to maintain suction Washable Washable ...
Owner's Guide
Page 5
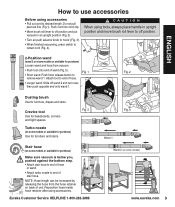
... an upright position (Fig. 2). • Turn air path selector knob to 'tools' (Fig. 3). • When finished vacuuming, press switch to retract cord (Fig. 4). Make sure vacuum is below you, pushed against the bottom step. • Attach stair hose to end of hose or wand. • Attach ... hose retainer on some models or available for furniture and stairs. NOTE: Hose length can be increased by releasing the hose from vacuum. • Push tool onto end of stair hose. Fig. 5 Eureka Customer Service HELPLINE 1-800-282-2886 WAND 1 WAND 1 WAND 2 Fig. 2 FLOORS Fig. 4 Wand 1 Wand 2 (on...
... an upright position (Fig. 2). • Turn air path selector knob to 'tools' (Fig. 3). • When finished vacuuming, press switch to retract cord (Fig. 4). Make sure vacuum is below you, pushed against the bottom step. • Attach stair hose to end of hose or wand. • Attach ... hose retainer on some models or available for furniture and stairs. NOTE: Hose length can be increased by releasing the hose from vacuum. • Push tool onto end of stair hose. Fig. 5 Eureka Customer Service HELPLINE 1-800-282-2886 WAND 1 WAND 1 WAND 2 Fig. 2 FLOORS Fig. 4 Wand 1 Wand 2 (on...
Owner's Guide
Page 6
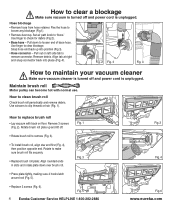
Use finger to 'floors.' Maintain brush roll Motor pulley can become hot with back on left side tab to replace brush roll • Lay vacuum with normal use. Rotate brush roll plate up into place (Fig. 4). Set air path knob to check for debris (Fig 2). • Base ...(Fig. 3). • To install brush roll, align star end first (Fig. 4), then position opposite end. Fig. 5 4 Eureka Customer Service HELPLINE 1-800-282-2886 Fig. 2 Fig. 4 Fig. 6 www.eureka.com ! Flex the hose to clear blockage. Fig. 1 • Rotate brush roll to loosen end of base hose. Snap hose...
Use finger to 'floors.' Maintain brush roll Motor pulley can become hot with back on left side tab to replace brush roll • Lay vacuum with normal use. Rotate brush roll plate up into place (Fig. 4). Set air path knob to check for debris (Fig 2). • Base ...(Fig. 3). • To install brush roll, align star end first (Fig. 4), then position opposite end. Fig. 5 4 Eureka Customer Service HELPLINE 1-800-282-2886 Fig. 2 Fig. 4 Fig. 6 www.eureka.com ! Flex the hose to clear blockage. Fig. 1 • Rotate brush roll to loosen end of base hose. Snap hose...
Owner's Guide
Page 7
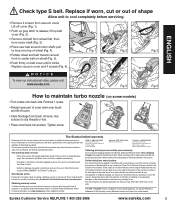
... for a term of three years for normal household use of the vacuum, including any warranty of this warranty. What Eureka will do Eureka will, at its option, repair or replace a defective vacuum or vacuum part that require replacement under license. When returning parts for Fitness For...number located on the rating plate on belt cover until it clicks. Replace vacuum cover and 4 screws (Fig. 6). Use scissors to the Eureka Authorized Warranty Station. The Eureka limited warranty Eureka warrants this vacuum cleaner to be implied in connection with your purchase or use of this...
... for a term of three years for normal household use of the vacuum, including any warranty of this warranty. What Eureka will do Eureka will, at its option, repair or replace a defective vacuum or vacuum part that require replacement under license. When returning parts for Fitness For...number located on the rating plate on belt cover until it clicks. Replace vacuum cover and 4 screws (Fig. 6). Use scissors to the Eureka Authorized Warranty Station. The Eureka limited warranty Eureka warrants this vacuum cleaner to be implied in connection with your purchase or use of this...
Owner's Guide
Page 8
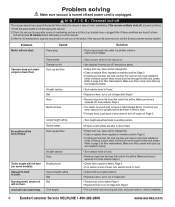
...that restrict the airflow. Problem solving ! Make sure vacuum is turned off This vacuum cleaner has a special thermostat that restrict the airflow. If the vacuum still does not work, call the Eureka customer service helpline. Rotating brush Vacuum height setting Belt Belt Cord tangles • Step .... Page 5 • Remove clogs from the hose that protects the vacuum in and turn selector knob to 'tools.' • Adjust knob to rewind completely. 6 Eureka Customer Service HELPLINE 1-800-282-2886 www.eureka.com Make sure hose is unplugged. Page 3 • Turn height ...
...that restrict the airflow. Problem solving ! Make sure vacuum is turned off This vacuum cleaner has a special thermostat that restrict the airflow. If the vacuum still does not work, call the Eureka customer service helpline. Rotating brush Vacuum height setting Belt Belt Cord tangles • Step .... Page 5 • Remove clogs from the hose that protects the vacuum in and turn selector knob to 'tools.' • Adjust knob to rewind completely. 6 Eureka Customer Service HELPLINE 1-800-282-2886 www.eureka.com Make sure hose is unplugged. Page 3 • Turn height ...
Quick Start Guide
Page 1
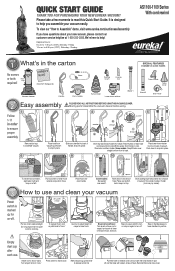
...30 p.m. (CST), Saturday - Assemble the vacuum cleaner before using. 1 Follow 1-11 in holder. Place thumbs on vacuum; Turn C knob to release cover. Do not pull past red line; QUICK START GUIDE THANK YOU FOR PURCHASING YOUR NEW EUREKA VACUUM! We're here to desired length. Helpline ...view our "How to snap into place. Moving parts! A D Snap! push down to Assemble" demo, visit www.eureka.com/suctionseal/assembly If you assemble your new vacuum, please contact our customer service helpline at top. Snap into place. 7 8 Insert top tab A turbo holder into...
...30 p.m. (CST), Saturday - Assemble the vacuum cleaner before using. 1 Follow 1-11 in holder. Place thumbs on vacuum; Turn C knob to release cover. Do not pull past red line; QUICK START GUIDE THANK YOU FOR PURCHASING YOUR NEW EUREKA VACUUM! We're here to desired length. Helpline ...view our "How to snap into place. Moving parts! A D Snap! push down to Assemble" demo, visit www.eureka.com/suctionseal/assembly If you assemble your new vacuum, please contact our customer service helpline at top. Snap into place. 7 8 Insert top tab A turbo holder into...


