
Owners Guide
Page 2
... area. • This vacuum cleaner creates suction. Keep cord away from battery cells can explode in the end product must be replaced with new ones at the same time. • Reverse polarity installation of 10 minutes. To unplug, grasp the charger, not the cord. • Do not handle the charger, including charger plug, and charger terminals with other cells or batteries in series, it should, has...
... area. • This vacuum cleaner creates suction. Keep cord away from battery cells can explode in the end product must be replaced with new ones at the same time. • Reverse polarity installation of 10 minutes. To unplug, grasp the charger, not the cord. • Do not handle the charger, including charger plug, and charger terminals with other cells or batteries in series, it should, has...

Owners Guide
Page 3
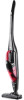
Hand Held Unit HAND UNIT 11 10 9 8 8. Secondary Filter 11. Handle On/Off Switch 2. Separation System 10. Floor Nozzle Release Button 6. Insert screw in the handle and fasten. Hand Held On/Off Switch 4. Container Release Button 3 Floor Nozzle 7. Vacuum Unit 12 12. FLOOR UNIT 1 2 3 4 5 6 Assembly Instructions 14.4V 7 Fit cable into lower portion of the unit and then insert upper handle into lower portion. Charging Indicator 5. Fasten the screw Floor Nozzle 1. Dust Container 9. Make sure it is aligned correctly. Hand Held Release Button 3.
Hand Held Unit HAND UNIT 11 10 9 8 8. Secondary Filter 11. Handle On/Off Switch 2. Separation System 10. Floor Nozzle Release Button 6. Insert screw in the handle and fasten. Hand Held On/Off Switch 4. Container Release Button 3 Floor Nozzle 7. Vacuum Unit 12 12. FLOOR UNIT 1 2 3 4 5 6 Assembly Instructions 14.4V 7 Fit cable into lower portion of the unit and then insert upper handle into lower portion. Charging Indicator 5. Fasten the screw Floor Nozzle 1. Dust Container 9. Make sure it is aligned correctly. Hand Held Release Button 3.

Owners Guide
Page 4
... charging. When connected to the vacuum. Do not turn off both switches on the handheld and the main vacuum are in the off . (Figure 3) 4 Insert the plug of adaptor to a power source, the indicator light will take between 15-17 hours. Damage to the main body. When the charging cycle is standing upright on while charging. (Figure 2) Always...
... charging. When connected to the vacuum. Do not turn off both switches on the handheld and the main vacuum are in the off . (Figure 3) 4 Insert the plug of adaptor to a power source, the indicator light will take between 15-17 hours. Damage to the main body. When the charging cycle is standing upright on while charging. (Figure 2) Always...

Owners Guide
Page 5
Caution: To avoid damage to vacuum or floor, always ensure unit is turned off and plug the adaptor back in. 5 During short pauses in vacuuming, the appliance can be left standing upright anywhere in the direction of the nozzle. (Figure 5) ! To do this, tilt the vacuum cleaner forwards slightly in the room. Remove the plug of the arrow. (Figure 4) 2. After vacuuming, switch the appliance off when not in the direction of the adaptor from appliance and operate the ON/OFF switch in use. 3. Using the vacuum cleaner Vacuuming Fig. 4 Fig. 5 1.
Caution: To avoid damage to vacuum or floor, always ensure unit is turned off and plug the adaptor back in. 5 During short pauses in vacuuming, the appliance can be left standing upright anywhere in the direction of the nozzle. (Figure 5) ! To do this, tilt the vacuum cleaner forwards slightly in the room. Remove the plug of the arrow. (Figure 4) 2. After vacuuming, switch the appliance off when not in the direction of the adaptor from appliance and operate the ON/OFF switch in use. 3. Using the vacuum cleaner Vacuuming Fig. 4 Fig. 5 1.

Owners Guide
Page 6
.... 6 Using the release button, unlock the dust container and remove it from the dust container and clean them by tapping out over a waste bin. (Figure 8) 4. Allow the filters to dry completely before refitting. 6. Maintenance Cleaning the filters The dust container should be washed out. Using the handle, remove the cyclone filter and cloth filter from the suction unit. 3. If heavily soiled, the filters and dust container can be emptied every time after vacuuming. 14...
.... 6 Using the release button, unlock the dust container and remove it from the dust container and clean them by tapping out over a waste bin. (Figure 8) 4. Allow the filters to dry completely before refitting. 6. Maintenance Cleaning the filters The dust container should be washed out. Using the handle, remove the cyclone filter and cloth filter from the suction unit. 3. If heavily soiled, the filters and dust container can be emptied every time after vacuuming. 14...

Owners Guide
Page 7
... brushroll slightly and remove the drive belt from the brushroll. (Figure 13) 6. If the brushroll cannot be cleaned at regular intervals. (Figure 11) 2. Take the brushroll out of the floor tool base and remove the cover from the main vacuum cleaner. (Figure 11). 3. Floor nozzle should be turned by hand and remove any entangled dirt deposits. (Figure 14) 7. To clean it release the floor nozzle from the floor nozzle. (Figure 12...
... brushroll slightly and remove the drive belt from the brushroll. (Figure 13) 6. If the brushroll cannot be cleaned at regular intervals. (Figure 11) 2. Take the brushroll out of the floor tool base and remove the cover from the main vacuum cleaner. (Figure 11). 3. Floor nozzle should be turned by hand and remove any entangled dirt deposits. (Figure 14) 7. To clean it release the floor nozzle from the floor nozzle. (Figure 12...

Owners Guide
Page 8
... purchase only when the vacuum cleaner is granted only to the Eureka Authorized Warranty Station. As a matter of warranty policy, Eureka will be free from the date of immediate household. Further limitations and exclusions Any warranty that require replacement under license. Your relief for repair, please include the model, type and serial number located on the rating plate on how long an implied warranty lasts, so the...
... purchase only when the vacuum cleaner is granted only to the Eureka Authorized Warranty Station. As a matter of warranty policy, Eureka will be free from the date of immediate household. Further limitations and exclusions Any warranty that require replacement under license. Your relief for repair, please include the model, type and serial number located on the rating plate on how long an implied warranty lasts, so the...

Owners Guide
Page 9
... properly. Problem Charging indicator light is securely inserted into outlet. • Filter assembly is clogged. • Unit isn't fully powered. • Unit isn't fully powered. • Brushroll is turned off. Solution • Make sure charging plug is not lit while charging. This product contains a nickel-metal hydride battery. Eureka Customer Service HELPLINE 1-800-282-2886 www.eureka.com 9 Not enough suction power Not enough running time. Before...
... properly. Problem Charging indicator light is securely inserted into outlet. • Filter assembly is clogged. • Unit isn't fully powered. • Unit isn't fully powered. • Brushroll is turned off. Solution • Make sure charging plug is not lit while charging. This product contains a nickel-metal hydride battery. Eureka Customer Service HELPLINE 1-800-282-2886 www.eureka.com 9 Not enough suction power Not enough running time. Before...

Owners Guide
Page 10
... the limits for help. 10 Eureka Customer Service HELPLINE 1-800-282-2886 www.eureka.com Unscrew all the wires attached to the battery. 5. Take out the battery compartment. WARNING: Do not mutilate or incinerate the battery pack, as a short circuit may cause harmful interference to correct the interference by sliding it will not occur in a residential installation. Remove the battery from that...
... the limits for help. 10 Eureka Customer Service HELPLINE 1-800-282-2886 www.eureka.com Unscrew all the wires attached to the battery. 5. Take out the battery compartment. WARNING: Do not mutilate or incinerate the battery pack, as a short circuit may cause harmful interference to correct the interference by sliding it will not occur in a residential installation. Remove the battery from that...


