Quick Start Guide
Page 1
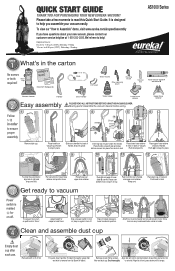
... Safeguards Turbo nozzle Extra belt Filter cleaning brush Dusting brush Crevice tool WAND 1 WAND 2 A B Hose release wand A and wand B Vacuum cleaner Handle 2STEP Easy assembly 1 2 Follow 1-12 in lid and twist to lift off . PLEASE READ ALL INSTRUCTIONS BEFORE USING THIS VACUUM CLEANER. A C Upper hose retainer 6 Remove dust cup. 7 Place handle on vacuum. Place dust cup on vacuum; Brush off . Dry thoroughly. We're here to 'floors.' Assemble the vacuum cleaner before using. 3 4 5 B Snap! Turn air path knob to ensure proper assembly. QUICK START GUIDE...
... Safeguards Turbo nozzle Extra belt Filter cleaning brush Dusting brush Crevice tool WAND 1 WAND 2 A B Hose release wand A and wand B Vacuum cleaner Handle 2STEP Easy assembly 1 2 Follow 1-12 in lid and twist to lift off . PLEASE READ ALL INSTRUCTIONS BEFORE USING THIS VACUUM CLEANER. A C Upper hose retainer 6 Remove dust cup. 7 Place handle on vacuum. Place dust cup on vacuum; Brush off . Dry thoroughly. We're here to 'floors.' Assemble the vacuum cleaner before using. 3 4 5 B Snap! Turn air path knob to ensure proper assembly. QUICK START GUIDE...

Owner's Guide
Page 2
... damage, call Eureka Customer Service HELPLINE 1-800-282-2886 immediately. Follow caution information wherever you start your vacuum cleaner Refer to Quick Start Guide for shipping damage. How to maintain your product visit www.eureka.com and click on the middle back side of your new Eureka vacuum cleaner for assembly and use accessories 3 2-position wand, crevice tool, dusting brush, turbo nozzle, bare floor nozzle, and stair hose. Where to find important vacuum information Keep this symbol...
... damage, call Eureka Customer Service HELPLINE 1-800-282-2886 immediately. Follow caution information wherever you start your vacuum cleaner Refer to Quick Start Guide for shipping damage. How to maintain your product visit www.eureka.com and click on the middle back side of your new Eureka vacuum cleaner for assembly and use accessories 3 2-position wand, crevice tool, dusting brush, turbo nozzle, bare floor nozzle, and stair hose. Where to find important vacuum information Keep this symbol...

Owner's Guide
Page 3
..., matches, or hot ashes. • Do not use without dust cup, filter and screen, and HEPA exhaust filter in use in areas where they may be present. • Store your work area well lighted. • Unplug electrical appliances before vacuuming them. • Unplug before connecting turbo nozzle. Keep cord away from openings and moving parts. • Do not place vacuum cleaner on cord. The bearings are permanently lubricated and sealed...
..., matches, or hot ashes. • Do not use without dust cup, filter and screen, and HEPA exhaust filter in use in areas where they may be present. • Store your work area well lighted. • Unplug electrical appliances before vacuuming them. • Unplug before connecting turbo nozzle. Keep cord away from openings and moving parts. • Do not place vacuum cleaner on cord. The bearings are permanently lubricated and sealed...

Owner's Guide
Page 4
... quick clean, Grasp filter and twist to remove latch to lift off lid. EXHAUST FILTER EF6 - Screen Exhaust filter EF6 ( HEPA filter on some models) Filter and screen (located inside dust cup) Dust cup Exhaust/HEPA filter compartment (located behind dust cup) Height adjustment knob Brush roll cover Turbo cover Turbo nozzle Hose Crevice tool Power switch Handle release Upper cord retainer Upper hose retainer Dusting brush Carry handle and cord wrap Lower cord retainer (on carry handle) Wand Power cord Quick release cord wrap Lower hose retainer Base hose Maintenance schedule Maintenance...
... quick clean, Grasp filter and twist to remove latch to lift off lid. EXHAUST FILTER EF6 - Screen Exhaust filter EF6 ( HEPA filter on some models) Filter and screen (located inside dust cup) Dust cup Exhaust/HEPA filter compartment (located behind dust cup) Height adjustment knob Brush roll cover Turbo cover Turbo nozzle Hose Crevice tool Power switch Handle release Upper cord retainer Upper hose retainer Dusting brush Carry handle and cord wrap Lower cord retainer (on carry handle) Wand Power cord Quick release cord wrap Lower hose retainer Base hose Maintenance schedule Maintenance...

Owner's Guide
Page 5
...) Make sure vacuum is in upright position to 2) Turn air path selector knob to 'tools.' WAND 2 WAND 1 WAND 1 Dusting brush Use for hard surfaces. When using tools. To avoid damage, do not set vacuum on and handle is below you, pushed against the bottom step. 1) Attach stair hose to end of hose or wand. 2) Attach turbo nozzle to end of wand. • For short wand, push hose release button to 'high carpet.' Bare floor nozzle and wand (with some models or available for...
...) Make sure vacuum is in upright position to 2) Turn air path selector knob to 'tools.' WAND 2 WAND 1 WAND 1 Dusting brush Use for hard surfaces. When using tools. To avoid damage, do not set vacuum on and handle is below you, pushed against the bottom step. 1) Attach stair hose to end of hose or wand. 2) Attach turbo nozzle to end of wand. • For short wand, push hose release button to 'high carpet.' Bare floor nozzle and wand (with some models or available for...

Owner's Guide
Page 6
Make sure vacuum cleaner is turned off and power cord is unplugged. Avoid touching the motor shaft when checking brush roll or belt. Fig. 3 Fig. 4 • Rotate brush roll 2 turns to 'floors.' Set air path knob to center belt. • Replace brush roll cover (Fig. 3). • Replace 4 screws (Fig. 6). Use finger to clear blockage. Use finger to check for debris (Fig 2). • Base hose - Pull out on handle release to loosen end of brush roll to stretch belt and insert right...
Make sure vacuum cleaner is turned off and power cord is unplugged. Avoid touching the motor shaft when checking brush roll or belt. Fig. 3 Fig. 4 • Rotate brush roll 2 turns to 'floors.' Set air path knob to center belt. • Replace brush roll cover (Fig. 3). • Replace 4 screws (Fig. 6). Use finger to clear blockage. Use finger to check for debris (Fig 2). • Base hose - Pull out on handle release to loosen end of brush roll to stretch belt and insert right...

Owner's Guide
Page 7
... this warranty. under normal use such as disposable dust bags, filters, drive belts, light bulbs, brush roll, bristles, impellers and cleaning. • Damages or malfunctions caused by Electrolux Home Care Products, Inc. Eureka Customer Service HELPLINE 1-800-282-2886 www.eureka.com 5 Warranty is limited to clip threads or hair. 4) Place cover back into position. Return shipping charges will , at its option, repair or replace a defective vacuum or vacuum part that...
... this warranty. under normal use such as disposable dust bags, filters, drive belts, light bulbs, brush roll, bristles, impellers and cleaning. • Damages or malfunctions caused by Electrolux Home Care Products, Inc. Eureka Customer Service HELPLINE 1-800-282-2886 www.eureka.com 5 Warranty is limited to clip threads or hair. 4) Place cover back into position. Return shipping charges will , at its option, repair or replace a defective vacuum or vacuum part that...

Owner's Guide
Page 8
... Eureka customer service helpline. Cause Power plug Solution • Push plug securely into hose retainer. Page 4 • Replace broken or out of hose. Vacuum is turned off Dust cup and filter No suction at the end of shape belt. Air path selector Belt Hose Bare floor setting Carpet height setting Dust cup and filter Air path selector Hose Turbo nozzle will not turn . brush roll will not start. If these conditions are found, fix them and wait at end of motor overheating. Make sure filter, screen and dust cup are installed...
... Eureka customer service helpline. Cause Power plug Solution • Push plug securely into hose retainer. Page 4 • Replace broken or out of hose. Vacuum is turned off Dust cup and filter No suction at the end of shape belt. Air path selector Belt Hose Bare floor setting Carpet height setting Dust cup and filter Air path selector Hose Turbo nozzle will not turn . brush roll will not start. If these conditions are found, fix them and wait at end of motor overheating. Make sure filter, screen and dust cup are installed...


