Owner's Guide
Page 2
... dust cup, a blocked hose or clogged filter. To avoid damage to carpet, area rugs, and flooring, avoid tipping the cleaner or setting it on . This plug will occur. • WARNING: This product contains chemicals known to the State of time, as the brush roll may cause damage. • Use extra care when cleaning on (l). If vacuum cleaner is turned on furniture, fringed area rugs or carpeted stairs during hose and tool use...
... dust cup, a blocked hose or clogged filter. To avoid damage to carpet, area rugs, and flooring, avoid tipping the cleaner or setting it on . This plug will occur. • WARNING: This product contains chemicals known to the State of time, as the brush roll may cause damage. • Use extra care when cleaning on (l). If vacuum cleaner is turned on furniture, fringed area rugs or carpeted stairs during hose and tool use...
Owner's Guide
Page 6
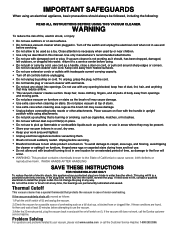
... and lower hose onto connector. Hose and Tool Storage C Hose Retainer E I ) to snap into place. Easy 4 Step Assembly To view our "How to ensure the handle has locked properly. Put dust cup (D) into clips. Push cup handle toward backbone (B) to lock. Turn clock- Then push hose into place on handle (C). Store dusting brush (H) on front of handle (C). On some models: Attach turbo nozzle (I G H E Route hose (E) through hose retainer on back of the vacuum. Place...
... and lower hose onto connector. Hose and Tool Storage C Hose Retainer E I ) to snap into place. Easy 4 Step Assembly To view our "How to ensure the handle has locked properly. Put dust cup (D) into clips. Push cup handle toward backbone (B) to lock. Turn clock- Then push hose into place on handle (C). Store dusting brush (H) on front of handle (C). On some models: Attach turbo nozzle (I G H E Route hose (E) through hose retainer on back of the vacuum. Place...

Owner's Guide
Page 10
... off screen. Turn clockwise to lock the cup to air dry thoroughly (24 hours) before placing back in the other , turn dust cup counter clockwise to view an instructional video on inside the front of grooves. Replacing the Belt Scan the QR code to view an instructional video on washing the dust cup filter Unplug vacuum. Using Philips screwdriver, remove 4 screws from the brushroll and motor shaft. Lift and remove hood. Lift left...
... off screen. Turn clockwise to lock the cup to air dry thoroughly (24 hours) before placing back in the other , turn dust cup counter clockwise to view an instructional video on inside the front of grooves. Replacing the Belt Scan the QR code to view an instructional video on washing the dust cup filter Unplug vacuum. Using Philips screwdriver, remove 4 screws from the brushroll and motor shaft. Lift and remove hood. Lift left...

Owner's Guide
Page 14
... will , at its option, repair or replace a defective cleaner or cleaner part that may vary by the Warranty Station. In no event shall the manufacturer be paid by state. under normal use, such as disposable dust bags, filters, drive belts, light bulbs, brush roll bristles, impellers and cleaning. • Damages or malfunctions caused by negligence, abuse, or use of the vacuum, including any warranty of Merchantability or any consequential...
... will , at its option, repair or replace a defective cleaner or cleaner part that may vary by the Warranty Station. In no event shall the manufacturer be paid by state. under normal use, such as disposable dust bags, filters, drive belts, light bulbs, brush roll bristles, impellers and cleaning. • Damages or malfunctions caused by negligence, abuse, or use of the vacuum, including any warranty of Merchantability or any consequential...


