
User Manual
Page 9
... to Your Direct Connection Display Module (For the TM-U375 only 1-10 Grounding the Printer l-11 Connecting the Power Supply 1-12 Installing the Ribbon Cassette 1-14 Installing the Paper Roll 1-16 Running the Self-test 1-18 Running the self-test with paper roll 1-18 Running the self...2 Using the Printer Operating the Control Panel 2-2 Buttons 2-2 Indicator lights 2-2 Slip Paper Handling 2-4 Validation Paper Handling 2-4 Replacing the Paper Roll 2-5 Replacing the Ribbon Cassette 2-6 Removing the ribbon cassette 2-7 Installing the ribbon cassette 2-8 Aerosol sprayer caution 2-9 vii
... to Your Direct Connection Display Module (For the TM-U375 only 1-10 Grounding the Printer l-11 Connecting the Power Supply 1-12 Installing the Ribbon Cassette 1-14 Installing the Paper Roll 1-16 Running the Self-test 1-18 Running the self-test with paper roll 1-18 Running the self...2 Using the Printer Operating the Control Panel 2-2 Buttons 2-2 Indicator lights 2-2 Slip Paper Handling 2-4 Validation Paper Handling 2-4 Replacing the Paper Roll 2-5 Replacing the Ribbon Cassette 2-6 Removing the ribbon cassette 2-7 Installing the ribbon cassette 2-8 Aerosol sprayer caution 2-9 vii
User Manual
Page 12
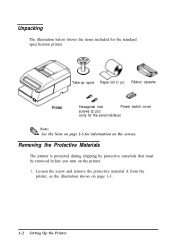
... the illustration shows on the printer. 1. Unpacking The illustration below shows the items included for information on the screws. Take-up spool Paper roll (1 pc) Ribbon cassette Hexagonal lock Power switch cover screws (2 pcs) (only for the serial interface) , Note: Q&A See the Note on page 1-5 for the standard specification printer...
... the illustration shows on the printer. 1. Unpacking The illustration below shows the items included for information on the screws. Take-up spool Paper roll (1 pc) Ribbon cassette Hexagonal lock Power switch cover screws (2 pcs) (only for the serial interface) , Note: Q&A See the Note on page 1-5 for the standard specification printer...

User Manual
Page 24
... the correct position. 1-14 Setting Up the Printer otherwise data may be lost. * Note: % Use the EPSON ERC-38 ribbon cassette for your printer. 1. Turn the ribbon cassette's knob two or three times in the direction of the arrow marked on the printer and open the printer cover. 2. Be sure the printer ...is necessary to take up any slack in the position as the illustration below and push the ribbon cassette until it clicks. Then rotate the cassette's knob two or three more times. Insert the...
... the correct position. 1-14 Setting Up the Printer otherwise data may be lost. * Note: % Use the EPSON ERC-38 ribbon cassette for your printer. 1. Turn the ribbon cassette's knob two or three times in the direction of the arrow marked on the printer and open the printer cover. 2. Be sure the printer ...is necessary to take up any slack in the position as the illustration below and push the ribbon cassette until it clicks. Then rotate the cassette's knob two or three more times. Insert the...

User Manual
Page 25
Print head * Note: Q3.l If the ribbon is installed between the print head and the ribbon mask without wrinkles or creases, as shown below. Make sure that the ribbon is not installed correctly, to install the ribbon cassette again. Tab Setting Up the Printer 1 - 1 5 2 or 3 more times Knob 4. Repeat steps 2, 3 and 4 above to remove the ribbon cassette, grasp the cassette's tab on the left side, lift the left side out first, and then pull the cassette out of the printer.
Print head * Note: Q3.l If the ribbon is installed between the print head and the ribbon mask without wrinkles or creases, as shown below. Make sure that the ribbon is not installed correctly, to install the ribbon cassette again. Tab Setting Up the Printer 1 - 1 5 2 or 3 more times Knob 4. Repeat steps 2, 3 and 4 above to remove the ribbon cassette, grasp the cassette's tab on the left side, lift the left side out first, and then pull the cassette out of the printer.
User Manual
Page 28
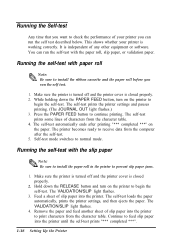
... other equipment or software. This shows whether your printer you can run the self-test with paper roll , Note: Qh Be sure to install the ribbon cassette and the paper roll before you run the self test described below. Make sure the printer is turned off and the printer cover is...
... other equipment or software. This shows whether your printer you can run the self-test with paper roll , Note: Qh Be sure to install the ribbon cassette and the paper roll before you run the self test described below. Make sure the printer is turned off and the printer cover is...

User Manual
Page 42
... LOAD switch Never pull out the paper roll manually. 4. otherwise the ribbon cassette may be damaged. otherwise data may be lost. , Note: Qh Use the EPSON-ERC-38 ribbon cassette for your printer. 2-6 Using the Printer 2. Replacing the Ribbon Cassette Never turn the ribbon cassette's feed knob in the direction of the arrow marked on...
... LOAD switch Never pull out the paper roll manually. 4. otherwise the ribbon cassette may be damaged. otherwise data may be lost. , Note: Qh Use the EPSON-ERC-38 ribbon cassette for your printer. 2-6 Using the Printer 2. Replacing the Ribbon Cassette Never turn the ribbon cassette's feed knob in the direction of the arrow marked on...
User Manual
Page 43
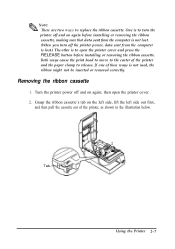
Using the Printer 2-7 If one of these ways is to turn the printer off and on again before installing or removing the ribbon cassette. Turn the printer power off the printer power, data sent from the computer is lost . (When you turn off and on the left side, ... left side out first, and then pull the cassette out of the printer and the paper clamp to replace the ribbon cassette. One is to open the printer cover. 2. Removing the ribbon cassette 1. Both ways cause the print head to move to the center of the printer, as shown in the illustration...
Using the Printer 2-7 If one of these ways is to turn the printer off and on again before installing or removing the ribbon cassette. Turn the printer power off the printer power, data sent from the computer is lost . (When you turn off and on the left side, ... left side out first, and then pull the cassette out of the printer and the paper clamp to replace the ribbon cassette. One is to open the printer cover. 2. Removing the ribbon cassette 1. Both ways cause the print head to move to the center of the printer, as shown in the illustration...

User Manual
Page 44
or 3 times 2. Then rotate the cassette's knob two or three more times. Turn the ribbon cassette's knob two or three times in the direction of the arrow, to place the ribbon in the correct position. 2-8 Using the Printer Insert the ribbon in the ribbon. Installing the ribbon cassette 1. This is necessary to take up any slack in the position as shown below, and push the ribbon cassette into the printer until it clicks.
or 3 times 2. Then rotate the cassette's knob two or three more times. Turn the ribbon cassette's knob two or three times in the direction of the arrow, to place the ribbon in the correct position. 2-8 Using the Printer Insert the ribbon in the ribbon. Installing the ribbon cassette 1. This is necessary to take up any slack in the position as shown below, and push the ribbon cassette into the printer until it clicks.

User Manual
Page 45
Print head a* Note: Remove the ribbon cassette from the printer when you store the printer for a long time. Doing so may cause fire. Using the Printer 2-9 CAUTION: Do not use aerosol sprayers containing flammable gas inside or around this product. Make sure that the ribbon is installed between the print head and the ribbon mask without wrinkles or creases, as shown below. 3.
Print head a* Note: Remove the ribbon cassette from the printer when you store the printer for a long time. Doing so may cause fire. Using the Printer 2-9 CAUTION: Do not use aerosol sprayers containing flammable gas inside or around this product. Make sure that the ribbon is installed between the print head and the ribbon mask without wrinkles or creases, as shown below. 3.
User Manual
Page 49
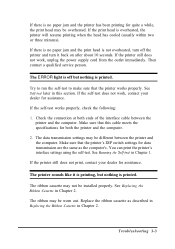
...contact your dealer for both ends of the interface cable between the printer and the computer. See Running the Self-test in Chapter 2. The ribbon cassette may be installed properly. Troubleshooting 3-3 The printer sounds like it back on after about 10 seconds. If the self-test does not ...minutes). If the self-test works properly, check the following: 1. You can print the printer's interface settings using the self-test. Replace the ribbon cassette as the computer's. If the printer still does not work , contact your dealer for quite a while, the print head may not be...
...contact your dealer for both ends of the interface cable between the printer and the computer. See Running the Self-test in Chapter 2. The ribbon cassette may be installed properly. Troubleshooting 3-3 The printer sounds like it back on after about 10 seconds. If the self-test does not ...minutes). If the self-test works properly, check the following: 1. You can print the printer's interface settings using the self-test. Replace the ribbon cassette as the computer's. If the printer still does not work , contact your dealer for quite a while, the print head may not be...
User Manual
Page 52
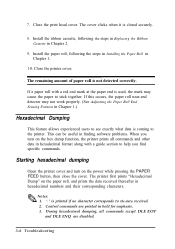
... you find specific commands. 7. The printer first prints "Hexadecimal Dump" on the power while pressing the PAPER FEED button, then close the cover. Install the ribbon cassette, following the steps in Installing the Paper Roll in Chapter 2. 9. Close the print head cover. Install the paper roll, following the steps in Replacing...
... you find specific commands. 7. The printer first prints "Hexadecimal Dump" on the power while pressing the PAPER FEED button, then close the cover. Install the ribbon cassette, following the steps in Installing the Paper Roll in Chapter 2. 9. Close the print head cover. Install the paper roll, following the steps in Replacing...

User Manual
Page 58
Otherwise, the paper may become ink stained or the ribbon may get caught in the next page). l Copy paper Thickness: Backing paper: Copy and original paper: Carbon copy paper: Total thickness: Example: Original + 2-ply copy 0....
Otherwise, the paper may become ink stained or the ribbon may get caught in the next page). l Copy paper Thickness: Backing paper: Copy and original paper: Carbon copy paper: Total thickness: Example: Original + 2-ply copy 0....

User Manual
Page 61
Reference Information 4-7 Impact resistance: When packed: Package: Epson standard package Height: 60 cm (23.62") Directions: 1 corner, 3 edges, and 6 surfaces No external or internal damage should be found after the vibration test, and... should not be damaged after it is dropped (for 30°C (86°F) and above, without condensation) Storage: 20 to 90%RH (excluding paper and ribbon, without condensation) temperature Vibration resistance: When packed: Frequency: 5 to 80%RH (see the range in Figure A.10 below, for all 4 edges). Environmental Specifications Temperature: ...
Reference Information 4-7 Impact resistance: When packed: Package: Epson standard package Height: 60 cm (23.62") Directions: 1 corner, 3 edges, and 6 surfaces No external or internal damage should be found after the vibration test, and... should not be damaged after it is dropped (for 30°C (86°F) and above, without condensation) Storage: 20 to 90%RH (excluding paper and ribbon, without condensation) temperature Vibration resistance: When packed: Frequency: 5 to 80%RH (see the range in Figure A.10 below, for all 4 edges). Environmental Specifications Temperature: ...