
User Manual
Page 9
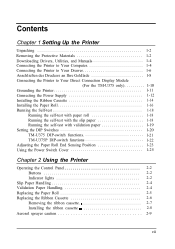
... l-6 Anschließen des Druckers an Ihre Geldladee l-8 Connecting the Printer to Your Direct Connection Display Module (For the TM-U375 only 1-10 Grounding the Printer l-11 Connecting the Power Supply 1-12 Installing the Ribbon Cassette 1-14 Installing the Paper Roll 1-16 Running the Self-test ... l-22 Adjusting the Paper Roll End Sensing Position l-23 Using the Power Switch Cover l-25 Chapter 2 Using the Printer Operating the Control Panel 2-2 Buttons 2-2 Indicator lights 2-2 Slip Paper Handling 2-4 Validation Paper Handling 2-4 Replacing the Paper Roll 2-5 Replacing the...
... l-6 Anschließen des Druckers an Ihre Geldladee l-8 Connecting the Printer to Your Direct Connection Display Module (For the TM-U375 only 1-10 Grounding the Printer l-11 Connecting the Power Supply 1-12 Installing the Ribbon Cassette 1-14 Installing the Paper Roll 1-16 Running the Self-test ... l-22 Adjusting the Paper Roll End Sensing Position l-23 Using the Power Switch Cover l-25 Chapter 2 Using the Printer Operating the Control Panel 2-2 Buttons 2-2 Indicator lights 2-2 Slip Paper Handling 2-4 Validation Paper Handling 2-4 Replacing the Paper Roll 2-5 Replacing the...
User Manual
Page 12
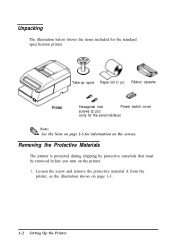
... protective material A from the printer, as the illustration shows on the printer. 1. Removing the Protective Materials The printer is protected during shipping by protective materials that must be removed before you turn on page 1-3. 1-2 Setting Up the Printer Unpacking The illustration below shows ...the items included for information on the screws. Take-up spool Paper roll (1 pc) Ribbon cassette Hexagonal lock Power switch cover screws (2 pcs) (only for the ...
... protective material A from the printer, as the illustration shows on the printer. 1. Removing the Protective Materials The printer is protected during shipping by protective materials that must be removed before you turn on page 1-3. 1-2 Setting Up the Printer Unpacking The illustration below shows ...the items included for information on the screws. Take-up spool Paper roll (1 pc) Ribbon cassette Hexagonal lock Power switch cover screws (2 pcs) (only for the ...

User Manual
Page 24
... Use the EPSON ERC-38 ribbon cassette for your printer. 1. Then rotate the cassette's knob two or three more times. Installing the Ribbon Cassette A CAUTIONS: Never turn the ribbon cassette's knob in the position as the illustration below and push the ribbon cassette until it clicks. Insert the ribbon in the ... times in the direction of the arrow marked on the printer and open the printer cover. 2. This is not receiving data when you replace a ribbon cassette; otherwise the ribbon cassette may be damaged. Be sure the printer is necessary to take up any slack in the correct position...
... Use the EPSON ERC-38 ribbon cassette for your printer. 1. Then rotate the cassette's knob two or three more times. Installing the Ribbon Cassette A CAUTIONS: Never turn the ribbon cassette's knob in the position as the illustration below and push the ribbon cassette until it clicks. Insert the ribbon in the ... times in the direction of the arrow marked on the printer and open the printer cover. 2. This is not receiving data when you replace a ribbon cassette; otherwise the ribbon cassette may be damaged. Be sure the printer is necessary to take up any slack in the correct position...

User Manual
Page 25
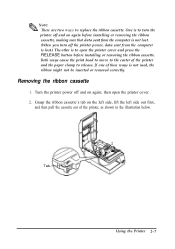
Tab Setting Up the Printer 1 - 1 5 Print head * Note: Q3.l If the ribbon is installed between the print head and the ribbon mask without wrinkles or creases, as shown below. Repeat steps 2, 3 and 4 above to remove the ribbon cassette, grasp the cassette's tab on the left side, lift the left side out first, and then pull the cassette out of the printer. Make sure that the ribbon is not installed correctly, to install the ribbon cassette again. 2 or 3 more times Knob 4.
Tab Setting Up the Printer 1 - 1 5 Print head * Note: Q3.l If the ribbon is installed between the print head and the ribbon mask without wrinkles or creases, as shown below. Repeat steps 2, 3 and 4 above to remove the ribbon cassette, grasp the cassette's tab on the left side, lift the left side out first, and then pull the cassette out of the printer. Make sure that the ribbon is not installed correctly, to install the ribbon cassette again. 2 or 3 more times Knob 4.
User Manual
Page 28
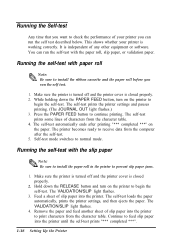
Self-test mode switches to feed slip paper into the printer until the self-test prints "*** completed ***". 1-18 Setting Up the Printer Hold down the PAPER FEED button, turn on the printer to install the ribbon cassette and the paper roll before you can run the self test. 1. The self...-test loads the paper automatically, prints the printer settings, and then ejects the paper. Continue...
Self-test mode switches to feed slip paper into the printer until the self-test prints "*** completed ***". 1-18 Setting Up the Printer Hold down the PAPER FEED button, turn on the printer to install the ribbon cassette and the paper roll before you can run the self test. 1. The self...-test loads the paper automatically, prints the printer settings, and then ejects the paper. Continue...

User Manual
Page 42
... the paper, as the illustration below . 3. otherwise the ribbon cassette may be damaged. Replacing the Ribbon Cassette Never turn the ribbon cassette's feed knob in Chapter 1. Be sure the printer is not receiving data when you replace a ribbon cassette; otherwise data may be lost. , Note: Qh Use the EPSON-ERC-38 ribbon cassette for your printer. 2-6 Using the...
... the paper, as the illustration below . 3. otherwise the ribbon cassette may be damaged. Replacing the Ribbon Cassette Never turn the ribbon cassette's feed knob in Chapter 1. Be sure the printer is not receiving data when you replace a ribbon cassette; otherwise data may be lost. , Note: Qh Use the EPSON-ERC-38 ribbon cassette for your printer. 2-6 Using the...
User Manual
Page 43
... these ways is to turn the printer off and on again before installing or removing the ribbon cassette. If one of the printer and the paper clamp to replace the ribbon cassette. Grasp the ribbon cassette's tab on again; then open the printer cover and press the RELEASE button ...before installing or removing the ribbon cassette, making sure that data...
... these ways is to turn the printer off and on again before installing or removing the ribbon cassette. If one of the printer and the paper clamp to replace the ribbon cassette. Grasp the ribbon cassette's tab on again; then open the printer cover and press the RELEASE button ...before installing or removing the ribbon cassette, making sure that data...

User Manual
Page 44
Insert the ribbon in the ribbon. or 3 times 2. Then rotate the cassette's knob two or three more times. Turn the ribbon cassette's knob two or three times in the direction of the arrow, to place the ribbon in the correct position. 2-8 Using the Printer This is necessary to take up any slack in the position as shown below, and push the ribbon cassette into the printer until it clicks. Installing the ribbon cassette 1.
Insert the ribbon in the ribbon. or 3 times 2. Then rotate the cassette's knob two or three more times. Turn the ribbon cassette's knob two or three times in the direction of the arrow, to place the ribbon in the correct position. 2-8 Using the Printer This is necessary to take up any slack in the position as shown below, and push the ribbon cassette into the printer until it clicks. Installing the ribbon cassette 1.

User Manual
Page 45
CAUTION: Do not use aerosol sprayers containing flammable gas inside or around this product. 3. Doing so may cause fire. Print head a* Note: Remove the ribbon cassette from the printer when you store the printer for a long time. Using the Printer 2-9 Make sure that the ribbon is installed between the print head and the ribbon mask without wrinkles or creases, as shown below.
CAUTION: Do not use aerosol sprayers containing flammable gas inside or around this product. 3. Doing so may cause fire. Print head a* Note: Remove the ribbon cassette from the printer when you store the printer for a long time. Using the Printer 2-9 Make sure that the ribbon is installed between the print head and the ribbon mask without wrinkles or creases, as shown below.
User Manual
Page 49
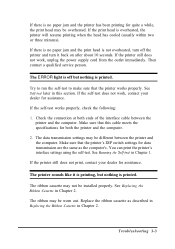
... , unplug the power supply cord from the outlet immediately. See Running the Self-test in Chapter 2. See Replacing the Ribbon Cassette in Chapter 1. Troubleshooting 3-3 If the print head is overheated, the printer will resume printing when the head has cooled (usually within two or three minutes). The ERROR light is off the...
... , unplug the power supply cord from the outlet immediately. See Running the Self-test in Chapter 2. See Replacing the Ribbon Cassette in Chapter 1. Troubleshooting 3-3 If the print head is overheated, the printer will resume printing when the head has cooled (usually within two or three minutes). The ERROR light is off the...
User Manual
Page 52
... and turn on the hex dump function, the printer prints all commands except DLE EOT and DLE ENQ are printed in Chapter 2. 9. Install the paper roll, following the steps in Replacing the Ribbon Cassette in bold for emphasis. 3. If a paper roll with a guide section to help you turn on the paper roll...
... and turn on the hex dump function, the printer prints all commands except DLE EOT and DLE ENQ are printed in Chapter 2. 9. Install the paper roll, following the steps in Replacing the Ribbon Cassette in bold for emphasis. 3. If a paper roll with a guide section to help you turn on the paper roll...

User Manual
Page 58
... or left edge of the slip paper, since meandering may get caught in the table below. Otherwise, the paper may become ink stained or the ribbon may occur. 4-4 Reference Information Choose slip paper carefully when the glue is flat, without curls, folds, warps, or wrinkles, especially at the paper end may... left edge, since paper feeding and paper insertion are affected by the ambient temperature, printing must not be performed under the conditions described in the printer mechanism.
... or left edge of the slip paper, since meandering may get caught in the table below. Otherwise, the paper may become ink stained or the ribbon may occur. 4-4 Reference Information Choose slip paper carefully when the glue is flat, without curls, folds, warps, or wrinkles, especially at the paper end may... left edge, since paper feeding and paper insertion are affected by the ambient temperature, printing must not be performed under the conditions described in the printer mechanism.

User Manual
Page 61
... range in Figure A.10 below, for 30°C (86°F) and above, without condensation) Storage: 20 to 90%RH (excluding paper and ribbon, without condensation) temperature Vibration resistance: When packed: Frequency: 5 to 55 Hz Acceleration: 2 G Sweep: 10 minutes (half circle) Time: 1...: X, Y, and Z No external or internal damage should be damaged after the drop test, and the printer should operate normally. Reference Information 4-7 Impact resistance: When packed: Package: Epson standard package Height: 60 cm (23.62") Directions: 1 corner, 3 edges, and 6 surfaces No ...
... range in Figure A.10 below, for 30°C (86°F) and above, without condensation) Storage: 20 to 90%RH (excluding paper and ribbon, without condensation) temperature Vibration resistance: When packed: Frequency: 5 to 55 Hz Acceleration: 2 G Sweep: 10 minutes (half circle) Time: 1...: X, Y, and Z No external or internal damage should be damaged after the drop test, and the printer should operate normally. Reference Information 4-7 Impact resistance: When packed: Package: Epson standard package Height: 60 cm (23.62") Directions: 1 corner, 3 edges, and 6 surfaces No ...