

User Manual
Page 7
...single unit. Cl Logic seeking and page mode for two drawers. Cl Control capability for check printing. Cl EPSON display module series connection (for slip paper. About This Manual Setting up and Using El Chapter 1 contains information on the ESC/POS@ standard. v ... IEEE 1284 Nibbe/Byte Modes. LI Chapter 3 contains troubleshooting information. Q EPSON® intelligent module connection (for easy paper roll loading. CI Chapter 2 contains information on using logic seeking. 0 Easy problem handling (e.g., paper jams or objects dropped into the printer) via a clamshell mechanism. Q ...
...single unit. Cl Logic seeking and page mode for two drawers. Cl Control capability for check printing. Cl EPSON display module series connection (for slip paper. About This Manual Setting up and Using El Chapter 1 contains information on the ESC/POS@ standard. v ... IEEE 1284 Nibbe/Byte Modes. LI Chapter 3 contains troubleshooting information. Q EPSON® intelligent module connection (for easy paper roll loading. CI Chapter 2 contains information on using logic seeking. 0 Easy problem handling (e.g., paper jams or objects dropped into the printer) via a clamshell mechanism. Q ...
User Manual
Page 9
... the Ribbon Cassette 1-14 Installing the Paper Roll 1-16 Running the Self-test 1-18 Running the self-test with paper roll 1-18 Running the self-test with the slip paper 1-18 Running the self-test with validation paper l-19 Setting the DIP Switches l-20... DIP-switch functions l-22 Adjusting the Paper Roll End Sensing Position l-23 Using the Power Switch Cover l-25 Chapter 2 Using the Printer Operating the Control Panel 2-2 Buttons 2-2 Indicator lights 2-2 Slip Paper Handling 2-4 Validation Paper Handling 2-4 Replacing the Paper Roll 2-5 Replacing the Ribbon Cassette 2-6 Removing...
... the Ribbon Cassette 1-14 Installing the Paper Roll 1-16 Running the Self-test 1-18 Running the self-test with paper roll 1-18 Running the self-test with the slip paper 1-18 Running the self-test with validation paper l-19 Setting the DIP Switches l-20... DIP-switch functions l-22 Adjusting the Paper Roll End Sensing Position l-23 Using the Power Switch Cover l-25 Chapter 2 Using the Printer Operating the Control Panel 2-2 Buttons 2-2 Indicator lights 2-2 Slip Paper Handling 2-4 Validation Paper Handling 2-4 Replacing the Paper Roll 2-5 Replacing the Ribbon Cassette 2-6 Removing...
User Manual
Page 12
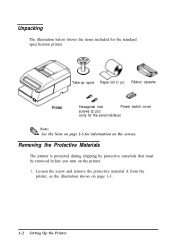
... 1-3. 1-2 Setting Up the Printer Loosen the screw and remove the protective material A from the printer, as the illustration shows on the printer. 1. Take-up spool Paper roll (1 pc) Ribbon cassette Hexagonal lock Power switch cover screws (2 pcs) (only for the serial interface) , Note: Q&A See the Note on page 1-5 for the standard specification...
... 1-3. 1-2 Setting Up the Printer Loosen the screw and remove the protective material A from the printer, as the illustration shows on the printer. 1. Take-up spool Paper roll (1 pc) Ribbon cassette Hexagonal lock Power switch cover screws (2 pcs) (only for the serial interface) , Note: Q&A See the Note on page 1-5 for the standard specification...

User Manual
Page 26
Installing the Paper Roll Use a paper roll that the arrow in the illustration, and will go, and push the PAPER LOAD switch to feed the paper roll until the paper comes out from the top of the printer. 1-16 Setting Up the Printer Fold the paper so it will not tear off jaggedly. Insert the tip of the paper into the.... , Note: Q3 The printer must be turned on the printer, open the printer cover, and remove the take-up spool. 3. No No Correct 2. Insert the paper roll as it is exactly straight and even, as shown in the exploded drawing below . 4. Turn on before installing the...
Installing the Paper Roll Use a paper roll that the arrow in the illustration, and will go, and push the PAPER LOAD switch to feed the paper roll until the paper comes out from the top of the printer. 1-16 Setting Up the Printer Fold the paper so it will not tear off jaggedly. Insert the tip of the paper into the.... , Note: Q3 The printer must be turned on the printer, open the printer cover, and remove the take-up spool. 3. No No Correct 2. Insert the paper roll as it is exactly straight and even, as shown in the exploded drawing below . 4. Turn on before installing the...

User Manual
Page 27
...take-up spool, follow the steps and the illustration below . Setting Up the Printer 1-17 b) Rotate the spool two or three times to secure the paper and reinsert the side of the paper roll into the groove on the cutter; then close the printer cover. , Note: % When the printer cover is open, the... PAPER FEED button is inactive. When using the take -up spool as the illustration below . a) Pull out the side of the take-up spool and ...
...take-up spool, follow the steps and the illustration below . Setting Up the Printer 1-17 b) Rotate the spool two or three times to secure the paper and reinsert the side of the paper roll into the groove on the cutter; then close the printer cover. , Note: % When the printer cover is open, the... PAPER FEED button is inactive. When using the take -up spool as the illustration below . a) Pull out the side of the take-up spool and ...
User Manual
Page 28
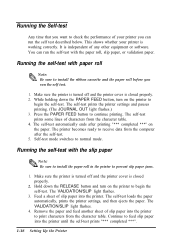
...18 Setting Up the Printer The self-test prints some lines of slip paper into the printer. Running the self-test with paper roll , Note: Qh Be sure to print characters from the character table. 4. Remove the paper and feed another sheet of characters from the character table. It is... OUT light flashes.) 3. Press the PAPER FEED button to check the performance of slip paper into the printer to install the ribbon cassette and the paper roll before you run the self test. 1. Running the self-test with the paper roll, slip paper, or validation paper. Running the Self-test Any time...
...18 Setting Up the Printer The self-test prints some lines of slip paper into the printer. Running the self-test with paper roll , Note: Qh Be sure to print characters from the character table. 4. Remove the paper and feed another sheet of characters from the character table. It is... OUT light flashes.) 3. Press the PAPER FEED button to check the performance of slip paper into the printer to install the ribbon cassette and the paper roll before you run the self test. 1. Running the self-test with the paper roll, slip paper, or validation paper. Running the Self-test Any time...
User Manual
Page 29
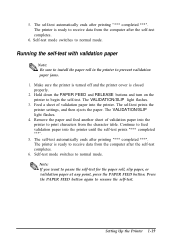
... the computer after the self-test completes. 6. The VALIDATION/SLIP light flashes. 3. Feed a sheet of validation paper into the printer to pause the self-test for the paper roll, slip paper, or validation paper at any point, press the PAPER FEED button. The self-test automatically ends after printing "*** completed ***". Make sure the printer is turned...
... the computer after the self-test completes. 6. The VALIDATION/SLIP light flashes. 3. Feed a sheet of validation paper into the printer to pause the self-test for the paper roll, slip paper, or validation paper at any point, press the PAPER FEED button. The self-test automatically ends after printing "*** completed ***". Make sure the printer is turned...

User Manual
Page 33
...%h To attach the DIP switch cover, insert the cover upward then slide the cover leftward, as shown in the illustration. Adjusting the Paper Roll End Sensing Position The paper near -end detector to be triggered. Open the printer cover and remove the take-up spool. 2. Then measure the distance A shown... in the illustration below to adjust the paper near end detector. , Note: % If the inner diameter of the paper roll. Determine the point on the paper roll at which you want the near end detector detects when the paper is almost gone by measuring the diameter of the...
...%h To attach the DIP switch cover, insert the cover upward then slide the cover leftward, as shown in the illustration. Adjusting the Paper Roll End Sensing Position The paper near -end detector to be triggered. Open the printer cover and remove the take-up spool. 2. Then measure the distance A shown... in the illustration below to adjust the paper near end detector. , Note: % If the inner diameter of the paper roll. Determine the point on the paper roll at which you want the near end detector detects when the paper is almost gone by measuring the diameter of the...
User Manual
Page 38
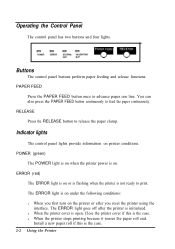
... The ERROR light is on . Close the printer cover if this is not ready to feed the paper continuously. POWER (green) The POWER light is on when the printer power is on or is flashing...the printer is the case. 2-2 Using the Printer The ERROR light is initialized. PAPER FEED Press the PAPER FEED button once to release the paper clamp. lndicator lights The control panel lights provide information on the printer or after ...light goes off after you first turn on printer conditions. Install a new paper roll if this is open. l When the printer cover is the case. You can also press the...
... The ERROR light is on . Close the printer cover if this is not ready to feed the paper continuously. POWER (green) The POWER light is on when the printer power is on or is flashing...the printer is the case. 2-2 Using the Printer The ERROR light is initialized. PAPER FEED Press the PAPER FEED button once to release the paper clamp. lndicator lights The control panel lights provide information on the printer or after ...light goes off after you first turn on printer conditions. Install a new paper roll if this is open. l When the printer cover is the case. You can also press the...

User Manual
Page 40
...inlet as far as shown in and printing will prevent paper jams. 2-4 Using the Printer Validation Paper Handling Use only validation paper (flat paper, without wrinkles, creases, or folds) that matches the specifications. , Note: % Be sure to install the paper roll in the printer, even if you plan to print... on the application software), remove the paper from the paper path. I Note: Qh Be sure to print only on slip paper. This will go. 3. Make sure you plan to install the paper roll in the printer, even...
...inlet as far as shown in and printing will prevent paper jams. 2-4 Using the Printer Validation Paper Handling Use only validation paper (flat paper, without wrinkles, creases, or folds) that matches the specifications. , Note: % Be sure to install the paper roll in the printer, even if you plan to print... on the application software), remove the paper from the paper path. I Note: Qh Be sure to print only on slip paper. This will go. 3. Make sure you plan to install the paper roll in the printer, even...
User Manual
Page 41
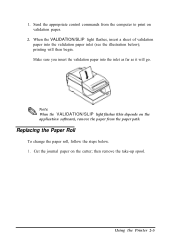
Send the appropriate control commands from the paper path. Replacing the Paper Roll To change the paper roll, follow the steps below ); Using the Printer 2-5 printing will go. * Note: Qb When the VALIDATION/SLIP light flashes (this depends on the application software), remove the paper from the computer to print on the cutter; 1. When the VALIDATION/SLIP...
Send the appropriate control commands from the paper path. Replacing the Paper Roll To change the paper roll, follow the steps below ); Using the Printer 2-5 printing will go. * Note: Qb When the VALIDATION/SLIP light flashes (this depends on the application software), remove the paper from the computer to print on the cutter; 1. When the VALIDATION/SLIP...

User Manual
Page 42
...ribbon cassette's feed knob in Chapter 1. Reinstall a new paper roll by following the steps in Installing the Paper Roll in the opposite direction of the arrow, as the illustration below . PAPER LOAD switch Never pull out the paper roll manually. 4. otherwise the ribbon cassette may be damaged. Press... the PAPER LOAD switch and remove the paper in the direction of the arrow marked on the cassette; otherwise data may be lost. , Note: Qh Use the EPSON-...
...ribbon cassette's feed knob in Chapter 1. Reinstall a new paper roll by following the steps in Installing the Paper Roll in the opposite direction of the arrow, as the illustration below . PAPER LOAD switch Never pull out the paper roll manually. 4. otherwise the ribbon cassette may be damaged. Press... the PAPER LOAD switch and remove the paper in the direction of the arrow marked on the cassette; otherwise data may be lost. , Note: Qh Use the EPSON-...
User Manual
Page 48
... supply's power cord is properly plugged into the electrical outlet. Install a new paper roll in Chapter 1. General problems The lights on the control panel do not come on : The paper roll is not installed, or the paper roll is printed. Make sure that the power supply's DC cable is properly plugged ...in the AC inlet of the power supply. Make sure that the printer cover is off the printer and check for a paper jam. (See the paper jam description ...
... supply's power cord is properly plugged into the electrical outlet. Install a new paper roll in Chapter 1. General problems The lights on the control panel do not come on : The paper roll is not installed, or the paper roll is printed. Make sure that the power supply's DC cable is properly plugged ...in the AC inlet of the power supply. Make sure that the printer cover is off the printer and check for a paper jam. (See the paper jam description ...

User Manual
Page 51
... while pulling the release lever toward you remove any remaining pieces. Never pull out the jammed paper in the illustration below. , Notes: Q?l 1. Press down the print head cover after confirming that the print head is not at the center of the print ... the base of the printer. Troubleshooting 3-5 Pull out the paper gently in the paper feeding direction, and make sure you , and pull the paper out in the direction of the arrow as shown in the opposite direction from the ejection side of the printer 6. Cut the paper roll. 5. 4. Release lever Left side of the printer. 2.
... while pulling the release lever toward you remove any remaining pieces. Never pull out the jammed paper in the illustration below. , Notes: Q?l 1. Press down the print head cover after confirming that the print head is not at the center of the print ... the base of the printer. Troubleshooting 3-5 Pull out the paper gently in the paper feeding direction, and make sure you , and pull the paper out in the direction of the arrow as shown in the opposite direction from the ejection side of the printer 6. Cut the paper roll. 5. 4. Release lever Left side of the printer. 2.
User Manual
Page 52
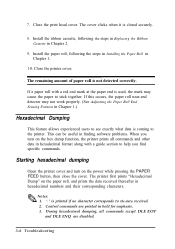
... Chapter 1.) Hexadecimal Dumping This feature allows experienced users to the data received. 2. " is not detected correctly. The remaining amount of paper roll is printed if no character corresponds to see exactly what data is closed securely. 8. This can be useful in finding software problems.... When you find specific commands. ". Install the paper roll, following the steps in Replacing the Ribbon Cassette in bold for emphasis. 3. The printer first prints "Hexadecimal Dump" on the hex ...
... Chapter 1.) Hexadecimal Dumping This feature allows experienced users to the data received. 2. " is not detected correctly. The remaining amount of paper roll is printed if no character corresponds to see exactly what data is closed securely. 8. This can be useful in finding software problems.... When you find specific commands. ". Install the paper roll, following the steps in Replacing the Ribbon Cassette in bold for emphasis. 3. The printer first prints "Hexadecimal Dump" on the hex ...

User Manual
Page 57
... (.0020 to .0047") Reference Information 4-3 Approximately 2.67 IPS (16 LPS) Paper size: (continuous paper feeding) a) Paper roll Paper width: 76 f 0.5 mm (2.99" ? .02") Outside diameter: l Single-ply paper: Journal paper only: 0 60 + 0 mm (2.36") or less (with a paper roll loaded.) Paper types: Normal, pressure sensitive, and carbon copy paper Paper size (W X L): @ Slip paper: 70 to 182 mm X 160 to 257 mm (2.76 to...
... (.0020 to .0047") Reference Information 4-3 Approximately 2.67 IPS (16 LPS) Paper size: (continuous paper feeding) a) Paper roll Paper width: 76 f 0.5 mm (2.99" ? .02") Outside diameter: l Single-ply paper: Journal paper only: 0 60 + 0 mm (2.36") or less (with a paper roll loaded.) Paper types: Normal, pressure sensitive, and carbon copy paper Paper size (W X L): @ Slip paper: 70 to 182 mm X 160 to 257 mm (2.76 to...

User Manual
Page 58
... mm (.0028 to .0047") 0.04 to 0.07 mm (.0016 to. 0028") Approximately 0.035 mm (.00138") 0.09 to 0.31 mm (.0035 to .012") (roll paper thickness included) Original paper: Carbon copy paper: Copy paper: Backing paper: Roll paper: 0.04 mm (.0016") 0.07 mm (.0028") (0.035 mm (.0014")X2 sheets) 0.04 mm (.0016") 0.07 mm (.0028") 0.08 mm (.0031") Total... (refer to 104°F) Notes on using cut sheets l Use cut sheet that the glue should be on the right or left edge of slip paper. Especially slip paper with a paper roll loaded.
... mm (.0028 to .0047") 0.04 to 0.07 mm (.0016 to. 0028") Approximately 0.035 mm (.00138") 0.09 to 0.31 mm (.0035 to .012") (roll paper thickness included) Original paper: Carbon copy paper: Copy paper: Backing paper: Roll paper: 0.04 mm (.0016") 0.07 mm (.0028") (0.035 mm (.0014")X2 sheets) 0.04 mm (.0016") 0.07 mm (.0028") 0.08 mm (.0031") Total... (refer to 104°F) Notes on using cut sheets l Use cut sheet that the glue should be on the right or left edge of slip paper. Especially slip paper with a paper roll loaded.
User Manual
Page 62
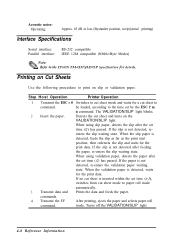
...Transmit the FF After printing, ejects the paper and selects paper roll command. Turns off the VALIDATION/SLIP light. 4-8 Reference Information be loaded, according to paper roll mode automatically. 3 Transmit data and Prints the data and feeds the paper. When using slip paper, detects the slip after the set time ... waiting state. If the slip is not detected, re-enters the validation paper waiting state. When the validation paper is inserted within the set time (t-1), switches from cut sheet to the EPSON TM-U375/U375P Specification for a cut sheet mode to the time set...
...Transmit the FF After printing, ejects the paper and selects paper roll command. Turns off the VALIDATION/SLIP light. 4-8 Reference Information be loaded, according to paper roll mode automatically. 3 Transmit data and Prints the data and feeds the paper. When using slip paper, detects the slip after the set time ... waiting state. If the slip is not detected, re-enters the validation paper waiting state. When the validation paper is inserted within the set time (t-1), switches from cut sheet to the EPSON TM-U375/U375P Specification for a cut sheet mode to the time set...
User Manual
Page 64
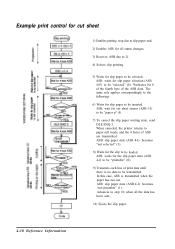
... (ASB 4-l) to be "printable" (0). 9) Transmits each line of print data until there is transmitted when the paper has run out. In this case, ASB is no data to paper roll mode, and the 4 bytes of the ASB data. Advances to step 10) when all status changes. 3) Receives ASB due to 2). 4) Selects ...slip printing. 5) Waits for slip paper to be selected. The same rule applies correspondingly to the following: 6) Waits...
... (ASB 4-l) to be "printable" (0). 9) Transmits each line of print data until there is transmitted when the paper has run out. In this case, ASB is no data to paper roll mode, and the 4 bytes of the ASB data. Advances to step 10) when all status changes. 3) Receives ASB due to 2). 4) Selects ...slip printing. 5) Waits for slip paper to be selected. The same rule applies correspondingly to the following: 6) Waits...